 Office Solutions Pro
Process marked SharePoint items from one Power Apps button on a page
Add a Power Apps button to a SharePoint page that runs a Power Automate flow for every list item people have marked, so that one click can generate many documents.
The For a selected item trigger works on one list item at a time, so it does not help when someone needs to process a dozen rows. A practical workaround is to mark rows in a Batch column, then run a flow that handles every marked row.
This walkthrough adds the last piece: a small Power App with one button, placed on a SharePoint page beside the list. Users mark their rows in grid view, select Process marked rows, and the documents appear in a library.
Before you begin
You need:
- A SharePoint list with a Yes/No column that marks rows for processing. The example column is Batch.
- A working flow that finds the marked rows and processes them. The flow in this example gets the marked items, stops if more than 50 are marked, loops through them, generates a document for each, and clears the Batch value. Batch generate Word and PDF documents from a SharePoint list walks through that flow.
- Permission to create a canvas app, and to edit pages on the site.
- Premium licensing. The flow uses Word Online (Business), a premium connector. A canvas app that runs a premium flow can need premium use rights even when the app itself uses only standard connectors, such as SharePoint. Microsoft says the users of an app connected to a flow with a premium connector need premium use rights, and that the app’s license designation may not show it. In the example, the app’s designation showed Premium once the flow was added, so treat the designation as a guide, not the final answer. Each person who uses the button needs rights for both the app and the flow. If the flow runs in the context of the app, each of them needs a Power Apps Premium or Dynamics 365 license. A Process license on the flow covers its premium use, but not the app. A Microsoft 365 license on its own doesn’t cover this example. What each person needs depends on the licenses they already have and how the flow runs, so check Licensing and Microsoft’s licensing FAQ against your setup.
As written, the batch flow supports one run at a time, counting runs of both the original flow and the copy you make here, up to 50 marked rows, and a list of up to 5,000 items. On a larger list, index Batch and turn on Pagination, as the batch tutorial describes, and try the flow and the page on a full-size copy of your list before you rely on them.
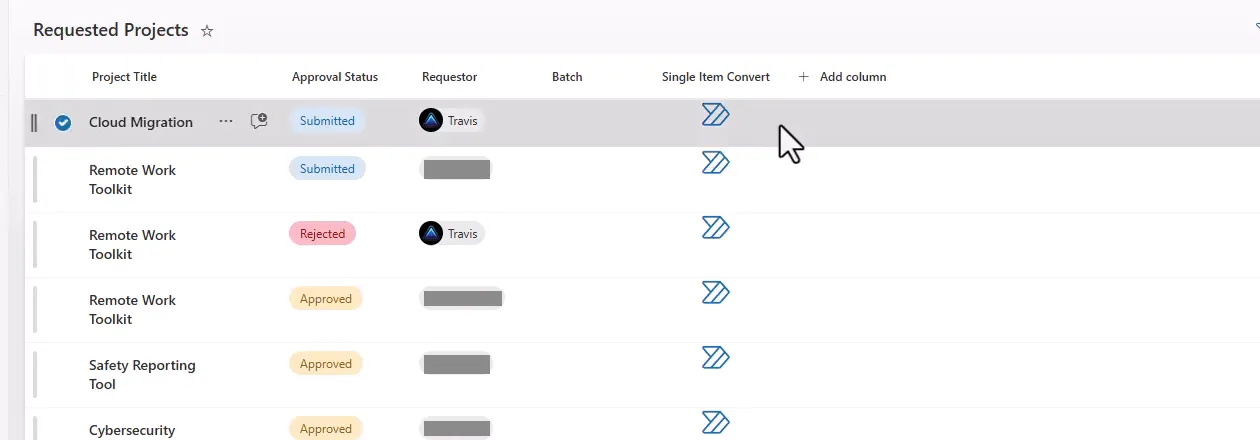
1. Copy the flow and change its trigger
Copying the flow lets you keep the original.
-
In Power Automate, open My flows, select the flow’s menu, and select Save as.
-
Give the copy a clear name, for example
SharePoint Multi-Select to Document PowerApp, then select Save.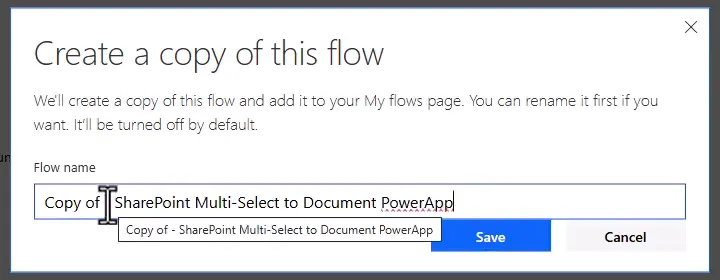
-
Turn the copy on, because copies are off by default.
-
Select Edit.
-
Delete the trigger, then add the Power Apps trigger When Power Apps calls a flow (V2).
-
Select Save.
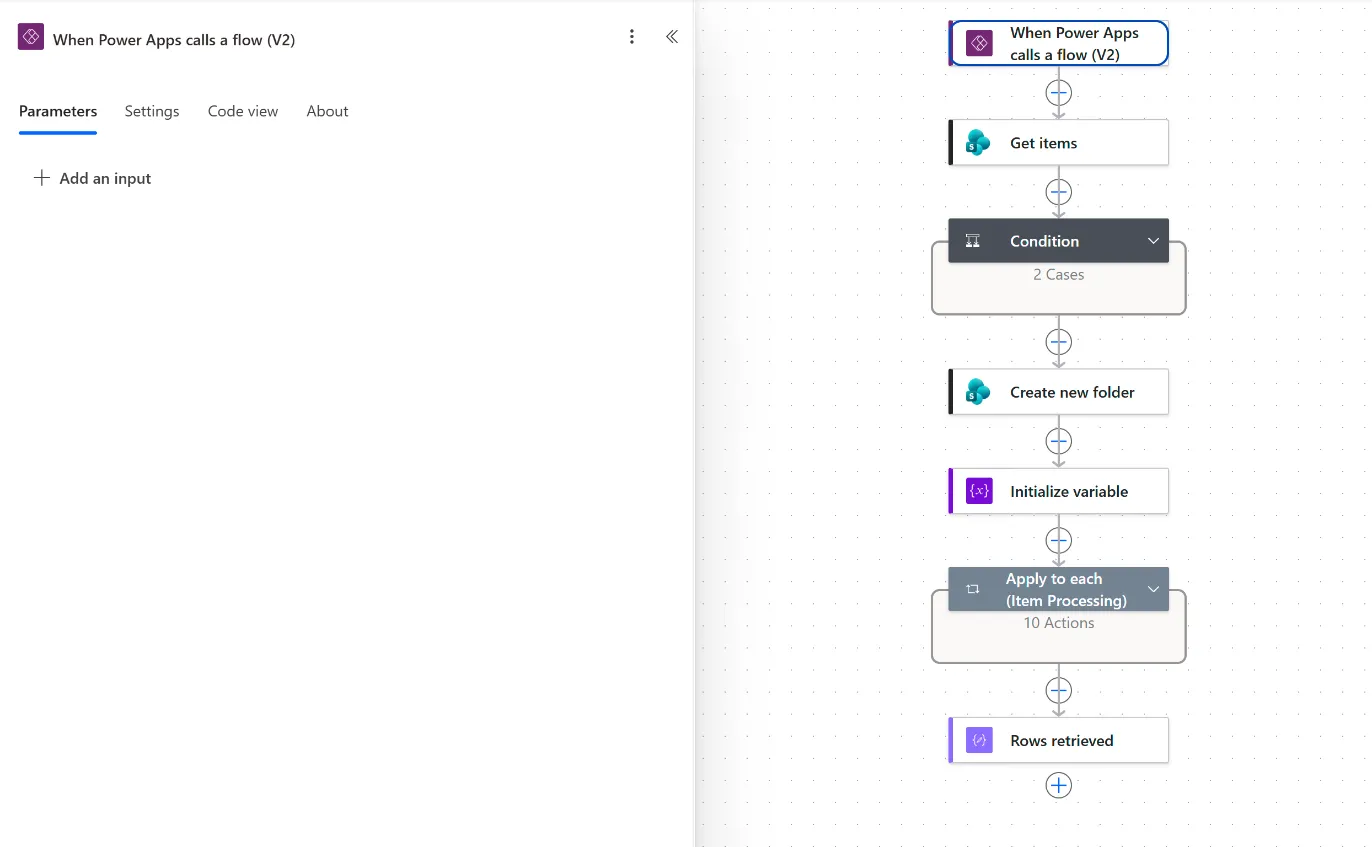
You only need to change the trigger if nothing later in the flow uses values from the old one. In this flow, the first action gets its own items, so nothing else changes. If your flow uses values from the old trigger, the save shows an error. Replace those values before continuing.
The trigger needs no inputs here. The flow decides what to process by reading the Batch column. Keep the Condition that stops the run when more than 50 rows come back, before anything is made.
That check proves only that no more than 50 rows came back. It doesn’t prove that every marked row came back, because on a large list Get items can miss rows, as the batch tutorial explains.
Update item keeps its default run-after setting, so it clears a row’s mark only after that row’s documents are made. A row whose actions fail keeps its mark. If Update item maps other fields, as the batch tutorial’s step 12 does, it writes back the values Get items returned when the run started, so don’t edit marked rows until the run finishes. A cleared mark means a run processed that row. A row still marked after a run wasn’t processed by that run. Its actions failed, or the run stopped before reaching it. It may have been marked after the run started, in which case it waits for the next run. Or Get items didn’t return it, as the batch tutorial’s large-list note describes.
An empty view filtered to Batch = Yes shows only that no marked row is waiting. It doesn’t show that every row someone meant to include was marked, or that a row someone unmarked by hand was processed. If a run retrieves no rows while that view still shows marked rows, Get items didn’t return them. That can happen on a list with more than 5,000 items, as Microsoft describes.
2. Create the button app
- In Power Apps, create a blank canvas app. A responsive layout works, although this example has only one button.
- Delete any controls you do not need.
- In Settings > Updates, turn on modern controls and themes.
- Add a Button, center it, and set its text to
Process marked rows. The screenshot in step 3 shows the label Generate Selected. Process marked rows says what the button does: it processes every marked row, not rows selected by one person. - Set a small screen height, for example
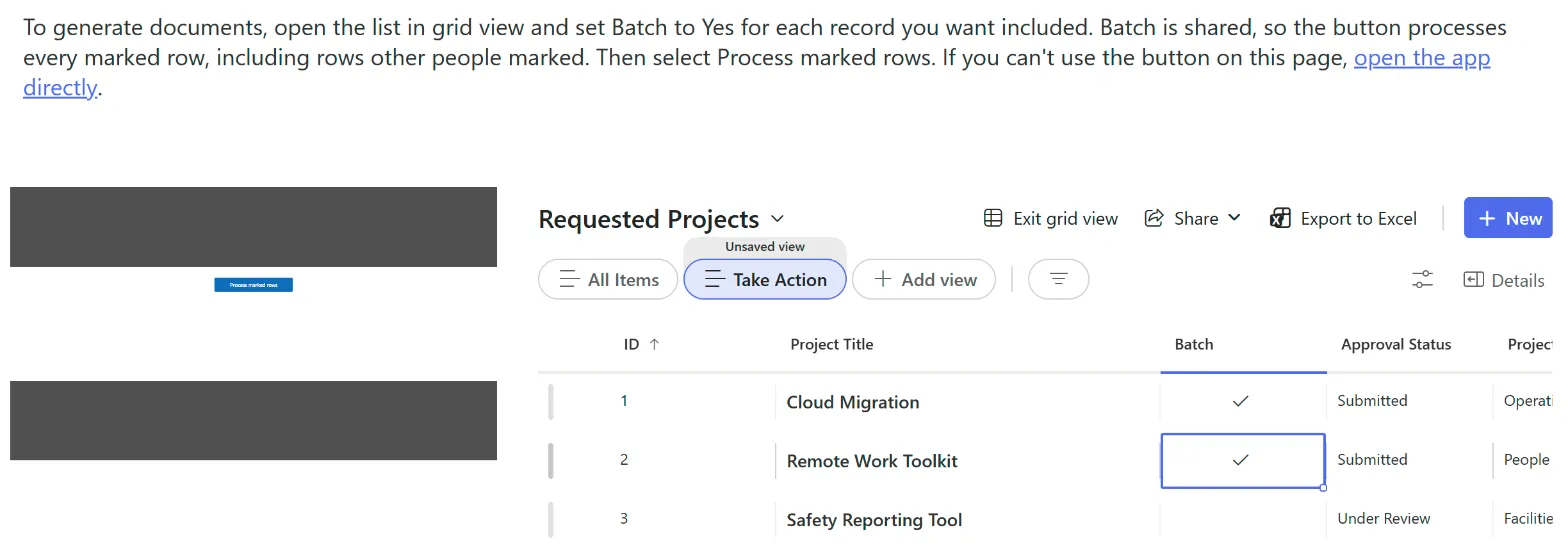
100, so that the app takes little room on the page. With a fixed layout, Power Apps zooms the app to fit the web part, so in a narrow column a wide app shows small, with bars above and below, as in the screenshot in step 5. - To match your site’s buttons, add a theme under Themes using the same color as your site.
- Name the app, for example
SharePoint List Buttons.
3. Connect the flow to the button
- Open the Power Automate pane in the app, select Add flow, and choose your copied flow.
- Set the button’s OnSelect to run it. Use your own flow’s name in place of
YourFlowName:
YourFlowName.Run()No parameters are needed, because the trigger has no inputs.
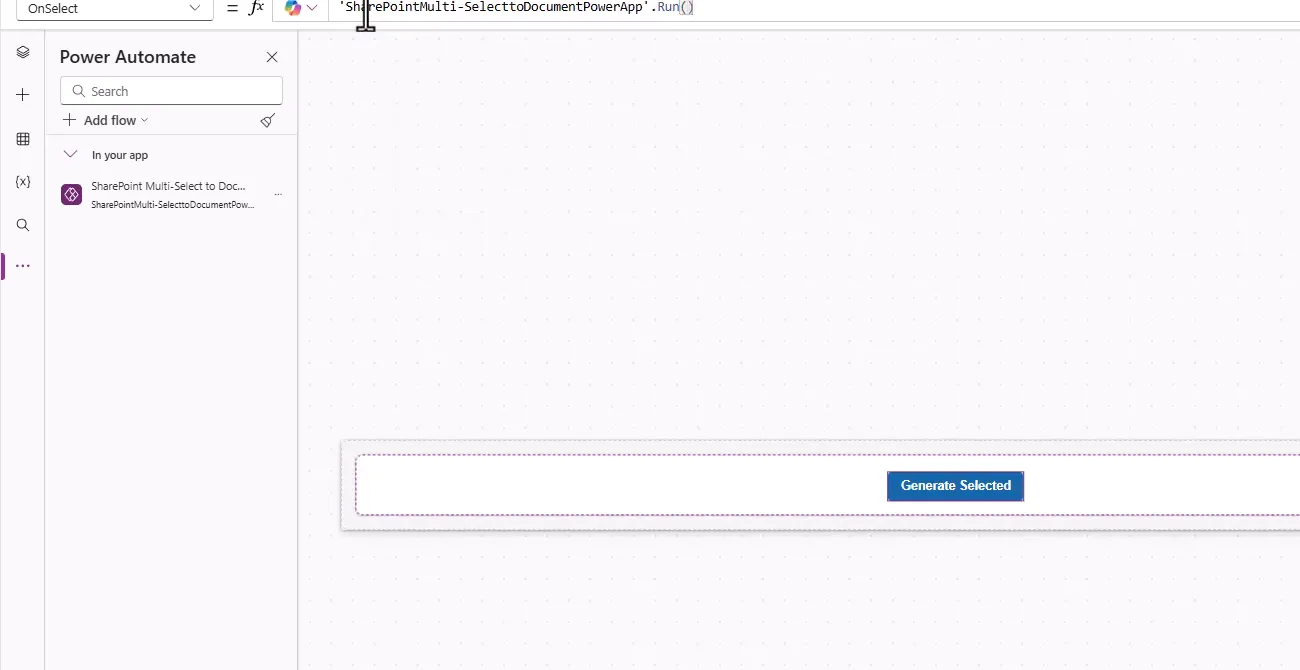
-
Save and publish the app.
-
Select Share, then Copy link. If other people will use the page, add them here too.
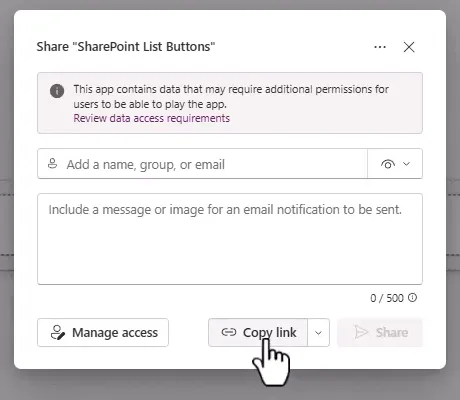
The dialog’s note is a useful reminder. People need access to the app’s data as well as to the app.
4. Build the SharePoint page
The Power Apps web part doesn’t yet support screen readers or keyboard navigation, so some people can’t use a button inside it. Sub-step 7 gives them another route.
-
In Site contents, select New > Page, then Create blank.
-
Add a one-column section at the top, and a section with a one-third left layout below it.
-
In the left column, add the Power Apps web part. It’s listed as Microsoft PowerApps (Preview), and searching for
PowerAppsfinds it. Paste the link into App web link or ID.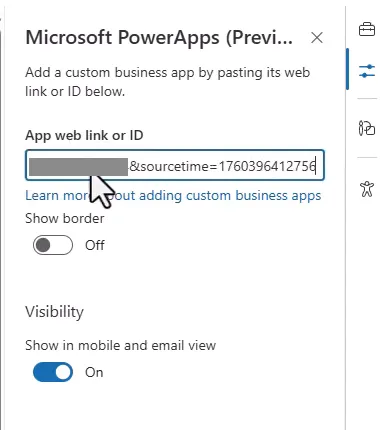
-
In the right column, add the List web part and select your list.
-
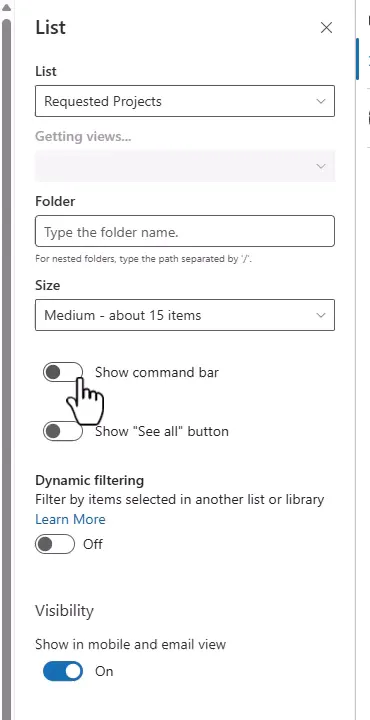
In the web part settings, leave Hide list controls off, since users need the command bar for Edit in grid view. Some versions of the pane show Show command bar instead, as in the screenshot. Make sure it’s on.
-
Select a view that shows the Batch column. The example uses a view named Take Action.
-
In the top section, add text that explains how to use the page. Include a link to the app itself, using the link you copied, for people who can’t use the web part. For example:
To generate documents, open the list in grid view and set Batch to Yes for each record you want included. Batch is shared, so the button processes every marked row, including rows other people marked. Then select Process marked rows. If you can’t use the button on this page, open the app directly.
Make “open the app directly” the link to the app. Opening the app from its link avoids the web part, but check the app with a keyboard and a screen reader before you rely on it. People can also run the original flow from the list’s Integrate > Flows menu, as described in the batch tutorial.
-
Name and publish the page. Each user may see a prompt the first time, asking for the app’s permission to access their data. Select Allow.
5. Generate documents
Before you mark rows, remember that Batch is shared. The button processes every marked row, whoever marked it, so check the column for marks you didn’t make.
- On the page, select Edit in grid view in the list.
- Set Batch to Yes on each row you want, up to 50. Exit grid view when you finish.
- Select Process marked rows.
- Open your document library and refresh. Documents appear as the flow works through the rows, so give it time.
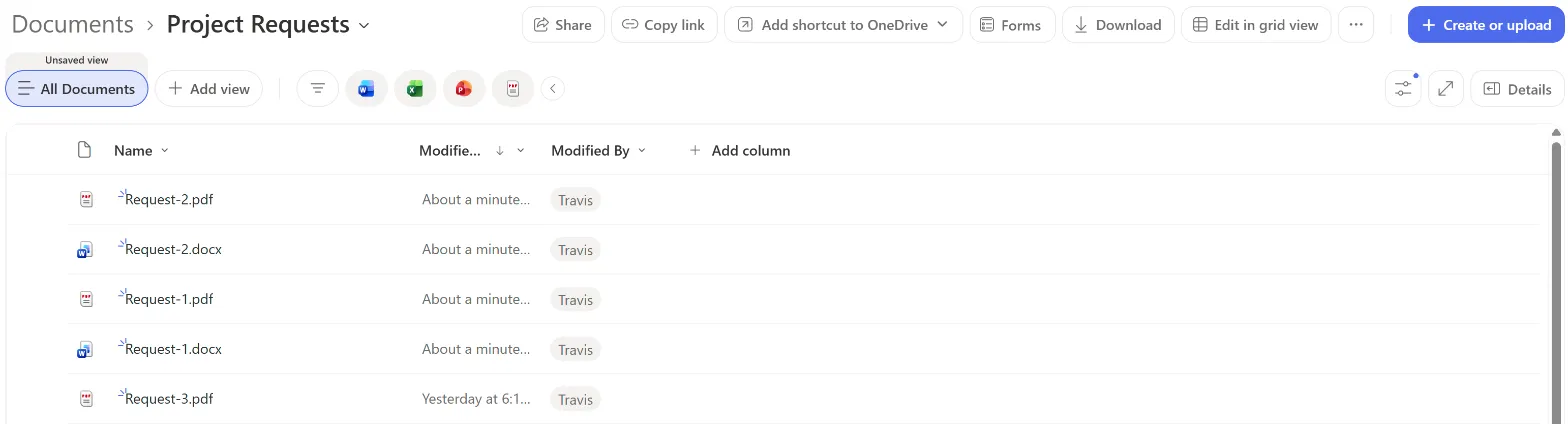
- Return to the list. A row whose mark was cleared was processed. A row still marked after a successful run wasn’t, so select the button again.
The button doesn’t show the flow’s progress. A Notify call after Run() in OnSelect can tell people that their click registered, but not that documents were made. The list is the record of what happened. If more than 50 rows were marked, the run stops before making anything, every mark stays, and the flow’s run history shows your message.
Plan for shared use
The Batch column is shared by everyone. If two people mark rows at around the same time, selecting the button processes all of them. For a small team this is rarely a concern, but agree on how the page will be used, or limit it to the people who process documents. Separate batches for each person need a different design.
One run at a time. The flow is meant for one run at a time, whoever starts it and however. That includes the original flow in the list’s Integrate > Flows menu, which processes the same marked rows as the button’s copy. Nothing in either flow, the app or the page enforces it. Each row’s mark is cleared only after its documents are made, so a second run started before the first one finishes can pick up the same rows. Both runs then replace the same final files, and each Move file replaces its file on its own:
- Both runs can succeed without an error. Each final file shows the run that last replaced it. When two runs process the same row, its Word file can come from one run and its PDF from the other, and the row may have changed in between.
- If a row’s actions fail after its Word file is moved and before its PDF is, that row’s Word file is new and its PDF is from an earlier run, or missing if there was none. The row keeps its mark.
So let one run finish before anyone selects the button again or runs the flow from the list. Don’t edit marked rows while a run is in progress either, because Update item can overwrite the edit with the values Get items returned when the run started. After a run that failed or overlapped another, open both final files for each affected row and check that they match the row and each other. To repair them, wait until no run is in progress, mark those rows, and select the button once more. If that run succeeds, both files for each row come from it.
Before rolling out, test with a second account to confirm they can open the page, see the app, and run the flow.
Troubleshooting
| Symptom | Likely cause | What to do |
|---|---|---|
| The flow reports an error after you swap the trigger | Later actions use values from the old trigger | Replace those values with the flow’s own data |
| The flow is not listed in the app | It uses a different trigger, or it is off | Use When Power Apps calls a flow (V2) and turn on the flow |
| The web part shows a prompt to allow access | The app needs permission to reach its data | Select Allow |
| The app does not appear in the web part | Link not pasted, or the app is unpublished or not shared | Publish the app, share it, and paste the link again |
| The list web part has no Edit in grid view | Hide list controls is on, or Show command bar is off | Turn Hide list controls off, or Show command bar on |
| The button works but nothing is generated | No rows have Batch set to Yes, grid view changes were not saved, or more than 50 rows are marked | Check the values and the flow’s run history, then select the button again |
| Someone can’t reach the button with a keyboard or screen reader | The Power Apps web part doesn’t support them yet | Use the direct link to the app, or the list’s Integrate > Flows menu |
| Only some documents appear | The flow is still running | Refresh after a short wait, then check the flow’s run history |
| A row’s Word file and PDF show different values | Two runs processed the row, or its actions failed between the two Move file actions | Wait until no run is in progress, mark the row, select the button once more, and check both files |
Companion video
Video: Trigger Power Automate Actions from a Power App Button in SharePoint! FOR MULTIPLE SELECTED ITEMS!!
If the player is blocked on your network, open the video on YouTube.
Need help applying this to your own setup? Read about consulting.