 Office Solutions Pro
Export a Power Apps form to Word or PDF and email it
Choose between the Power Apps PDF function for single-page output and a Power Automate flow for multi-page Word and PDF files, then email the result to the user.
There are two ways to turn a record in a canvas app into a document. The first question to ask is whether the content fits on one page.
| Does the content fit on one page? | Approach |
|---|---|
| Yes | Use the Power Fx PDF function, in the app |
| No, or the length varies | Use Power Automate with a Word template |
Before you begin
You need a canvas app that shows records from a SharePoint list, and a variable that holds the selected record. The example uses gblSelectedRequest. Option 1 needs only the app. Option 2 also needs permission to create flows, a document library for templates and working files, Microsoft Word desktop on Windows, and the licensing described under Check these first. It builds the Word template as in Create Word and PDF documents from a SharePoint list item.
The site, list, library and flow names in the screenshots are examples. Use your own.
Option 1: Use the PDF function
This works without a flow, but the PDF function is an experimental feature. Its behavior can change, and Microsoft says experimental features aren’t meant for production use.
1. Turn on the PDF function
In the app, turn on the PDF function under Settings > Upcoming features > Experimental. It is off by default.
2. Build the export screen
- Create a screen for the export, with a form inside a container. Point the function at the container, not the form. Supported targets are vertical galleries, layout containers, containers, and screens.
- If you use a modern form, replace long text controls with classic controls and turn on Auto height, so that long answers are shown in full.
3. Create the PDF
Add a button, and set its OnSelect. Use your own container name:
Set(gblPDFExport, PDF('Project Request Container Export Screen', {ExpandContainers: true, Orientation: PaperOrientation.Landscape, Size: PaperSize.Letter, Margin: "25pt 25pt 25pt 25pt"}))
4. Preview and check the PDF
To preview it, add a PDF viewer control, and set its Document to gblPDFExport. This control is also experimental.
ExpandContainers lets a scrolling container expand to show all its content. PDF can only use content on the screen where you call it, and generation runs on the user’s device.
The limit is page breaks. When content runs past one page, the text can be cut across the break.

If that happens, use Option 2.
Option 2: Use Power Automate and a Word template
Here the app sends the record’s ID to a flow, and the flow fills a Word template.
Check these first
- Premium licensing. The flow uses Word Online (Business), a premium connector. A canvas app that runs a premium flow can need premium use rights even when the app itself uses only standard connectors, such as SharePoint. Microsoft says the users of an app connected to a flow with a premium connector need premium use rights, and that the app’s license designation may not show it. In the example, the app’s designation showed Premium once the flow was added, so treat the designation as a guide, not the final answer. Each person who uses the button needs rights for both the app and the flow. If the flow runs in the context of the app, each of them needs a Power Apps Premium or Dynamics 365 license. A Process license on the flow covers its premium use, but not the app. A Microsoft 365 license on its own doesn’t cover this example. What each person needs depends on the licenses they already have and how the flow runs, so check Licensing and Microsoft’s licensing FAQ against your setup.
- No MFA conditional access policy on the Populate action. The Populate action can’t be used if an MFA conditional access policy is enabled.
1. Create a template library
- In the SharePoint site, create a document library, such as
Template Processing. - Add a folder, such as
Request Intake Template.
2. Build the Word template
The template is built the same way as for a SharePoint list item. See Build the Word template for the full steps. In short:
- In Word desktop on Windows, type your labels and lay out the document.
- On the Developer tab, add a Plain Text Content Control wherever a value goes.
- In each control’s Properties, enter a Title and, optionally, a Tag. The Title is the name you will see in the flow. Every control needs a different Title. For a value that can run to several paragraphs, also select Allow carriage returns (multiple paragraphs).
- Save the
.docxand upload it to the folder.
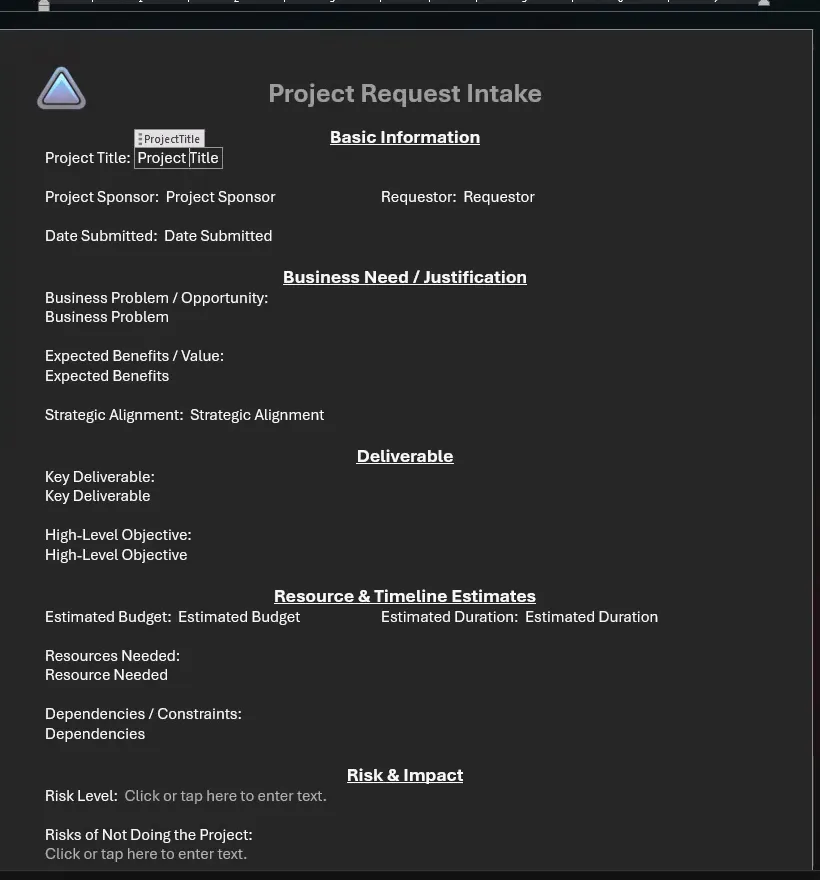
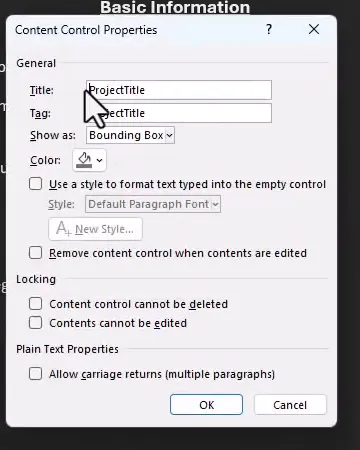
Use plain text controls, because the connector doesn’t support rich text, building block gallery, date picker, or check box content controls, or legacy form controls.
3. Start the flow
- In your solution, or in Power Automate, create a cloud flow, and add the When Power Apps calls a flow (V2) trigger.
- Add two text inputs named
IDandImpactAreas.
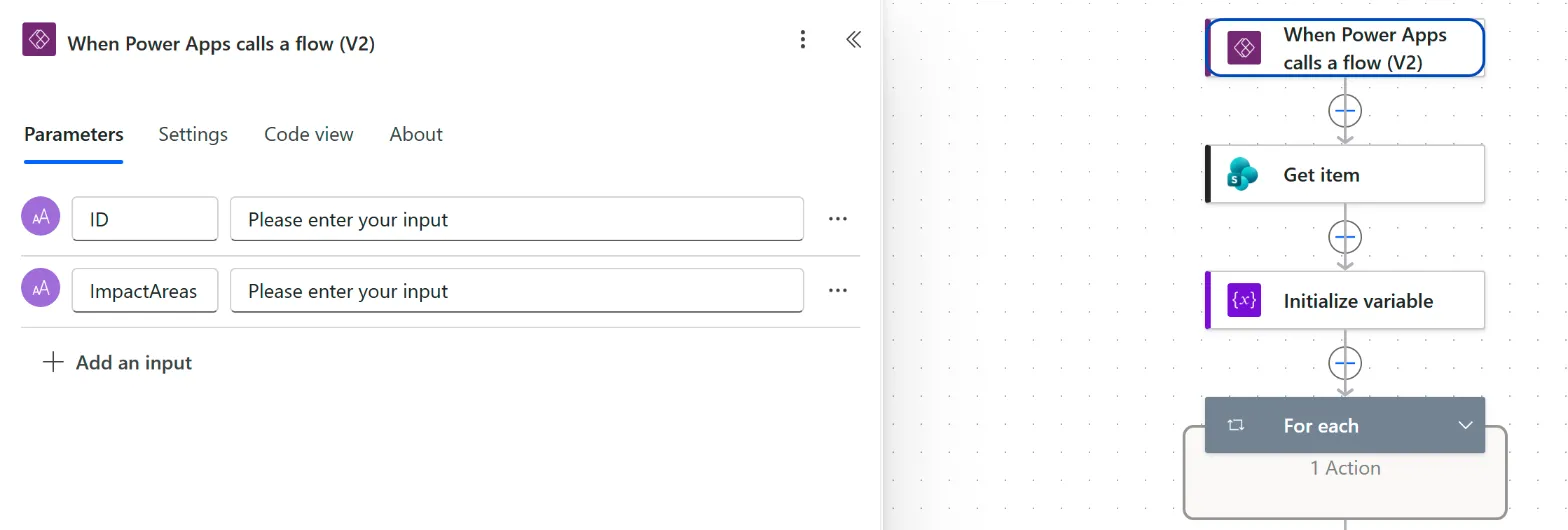
- Add the SharePoint action Get item. Select your site and list, and set Id to the
IDinput.
Passing only the ID keeps the app simple, because Get item returns the other columns.
4. Handle multi-select values
A multi-select column has to be turned into text. You can do this in either place, so use the one you find easier.
In the app: pass the joined values through the ImpactAreas input, as shown in step 8. Use that input in the template. This is the simpler way.
In the flow:
- Add Initialize variable, named
varImpactArea, type String. - Add Append to string variable. For Value, select Impact Areas Value and type a comma and a space. The designer wraps it in a loop, shown as For each (Apply to each in the classic designer).
Both methods need the column’s Value, but they give different text. Concat puts its separator only between values. The loop in the flow adds the separator after every value, so it leaves a comma and a space at the end:
| Values selected | Concat in the app | Loop in the flow |
|---|---|---|
| None | Empty text | Empty text |
| One | Operations | Operations, |
| Two | Operations, Financial | Operations, Financial, |
5. Fill in the template
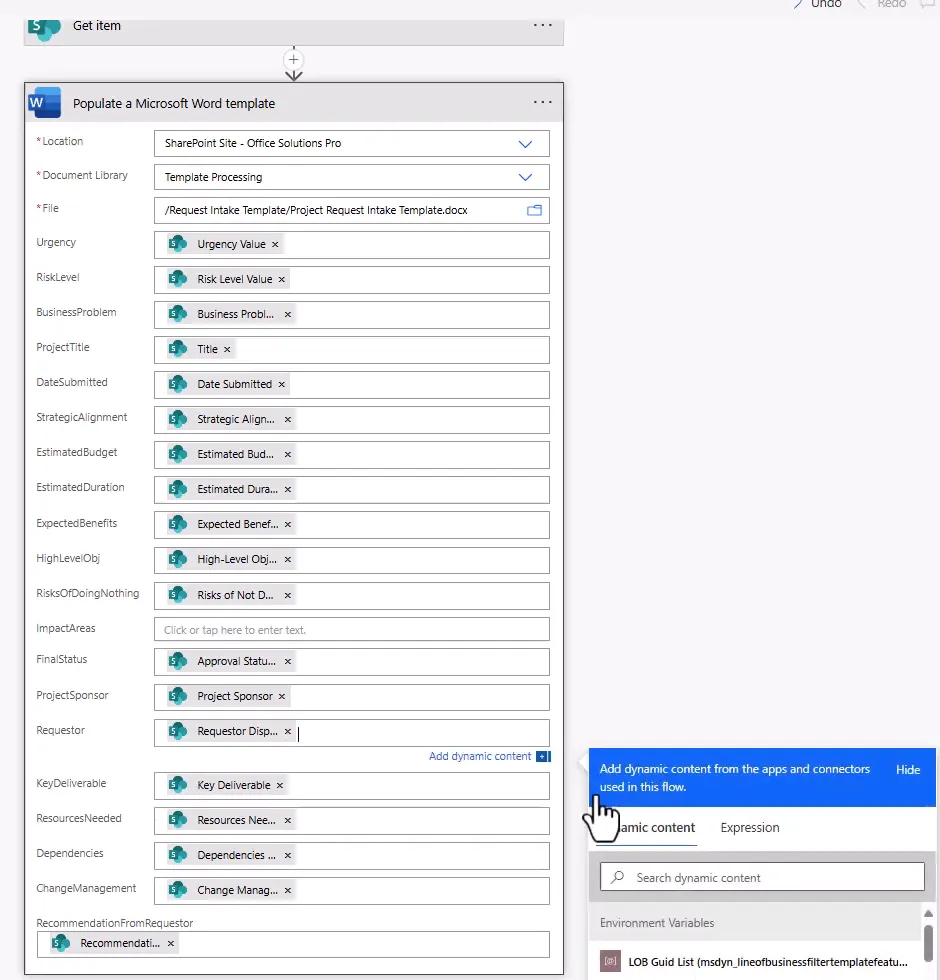
- Add Populate a Microsoft Word template, and select the site, library, and file.
- Map each control to a column from Get item. For Choice columns, use the entry ending in Value.
- Set the impact areas control to your variable or to the
ImpactAreasinput.
6. Save the Word document
Each run saves its files in a folder of its own, so two runs never share a working file.
-
Add the SharePoint action Create new folder. Select your site, set List or Library to your template library, and set Folder Path to
Runs/followed by this expression:workflow()?['run']?['name']workflow()returns details of the current run, including the run’s name, which is different for every run. -
Add the SharePoint action Create file. Set Folder Path to your template library, then
/Runs/, then the same expression. In the example, that is/Template Processing/Runs/followed by the expression. -
Set File Name to
Request-, then ID from Get item, then.docx. Do not leave out the extension. Without it, the file has no type and can’t be opened normally. -
Set File Content to Microsoft Word document from the template action. After you save, the token shows as Body.
-
Name the flow, such as
Generate Project Request PDF, and save it.
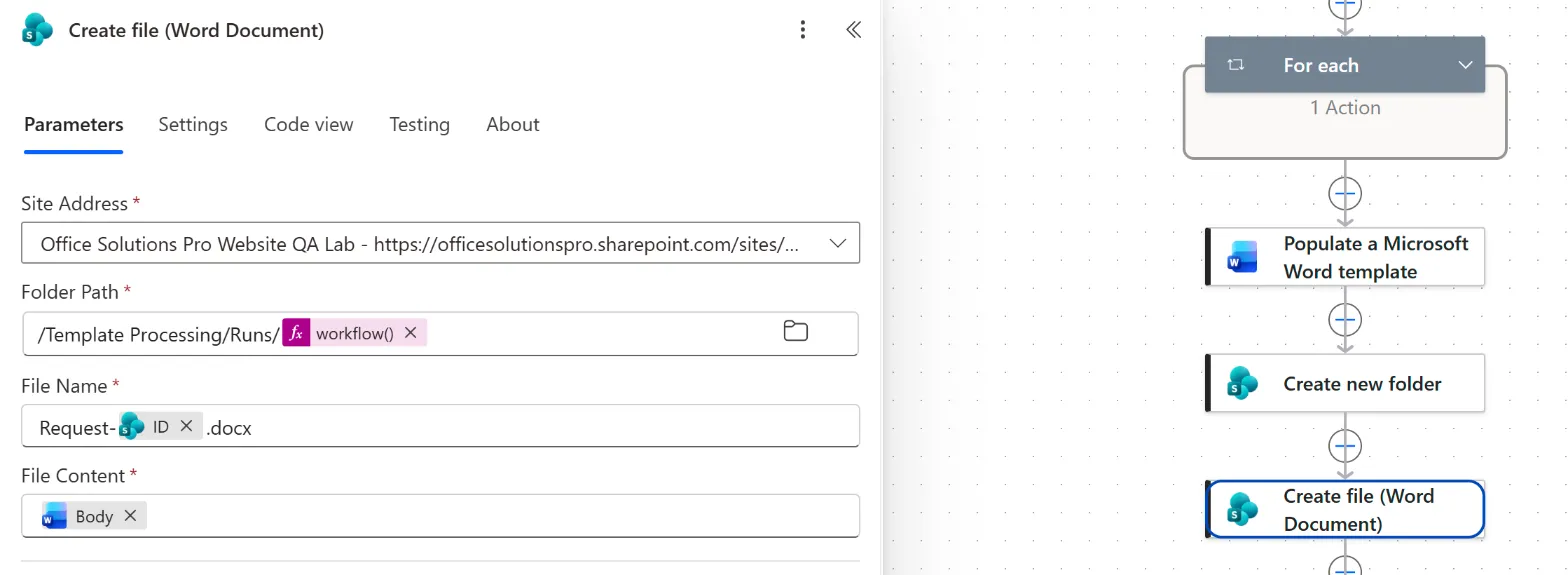
The name uses the ID because it never changes, so the name still fits after someone edits the title, which appears inside the document.
7. Add the flow to the app
- In the app, open the Power Automate pane, select Add flow, and choose your flow.
- Each time you change the flow, refresh it in the app before testing.
8. Call the flow from a button
Set the button’s OnSelect. gblSelectedRequest is the record selected in the example app, so use your own record variable:
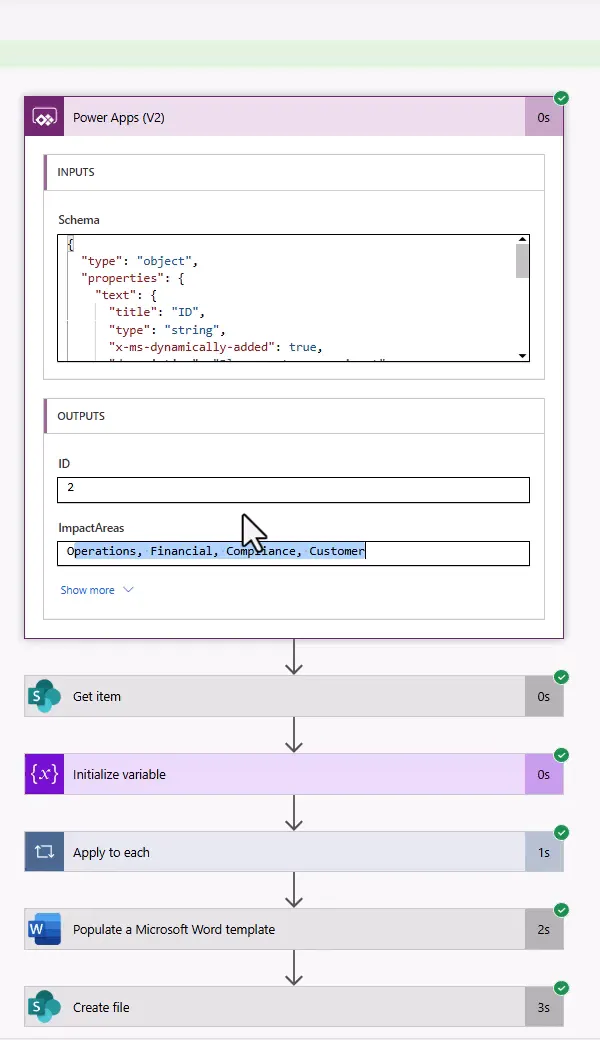
GenerateProjectRequestPDF.Run(gblSelectedRequest.ID, Concat(gblSelectedRequest.'Impact Areas', Value, ", "))
Include Value in Concat. Without it, the input arrives empty or incorrect. To confirm, open the flow’s run and check the inputs.
9. Email the document
- Add Send an email (V2) after Create file, using the Office 365 Outlook connector.
- Set To to the right person. The example uses Created By Email, which shows as Author.Email. If To only offers a people picker, select the gear beside it, then Use dynamic content.
- Set Subject and Body, such as
Project Request Intakewith the title. - Under Advanced parameters, select Show all. Under Attachments, select Add new item.
- Set the attachment’s Name to a name ending in
.docx. The example uses Title- ID#ID.docx. This names only the copy in the email, so the title is fine here. - Set its Content to Microsoft Word document. After you save, the token shows the action’s name, Populate a Microsoft Word template.
If the attachment won’t open, check that its name has an extension.
10. Create and email a PDF
Convert Word Document to PDF doesn’t support files labeled Confidential or Highly Confidential. Handle those files outside this flow.
-
After the first Create file, add Get file properties, selecting your site and library, and using ItemId from Create file.
-
Add Convert Word Document to PDF, and select the same site and library.
-
In File, include the folders in the path: type
/Runs/, add the run-name expression, type/, then select File name with extension. The path starts inside the library, so leave out the library’s name. The screenshot shows the same pattern with the example’s earlier folder,/Request Intake Template/.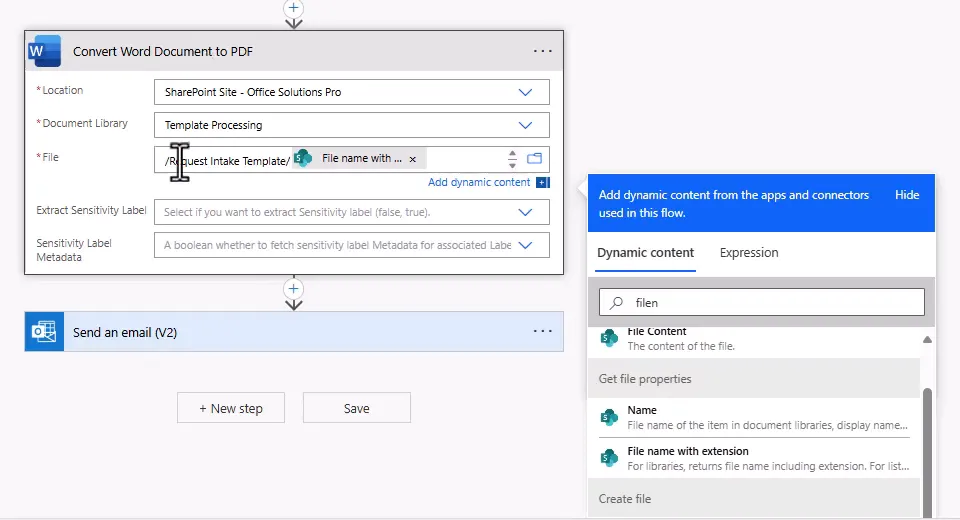
-
Add Create file for the PDF. Use the same run folder and name, ending in
.pdf, and set File Content to the converted output. -
To email the PDF instead, the email has to come after the PDF is made. Move Send an email (V2) below the PDF’s Create file, or delete it and add it again there, with To, Subject and Body set as in step 9. Then set the attachment’s Name to end in
.pdf, and its Content to PDF document from the convert action. After you save, that token shows the action’s name.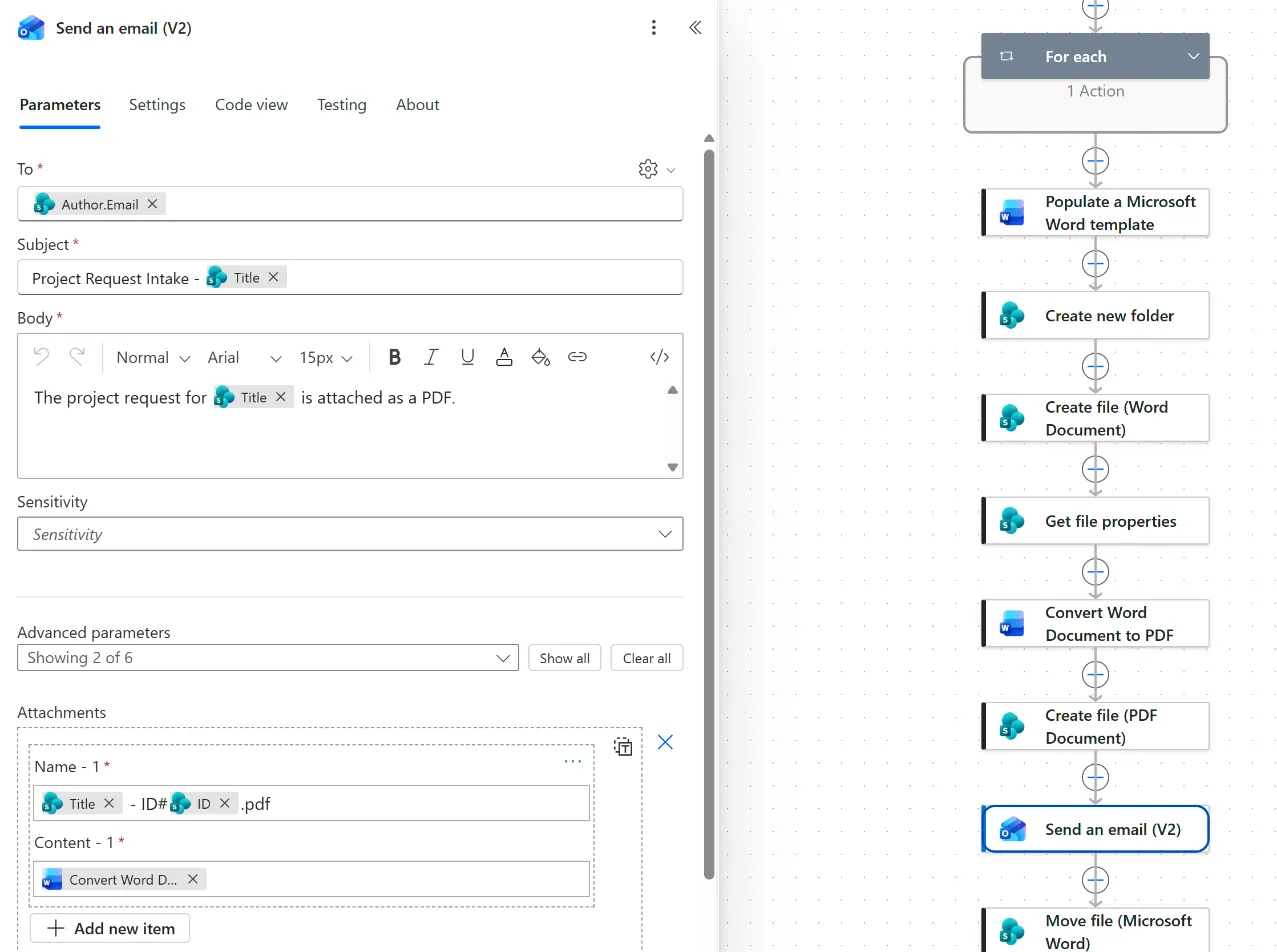
11. Test and manage repeat runs
- Refresh the flow in the app, then run the button.
- Open the files in the run’s folder in
Runs. - Confirm the email arrives and its attachment opens.
- Select the button a second time.
Each run saves its files in its own folder, so a repeat run doesn’t collide with an earlier one. Decide what to keep:
-
Email only. At the end of the flow, add the SharePoint action Delete file for the Word file and for the PDF, using the Id from each Create file. The empty run folder stays, as described under Run folders below.
-
One current copy per record. Add Move file for each file, the Word file first, with If another file is already there set to Replace, as in Move the files and replace older copies. The final files are
Request-<ID>.docxandRequest-<ID>.pdf. The empty run folder stays, as described under Run folders below. Generate one record’s documents with one run at a time, as described under One run per record at a time below.
-
Every copy. Leave the files where they are. Each run adds a folder with its own copy, and they stay until someone deletes them, so plan how long to keep them. Deleting a run folder deletes that run’s copies.
-
Limit when the button appears. It reduces repeat runs, but does not prevent them. For example, set the button’s Visible so that it only shows in one status:
If(ThisItem.'Approval Status'.Value = "Under Review", true, false)Use the end status that fits your process. ThisItem works only inside a gallery or form. For a button outside one, use your record variable instead, such as gblSelectedRequest.
Run folders. With email only or one current copy, each run’s empty folder stays in Runs. If a run fails, its folder keeps the working files, so you can see how far it got. The folder is named with the run’s name, which workflow() returns, so you can match it to the run in the run history.
From time to time, open Runs in your template library and delete old folders by hand. Before you delete one, make sure no run is in progress, that the email arrived, and, with one current copy, that the final documents for that record are in the destination folder and open correctly. Keep a failed run’s folder until you’ve found out why it failed. Delete only folders inside Runs, never Runs itself, the template folder or the destination folder. With every copy, the folders are the copies, so delete them only when you no longer need them.
One run per record at a time. With one current copy, the flow is meant for one generation of a record’s documents at a time, whoever selects the button. Nothing in the flow or the app enforces that. Hiding the button by status, as above, doesn’t stop two people from selecting it at once. Separate run folders keep two runs from sharing a working file, but both replace the same final files, and each Move file replaces its file on its own:
- Both runs can succeed without an error. Each final file shows the run that last replaced it. If two runs for the same record overlap, the Word file can come from one run and the PDF from the other, and the record may have changed in between.
- If a run fails after the first Move file succeeds and before the second one does, the Word file is new and the PDF is from an earlier run, or missing if there was none.
So agree with everyone who uses the app not to generate a record’s documents while a run for it is in progress. After a run that failed or overlapped another, open both final files and check that they match the record and each other. To repair a mismatched pair, wait until no other run for the record is in progress, then select the button once more. If that run succeeds, both files come from it.
To test your choice, select the button again. After a successful run, the email arrives and, with one current copy, the final documents are in the destination folder. The run’s folder is still in Runs.
Troubleshooting
| Symptom | Likely cause | What to do |
|---|---|---|
PDF is not recognized | The experimental feature is off | Turn it on under Upcoming features |
| PDF text is cut at the page break | The content is longer than a page | Use Option 2 |
| PDF is empty or misses parts | The function targets a form, or ExpandContainers is off | Target a container and set ExpandContainers: true |
| The app crashes when generating a PDF | The output is too large for the device | Reduce images and data |
ImpactAreas is blank | Concat is missing Value | Use the formula in Option 2, step 8 |
| A multi-select shows odd text in the document | The wrong token was used | Use the variable, or the input |
| The convert action can’t find the file | The run folder is missing from File | Add /Runs/, the run-name expression, and / before File name with extension |
| Create file fails | Folder Path doesn’t match the folder that Create new folder made | Use /Runs/ and the same run-name expression in both |
| A step after Create file cannot find the new file, although the path is right | The file is not available yet | Microsoft recommends a short delay, about a minute, before later actions use a file created from the Word connector. Add a Delay before the step that fails |
| The conversion fails for a labeled file | The file has a Confidential or Highly Confidential sensitivity label | Handle these files outside the flow |
| The email attachment doesn’t open | The name has no extension | Add .docx or .pdf |
| A change to the flow has no effect in the app | The app has the old definition | Refresh the flow in the app |
| A repeat run fails at Move file | If another file is already there isn’t set to Replace | Set it to Replace, as in Option 2, step 11 |
Folders build up in Runs | Each run leaves its folder behind | Delete old folders by hand, as described under Run folders in Option 2, step 11 |
| The Word file and the PDF show different values | Two runs for the record overlapped, or a run failed between the two Move file actions | Wait until no run for the record is in progress, select the button once more, and check both files |
Companion video
Video: Convert Power Apps Forms to Word/PDF and Send via Email | PDF Function. The video saves the Word file in a Template folder, named from the title and ID. The steps here use a folder for each run and name the files by ID only.
If the player is blocked on your network, open the video on YouTube.
Need help applying this to your own setup? Read about consulting.