 Office Solutions Pro
Generate a PDF from a SharePoint list item with no premium connectors
Turn a Word template into HTML, fill it with SharePoint list data in Power Automate, and convert it to a PDF using only standard connectors, including a logo that survives the conversion.
On this page
- Overview
- Before you begin
- 1. Put tokens in the Word template
- 2. Save the template as filtered HTML
- 3. Add the logo and title to the HTML
- 4. Upload the logo and start the flow
- 5. Convert the logo to Base64
- 6. Fill in the HTML with Compose
- 7. Create the HTML file and convert it
- 8. Save the PDF to SharePoint
- 9. Test the flow
- Share the flow with other people
- Troubleshooting
- Choosing between this and premium
The Word Online (Business) connector, which includes Populate a Microsoft Word template, is a premium connector. If you do not have a premium license, you can still produce a formatted PDF. The trick is to save your template as HTML, fill it in with a Compose action, and let OneDrive convert the result.
The flow in this walkthrough runs from a selected SharePoint list item and goes through these stages:
- Read the item and the logo file.
- Build the HTML document.
- Save it to OneDrive as an
.htmfile. - Convert that file to PDF.
- Save the PDF to a SharePoint library.
Before you begin
You need these items:
- A SharePoint list with the data for your document. The example is a project request list.
- A Word document that you want to use as the template.
- A SharePoint library for working files, a library folder for finished PDFs, and an image library or folder for the logo. The example uses
Template ProcessingandShared Documents/Project Requests. Each run also makes its own folder in the working library. - A OneDrive for work or school folder for the conversion. The example uses
ConvertDocuments. - Access to Power Automate. The flow uses the SharePoint and OneDrive for Business connectors, plus built-in actions.
- The header snippet: custom-header.html.
1. Put tokens in the Word template
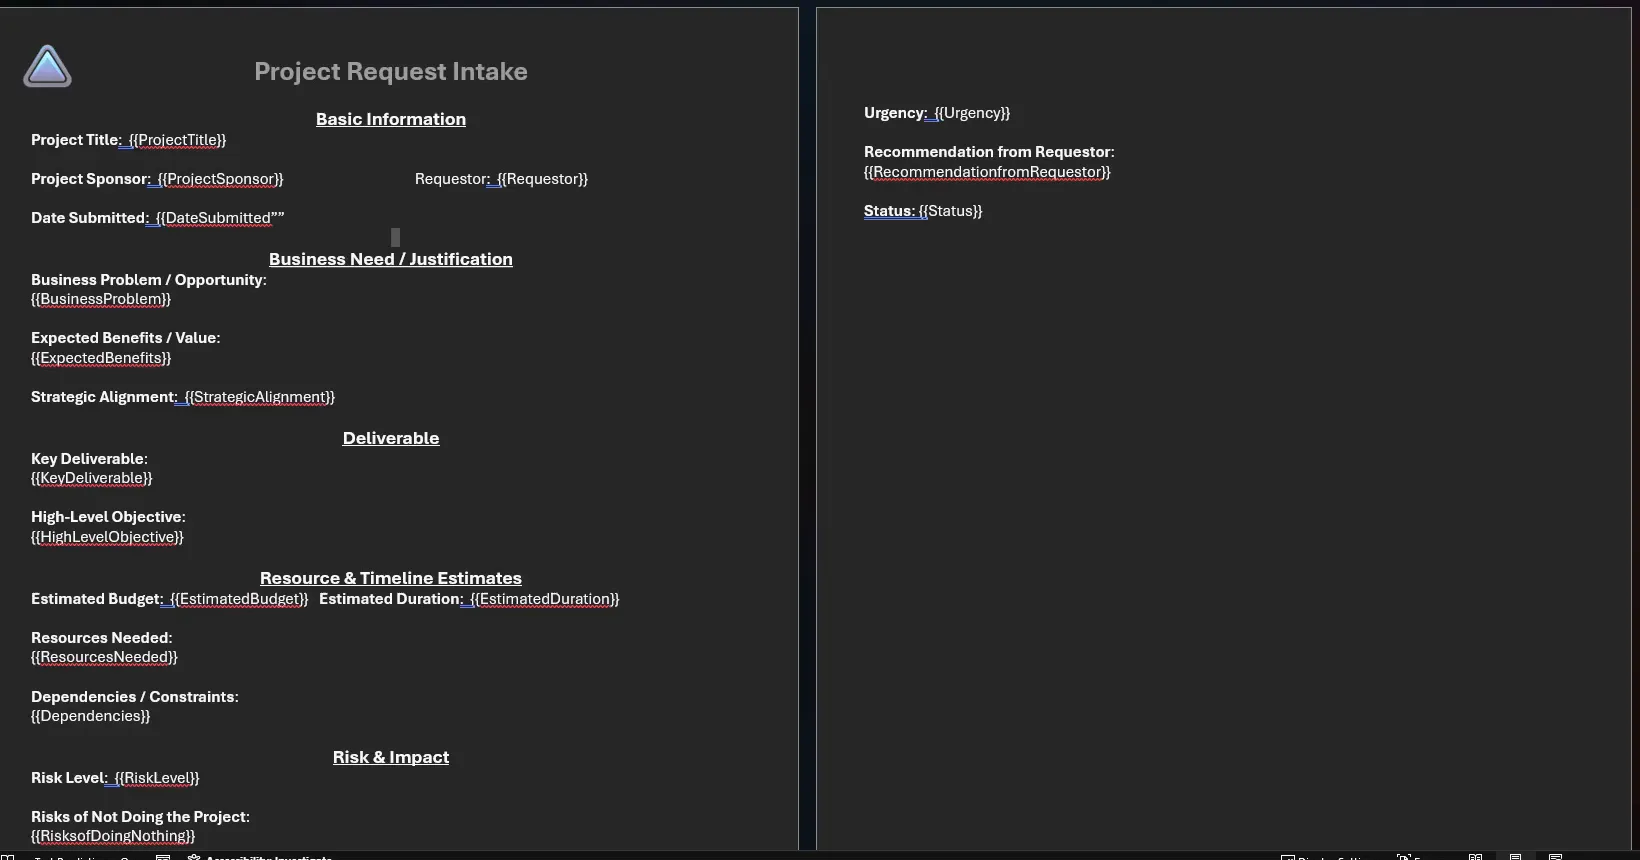
Replace every value that should come from SharePoint with a token that is easy to find in HTML.
- Open your template in Word. If it uses content controls, select Developer > Design Mode and delete them.
- Type a token in place of each value, such as
{{ProjectTitle}}. The format is up to you, as long as each token stands out when you read the HTML. - Keep an eye on underlined or bold blank spaces. Those formats carry through to the HTML and can appear as stray marks in the document.
- Save this as a normal Word document, such as
Project Request Template (HTML). Word is easier to edit than the HTML, so keep this version for later changes.
2. Save the template as filtered HTML
- In Word, select File > Save As > Browse.
- Set Save as type to Web Page, Filtered and save. The file has an
.htmextension. Choose Yes if Word warns you about removing Office-specific features. - Close the file and open it in Notepad.
The saved page can lose content from the Word header, such as your logo and page title. Step 3 adds them back.
3. Add the logo and title to the HTML
- In Notepad, find
<div class=WordSection1>. - On the next line, paste the contents of custom-header.html.
- Change
Project Request Intaketo your own title. - Save the file.
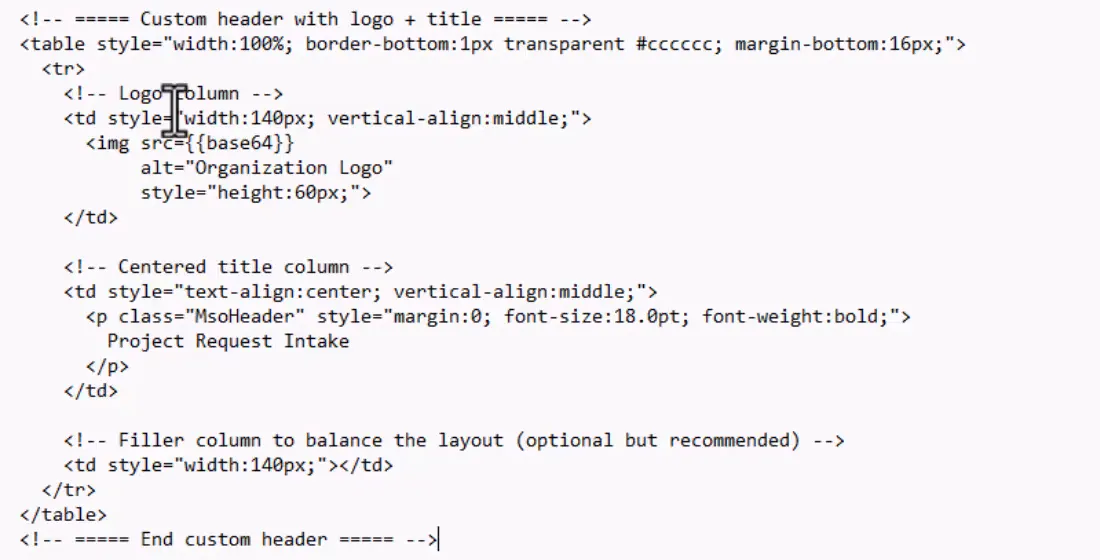
The snippet is a three-column table: logo, title, and a filler column. The filler is the same width as the logo column, so the title stays centered on the page. {{base64}} is a placeholder that you replace in the flow.
Leave the rest of Word’s HTML alone unless something looks wrong. It carries your formatting.
4. Upload the logo and start the flow
Create the flow in your default environment. The list’s flow menu lists only the flows in the default environment for the For a selected item trigger.
- Upload your logo to SharePoint. The example puts it in an
imagesfolder in Site Assets. A PNG file matches the expression in Step 5. - In Power Automate, create an instant cloud flow with the SharePoint trigger For a selected item, and select your site and list.
- Add the SharePoint action Get item. Select the same site and list, and set Id to the trigger’s ID.
- If a column allows multiple selections, convert it to text:
- Add Initialize variable, with a name such as
varImpactAreasand type String. - Add an Apply to each on that column’s values. Select the column from the dynamic content list rather than typing it.
- Inside it, add Append to string variable, with the value and a comma.
- Add Initialize variable, with a name such as
Save the flow regularly as you build.
5. Convert the logo to Base64
A logo loaded from a SharePoint link can appear in the .htm file but fail in the PDF. Embedding the image in the HTML avoids that.
- Add the SharePoint action Get file content, and select the logo file.
- Rename the action
Get file content (Logo). - Add Initialize variable with name
varLogoDataand type String. - Click in Value, open the expression editor, and enter:
concat('data:image/png;base64,', base64(body('Get_file_content_(Logo)')))Keep the comma inside the quotes after base64. Without it, the image does not work.
The name in body() is the action’s name with underscores in place of spaces. If you used a different action name, change it here. If your logo is not a PNG file, change image/png to match.
6. Fill in the HTML with Compose
- Add a Compose action.
- Copy everything from the Notepad file and paste it into Inputs.
- Find
{{base64}}, delete it, and select the variable varLogoData. - Find each token and replace it with the matching field from Get item. Use the variable for any multi-select column.
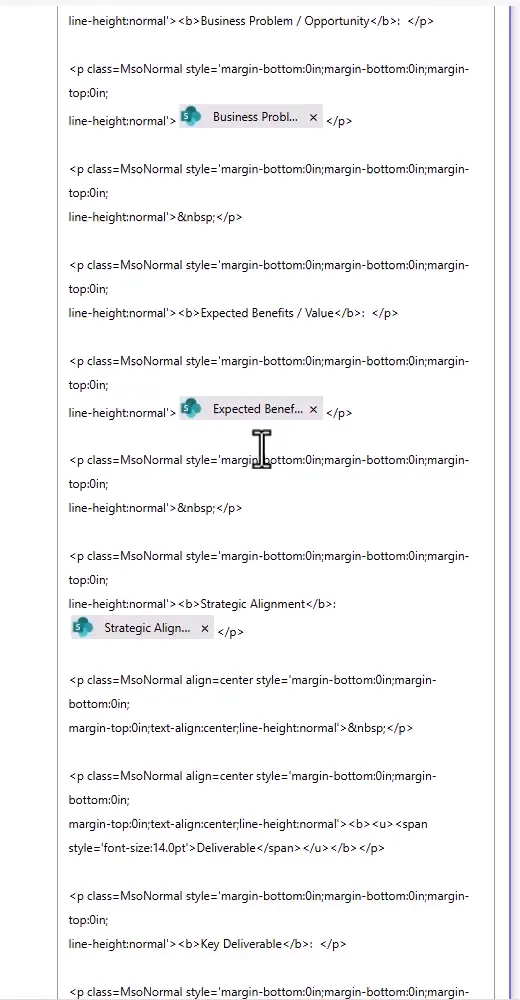
This is the slowest step, and it is easy to miss one. If you change the template later, you also need to paste the new HTML and map the fields again.
7. Create the HTML file and convert it
-
Add the OneDrive for Business action Create file, and rename it
Create file (htm).-
Folder Path: your conversion folder.
-
File Name:
Request-, then ID from Get item, then-, then this expression, then.htm:workflow()?['run']?['name'] -
File Content: the Outputs of Compose.
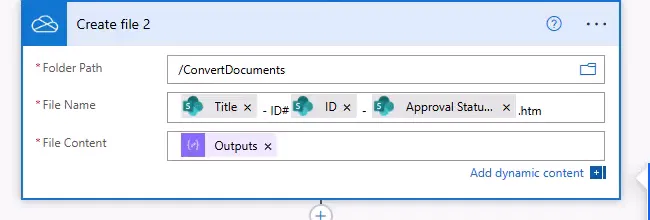
The example in the screenshot builds the name from the title, ID, and status.
workflow()returns details of the current run, including the run’s name, which is different for every run, so two runs never share this working file. -
-
Add the OneDrive for Business action Convert file.
- File: the Id from Create file (htm).
- Target type: PDF.
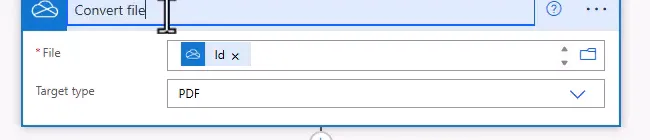
Microsoft lists htm and html as source formats for PDF conversion. Keep the logo file small: conversion is limited to files of 2 MB, and the embedded logo adds to the size of the .htm file.
8. Save the PDF to SharePoint
Creating the file in a working folder and then moving it lets you replace an earlier PDF without the flow failing. Each run uses a folder of its own in the working library, so two runs never share a working file.
- Add the SharePoint action Create new folder. Select your site, set List or Library to your working library, and set Folder Path to
Runs/followed by the run-name expression from step 7. - Add the SharePoint action Create file.
- Folder Path: the run folder: your working library, then
/Runs/, then the run-name expression. In the example, that is/Template Processing/Runs/followed by the expression. - File Name:
Request-, then ID from Get item, then.pdf. - File Content: File content from Convert file.
- Folder Path: the run folder: your working library, then
- Add the SharePoint action Move file.
- File to Move: the Id from the previous step.
- Destination Folder: your final folder.
- If another file is already there: Replace.
- Add the OneDrive for Business action Delete file, and set File to the Id from Create file (htm). This removes the working
.htmfile.
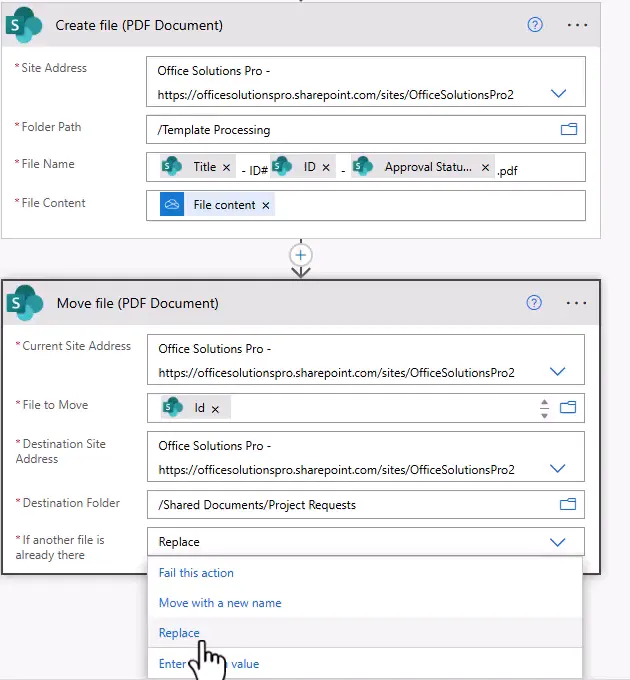
The screenshot shows the example’s earlier pattern, with the PDF at the top of the working library and a name built from the title, ID, and status. Use the run folder and the Request- name instead.
The move leaves the run’s folder empty, and it stays in Runs. If a run fails, its folder keeps the working file, so you can see how far it got. If it fails after the .htm file is created, that file also stays in your OneDrive folder; delete it by hand once you’ve found out why. The folder is named with the run’s name, which workflow() returns, so you can match it to the run in the run history.
Delete old run folders by hand. From time to time, open Runs in your working library and delete old folders. Before you delete one, make sure no run is in progress, and that the final PDF for that item is in the destination folder and opens correctly. Keep a failed run’s folder until you’ve found out why it failed. Delete only folders inside Runs, never Runs itself or the destination folder.
A moved file keeps its name, so the final PDF is Request-<ID>.pdf. The ID never changes, so every run for an item replaces the same PDF, even after someone edits the title, which appears inside the document.
Run the flow for one item at a time. The flow is meant for one generation of an item’s PDF at a time, whoever starts it. Nothing in the flow enforces that. Separate run folders and .htm names keep two runs from sharing a working file, but both replace the same PDF. The PDF shows the run whose Move file replaced it last. If the item changed between two overlapping runs, that can be the run that started first, so the PDF can show the older values. If a run fails before its Move file succeeds, the PDF from an earlier run stays as it was. To be sure the PDF matches the current item, wait until no other run for the item is in progress, then run the flow once more. If that run succeeds, the PDF comes from it.
If you’d rather keep a history, see File names and repeat runs for what each naming choice keeps.
9. Test the flow
-
Save the flow.
-
In the SharePoint list, select an item, then select Integrate > Flows and your flow.
-
The first time, select Continue. Then select Run flow.
-
Check the run. Every action should show a green check mark.
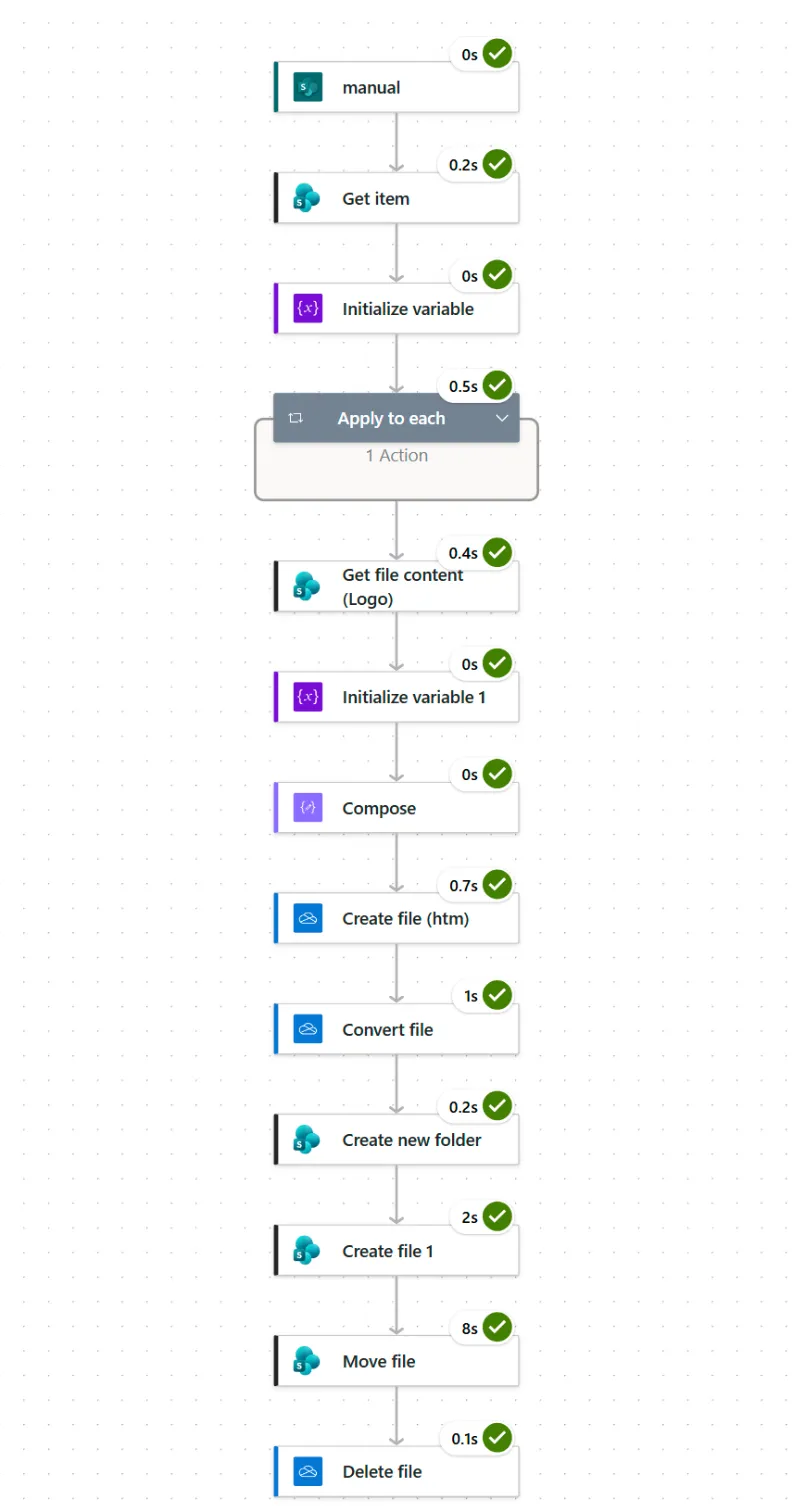
-
Open the PDF in the destination folder and read all of it. Look for your logo, any stray marks, and any token that was not replaced.
-
In
Runs, the run’s folder is still there, and empty.
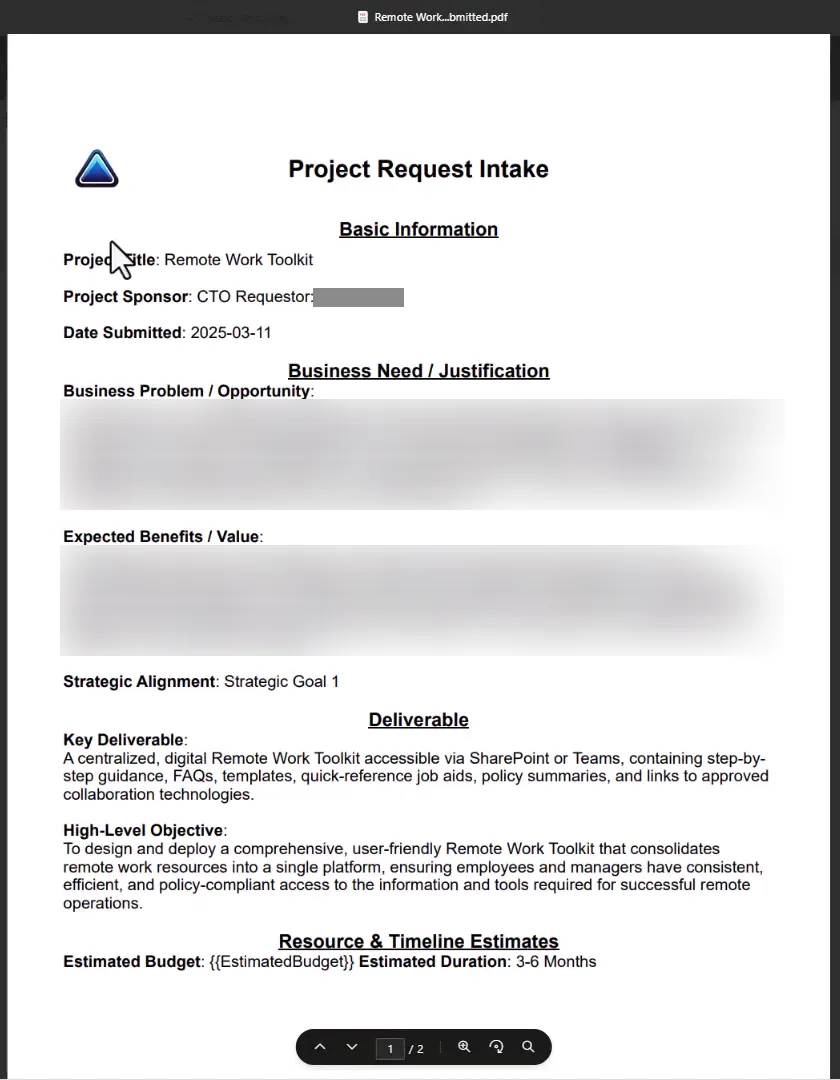
The example shows a common miss: {{EstimatedBudget}} still appears near the bottom, because that token was not mapped in Compose.
The flow deletes the .htm file at the end. To keep it, for example to open it in Word, leave out Delete file. Each run then leaves its own .htm file in OneDrive, and they stay until someone deletes them.
Share the flow with other people
The list’s users do not automatically get to run your flow. Add them from the flow’s details page under Manage run-only users. Two rules decide whether it works for them:
- Users must have Edit permissions on the list to run flows.
- The OneDrive folder depends on which connection the flow uses. If runs use your connection, the file goes into your OneDrive. If you have run-only users provide their own connection, each person’s runs use their own OneDrive. The connector can only work with data owned by the account behind the connection, including folders added as shortcuts, so sharing your folder does not help. Make sure the folder path exists in each person’s OneDrive.
Test with a second account before you roll the flow out.
Troubleshooting
| Symptom | Likely cause | What to do |
|---|---|---|
| The logo shows as a broken image | The expression is wrong, or the variable holds the raw file content | Use the expression in Step 5 and check the comma and the action name |
| The flow is not under Integrate > Flows | It is not in the default environment, or it’s turned off | Rebuild it in the default environment, and turn it on |
| Bad gateway or The resource could not be found at conversion | The file was not ready | Increase the delay between creating the file and converting it. Add a Delay of about 10 seconds |
| The same file already exists, or the second run fails | A working file name or folder repeats | Use the run-name expression in the .htm name and the PDF’s folder, and Replace in Move file, as in steps 7 and 8 |
| An item has more than one PDF | The name includes something that changes, such as the title | Name the PDF from the ID only |
Empty folders build up in Runs | Each run leaves its folder behind | Delete old folders by hand, as described in step 8 |
The PDF contains {{...}} text | A token was not replaced | Search Compose for {{ and map the rest |
| Dashes or lines appear in blank spaces | Underlined spaces in Word carried over | Remove them from the Word template, or from the HTML |
| Another user’s run fails | Their connection cannot reach the folder or list | Review the sharing rules above |
| A new designer shows the trigger as manual | The designer displays the trigger differently | Switch off New designer to see For a selected item |
Choosing between this and premium
This approach works well when you need a few standard documents and do not have a premium license. The tradeoff is maintenance, since each template change means updating the Compose action. Word template actions are easier to maintain when you have the license. A third option is to keep the HTML in a SharePoint library and use replace() expressions on its tokens, which takes longer to set up but makes later template changes easier.
Companion video
Video: Stop Paying for Premium! Generate PDFs in Power Automate with FREE Connectors Only | Easy HTML!
If the player is blocked on your network, open the video on YouTube.
Need help applying this to your own setup? Read about consulting.