 Office Solutions Pro
Run parallel emails in Power Automate and join the branches
Send two emails in parallel from a SharePoint list, handle failures, and make a final action wait for both.
On this page
- Overview
- Before you begin
- 1. Create the SharePoint-triggered flow
- 2. Add the requester receipt
- 3. Add the manager email as a parallel branch
- 4. Add a failure scope within each branch
- 5. Join both branches with a final Compose action
- 6. Save and test with a new list item
- 7. Check the join in the new designer
- Troubleshoot the dependency, then the action
When two actions do not depend on each other, putting them in separate branches lets Power Automate process them concurrently. In this example, a new SharePoint request starts two email actions: a receipt for the requester and a notification for the manager. Each branch has its own failure scope, and both branches feed a final Compose action.
Before you begin
Have access to Power Automate, a SharePoint Online list, and an Office 365 Outlook mailbox with working connections. Your SharePoint connection must be able to access the selected list; your test user must be able to create an item. Use a list with a single-person Requestor column so the trigger exposes Requestor Email, or substitute an email field from your own list.
The example uses the existing Requested Projects list on the Office Solutions Pro site. It uses a custom Project Request Intake form, which you don’t need for this tutorial. A standard list form and an appropriate email field are sufficient.
Both SharePoint and Office 365 Outlook are Standard connectors in Power Automate, so neither needs a Premium license. The free plan or a Microsoft 365 license plan gives access to standard connectors. You still need access to those services. Microsoft: licensing context.
Most of the build uses the classic designer, and step 7 checks the join in the new designer. The classic layout is a preference, not a requirement. Microsoft recommends the new designer and currently documents switching to classic with the New designer toggle. Microsoft also says the new designer will replace the classic designer once it can cover most, if not all, classic scenarios, so the classic steps below may not always be available. Microsoft: designer differences and limitations, Microsoft: classic designer replacement.
1. Create the SharePoint-triggered flow
In Power Automate, select Create → Automated cloud flow. Select Skip in Build an automated cloud flow, because you’ll add the trigger in the designer. Turn off New designer before adding actions if you want the classic layout used below.
If the flow is still empty, choose Switch without saving. Save existing work before switching designers on a flow you have already configured.
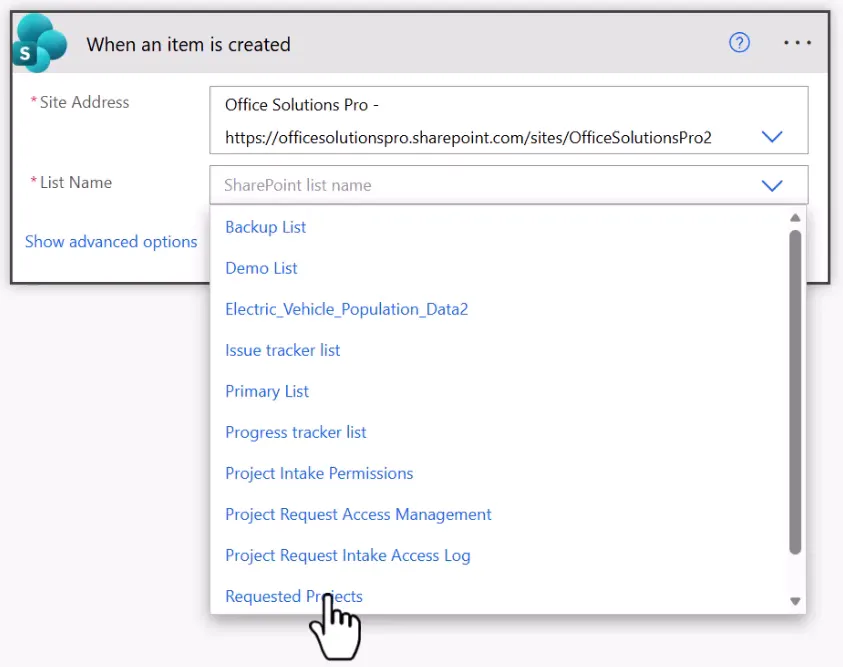
Add the SharePoint trigger When an item is created and set:
| Parameter | Example value |
|---|---|
| Site Address | Office Solutions Pro, the SharePoint site in this example |
| List Name | Requested Projects |
Choose your own site and list when reproducing this. The trigger runs for a newly created item, rather than for every subsequent edit. Microsoft: SharePoint trigger.
2. Add the requester receipt
Select New step, search for Send an email (V2), and choose the Office 365 Outlook action.
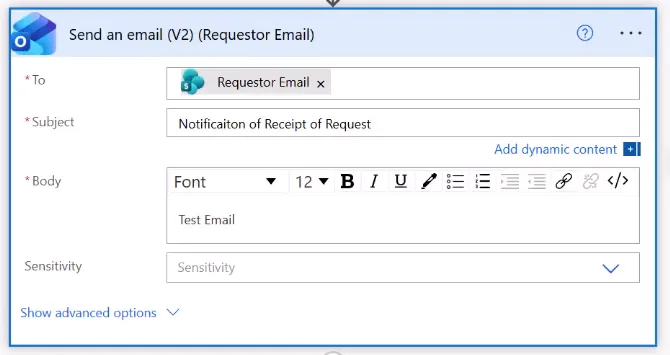
Use the action’s menu to rename it Send an email (V2) (Requestor Email). For To, insert the trigger’s Requestor Email dynamic-content value. Configure the sample message:
| Input | Value |
|---|---|
| To | Requestor Email, from When an item is created |
| Subject | Notification of Receipt of Request |
| Body | Test Email |
The requester and manager emails use different subjects so you can tell them apart when they arrive. The subjects are message text, not flow conditions. Use the spelling in the tables here; the example screenshots show “Notification” misspelled.
3. Add the manager email as a parallel branch
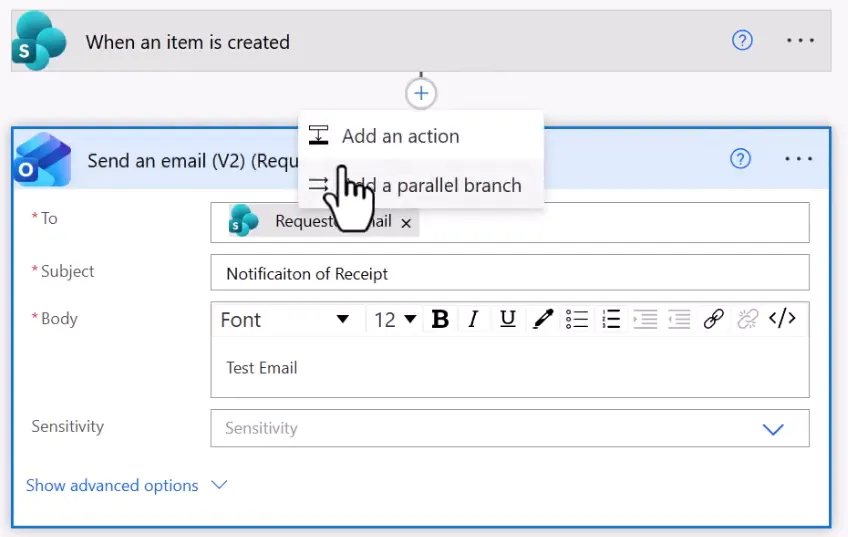
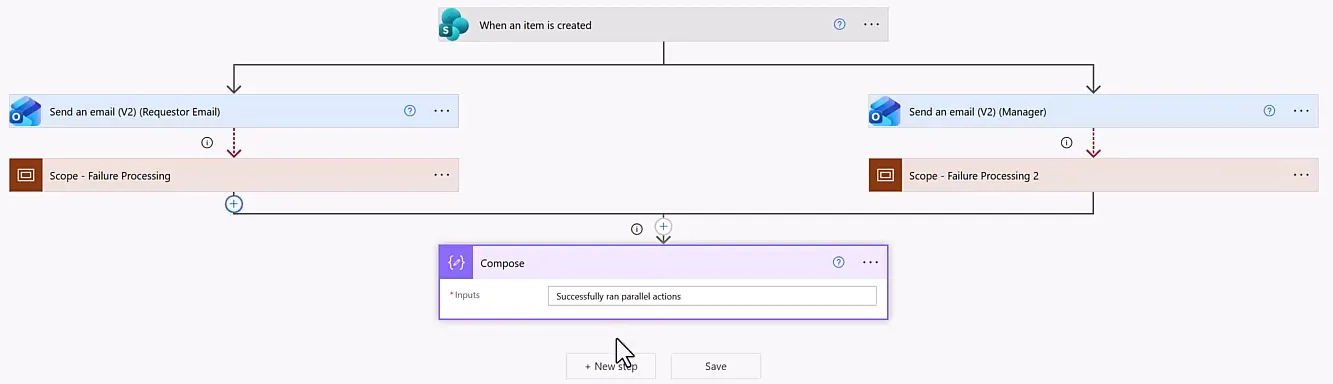
Select the + on the connector between the trigger and the requester email. Choose Add a parallel branch. Add a second Send an email (V2) action in the new branch.
Rename this action Send an email (V2) (Manager) and configure:
| Input | Value |
|---|---|
| To | Your manager or process-notification recipient |
| Subject | Notification of New Request |
| Body | Notification of New Request |
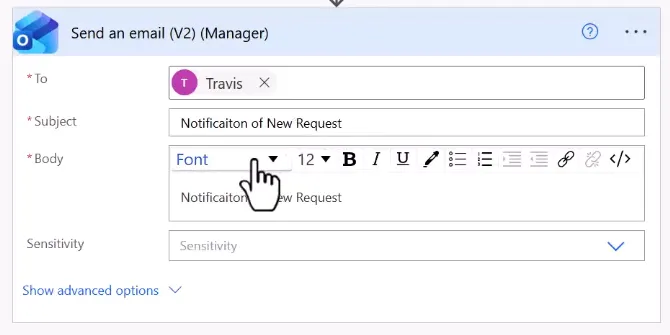
In this example, both messages go to the same mailbox. “Manager” is a manually selected recipient here; no manager-lookup action is added.
Both email branches depend on the trigger, so neither needs the other email to finish. Keep dependent work sequential. Parallel execution can reduce elapsed time, but it does not promise identical start times, delivery order, or a fixed speed improvement. Microsoft: independent parallel work.
4. Add a failure scope within each branch
Each branch gets its own failure scope, so an alert tells you which branch failed. The scope contains Compose - Failed Run Link followed by an Outlook email to the process manager. If you already have a suitable scope, you can insert it from My clipboard instead of building it.
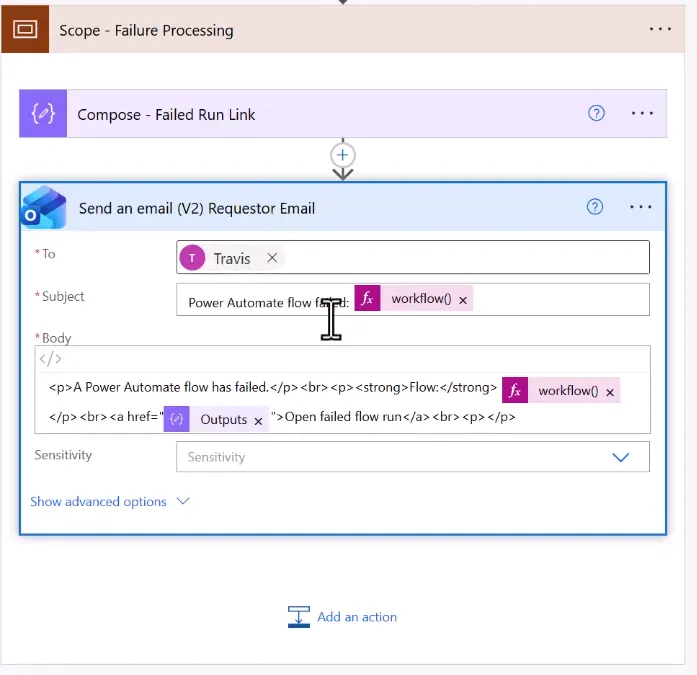
The alert in the screenshot is prebuilt, with an HTML link and flow-name expressions. The following steps build a simpler minimal handler, using Microsoft’s documented workflow functions, so your email will differ from the screenshot.
- Use the branch’s small + → Add an action beneath the requester email. Add Control → Scope and name it Scope - Failure Processing.
- Inside it, add Data Operation → Compose. Rename it Compose - Failed Run Link.
- In Compose’s Expression editor, enter this expression for the commercial Power Automate portal:
concat('https://make.powerautomate.com/environments/', workflow()['tags']['environmentName'], '/flows/', workflow()['name'], '/runs/', workflow()['run']['name'])The expression combines the environment, flow, and run identifiers. Microsoft’s error-handling guidance reads the flow identifier from logicAppName in the workflow tags instead of workflow()['name']. Microsoft documents both properties, so this example keeps workflow()['name']. Microsoft: workflow properties, Microsoft: current-run links.
US government clouds use different portal addresses. Microsoft lists https://make.gov.powerautomate.us (GCC), https://make.high.powerautomate.us (GCC High), and https://make.powerautomate.appsplatform.us (DoD). If you use one of those clouds, put your portal’s address in the expression in place of https://make.powerautomate.com. Microsoft’s list gives the portal addresses only, not the path to a flow run, so confirm in step 6 that the generated link opens the run. Microsoft: US Government service URLs.
- Below Compose, inside the scope, add Send an email (V2). Address it to the process manager. Use a subject such as
Requester email failedand include an explanation plus Outputs from this branch’s Compose - Failed Run Link in the body. This simpler message identifies the branch and includes the run URL. - On the scope itself, open … → Configure run after. Select has failed, clear is successful, and select Done.
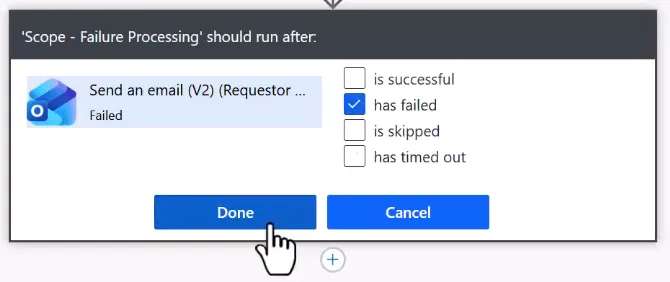
Repeat the handler beneath the manager email. Name the second scope Scope - Failure Processing 2, and use a distinct subject such as Manager notification failed. Its scope must depend on Send an email (V2) (Manager) with only has failed selected. If you copy actions, confirm the second notification uses its own Compose output.
These failure scopes handle Failed only. Add has timed out as well if your intended policy includes timeouts. That is an optional extension, and the screenshots show has failed only. Microsoft: error handling.
5. Join both branches with a final Compose action
In the classic designer, use the large + New step button at the bottom of the entire flow. Add Compose there, rather than inside either branch. The flow-level New step button is separate from the branch-local plus button. Microsoft: options after adding parallel branches.
The final Compose in the example screenshot contains this text:
Successfully ran parallel actions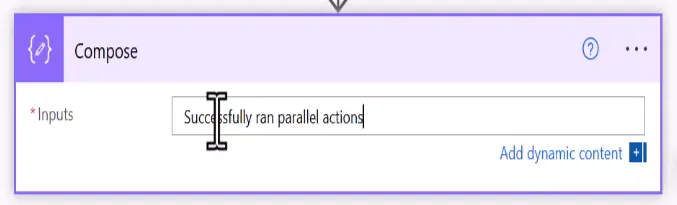
Use neutral wording for the all-outcome join below, such as:
Parallel branches finishedA static Compose message does not check whether both emails succeeded, so success wording can mislead when this action also runs after a failure.
Open the final Compose’s Configure run after. It must list both failure scopes. Select each scope separately and enable all four outcomes:
| Predecessor | is successful | has failed | is skipped | has timed out |
|---|---|---|---|---|
| Scope - Failure Processing | Yes | Yes | Yes | Yes |
| Scope - Failure Processing 2 | Yes | Yes | Yes | Yes |
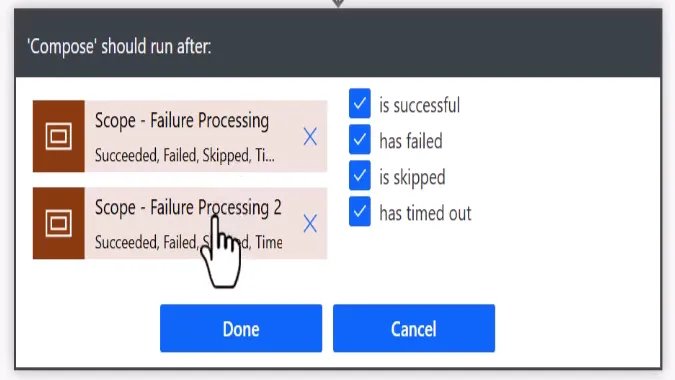
Settings apply separately to each predecessor, so the outcomes you select for one scope do not carry over to the other. If you can’t select the second scope, select Done, reopen Configure run after, and select it there. Verify both entries before you select Done for the last time.
Why Skipped matters: If the requester email succeeds, its failure scope is skipped. The same applies to the manager branch. The final Compose must accept that skipped state to run on the normal path. It waits for both selected scopes to reach an allowed outcome; it is not a “whichever branch finishes first” action.
With these Run after settings, each email’s result should lead to the following:
| Email result | Its failure scope | Final Compose |
|---|---|---|
| Succeeds | Skipped | Runs after both branches finish |
| Fails | Runs and tries to send the alert | Runs after both branches finish, even if the alert fails |
| Times out | Skipped, so no alert is sent, unless you added has timed out to the scope | Runs after both branches finish |
Because all four outcomes are allowed, this Compose can also run after a notification or handler fails, so use a join like this for cleanup or logging, not as a success-only business gate.
An email action’s result and the run’s overall status are separate results. To confirm success, open the run and check each email action and failure scope, and don’t rely on the run’s overall status alone. Azure Logic Apps documentation says a run can be Succeeded after an action failed, if a later action handled the failure, and that a run is Failed if any branch ends in failure. Those pages are for Azure Logic Apps, so they don’t settle what this flow reports. Check what your own flow’s run shows. Azure Logic Apps: run statuses, Azure Logic Apps: branch statuses, Microsoft: Run after settings, Azure Logic Apps: multiple predecessors and statuses.
6. Save and test with a new list item
Name the flow Demo Parallel and select Save. Return to its details page and confirm it is turned on.
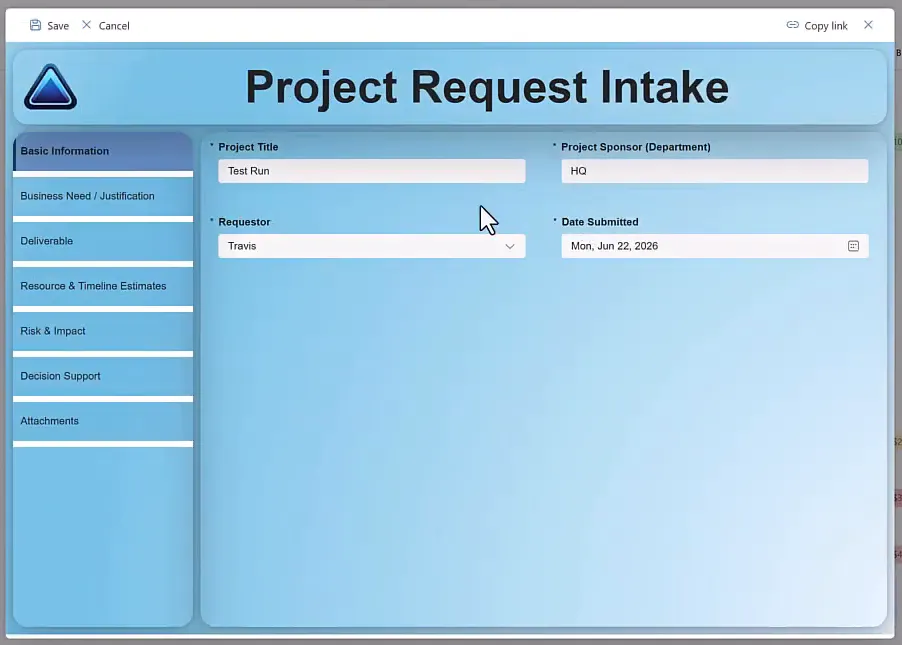
In the SharePoint list, create a new request and save it. This example uses the custom form with Project Title = Test Run, Project Sponsor (Department) = HQ, and Requestor = Travis. Use an appropriate test requester and complete your own list’s required fields; those example values are not trigger filters.
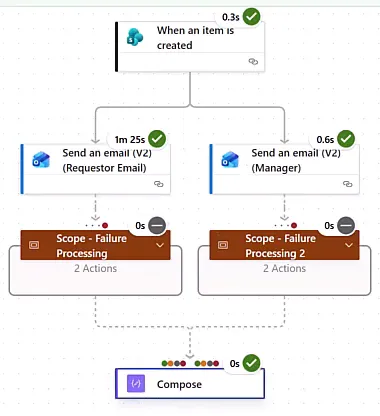
Refresh the flow’s run history, open the new run, and wait for both branches to finish. In this example’s successful run:
- Both original email actions have green success indicators.
- Both failure scopes are Skipped, which is expected.
- The shared final Compose succeeds after the branches finish.
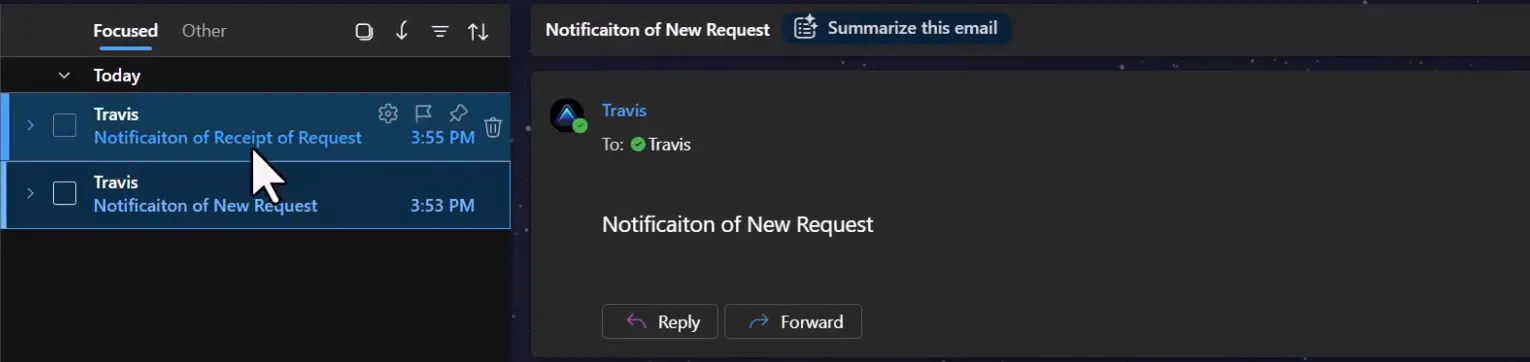
Check the recipient mailbox too. In this example, the receipt and the new-request notification both arrive in the same mailbox.
This verifies the normal path only. It does not exercise a failed email, a timeout, or delivery of a failure alert. In your own test flow, validate the handler paths and confirm the run URL from Compose - Failed Run Link opens the correct run for an authorized flow owner or co-owner. A link does not itself grant access. Microsoft: owners can view run history. Static results let you mock an action’s result and see how a flow reacts when that action fails. Microsoft: static results.
7. Check the join in the new designer
To check the join here, turn the New designer toggle back on. If you built the final Compose in step 5, it already lists both scopes, so confirm the entries below rather than changing them.
Building the join directly in the new designer needs one more step. If you can’t add an action below both branches, add it beneath one branch. It then lists only that branch’s scope, with only Is successful selected. Left like that, the action doesn’t wait for the other branch, and it’s skipped whenever that scope is skipped.
Select the final action and open Settings → Run after:
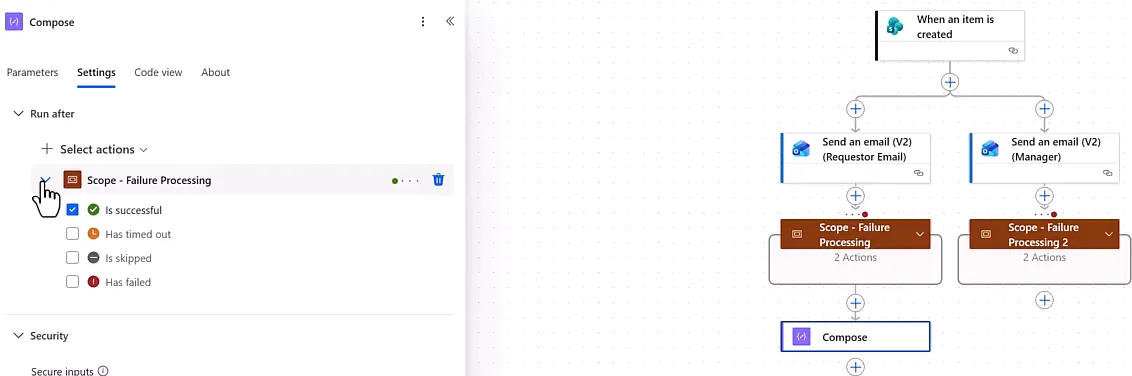
This is the starting point for an action added beneath one branch. A final Compose built in step 5 shows both scopes, as in the next screenshot.
Use Select actions to include both Scope - Failure Processing and Scope - Failure Processing 2. Expand each and select all four outcomes.
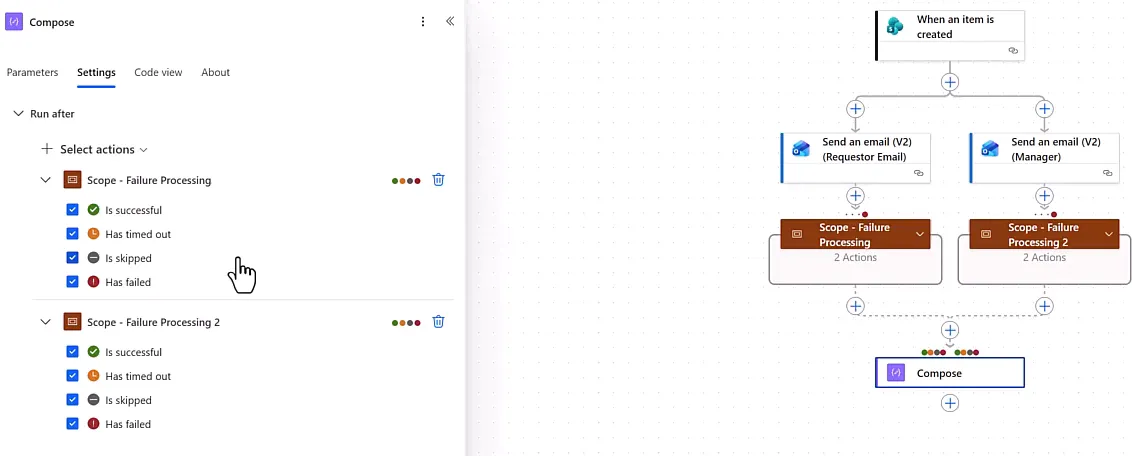
The final action should now have connections from both scopes.
Save and retest after changing dependencies.
Troubleshoot the dependency, then the action
If an email fails, inspect that email’s run inputs, connection, recipient, and error details. If the final action is skipped, inspect both predecessor selections and their accepted statuses—especially Skipped on the failure scopes. Also check that the run reached those actions and was not canceled.
A missing outcome in Run after is a common cause of a skipped final action, but not the only one.
A branch can’t use outputs from the other branch, and the designer may refuse to save that kind of reference. Microsoft: FlowCheckerError. Use trigger data or earlier shared outputs in independent branches, and move work that needs both results after the join. Dragging an existing action into a parallel branch doesn’t always work. If it causes problems, try deleting the action and adding it again, then check its dynamic-content references.
The result is a flow with independent notification branches and an explicit continuation point.
Companion video
Video: Power Automate Parallel Actions Tutorial: Run Multiple Actions at the Same Time. Published June 23, 2026.
If the player is blocked on your network, open the video on YouTube.
Need help applying this to your own setup? Read about consulting.