 Office Solutions Pro
Make SharePoint form fields read-only and hide Edit in grid view
Add read-only field settings to a modern SharePoint form, preserve its existing layout, and hide the grid-editing command in a formatted view.
A request form can show Status and Resolution while keeping those fields out of its editable controls. This tutorial uses form-body JSON to do that, then adds view JSON to hide Edit in grid view.
These are interface changes. They do not create field-level authorization or revoke a user’s underlying update rights. Use this approach to guide the normal form experience; design actual permissions separately when access must be enforced. SharePoint permissions apply to sites, lists, and items, not to individual columns.
Before you begin
This example uses a SharePoint Online modern list named Office Support Request. Its form already has a custom header, footer, and four body sections, and its view already colors rows by Priority. Customize a SharePoint list form with JSON covers that form layout, and Customize a SharePoint list form without Power Apps or JSON covers the High-priority row color. This tutorial changes the existing JSON rather than recreating that earlier design.
You need permission to create/manage views and configure form formatting. Back up the current Body and view JSON before editing. If your list uses multiple content types, confirm which form you are configuring: Microsoft stores this formatting on the list content type, which must allow edits. Microsoft: form configuration prerequisites.
The sample targets the internal field names Status and Resolution. Verify your own internal names, especially if columns were renamed. To find one, open List settings, select the column under Columns, and read the value after Field= in the page address. If the address shows %5F, read it as an underscore. Keep the property names fieldsettings and readonly in the lowercase spelling shown.
1. Open the form’s Body formatting
- Open an existing list item in its display form.
- Expand the Edit form menu at the top and choose Configure layout.
- In Apply formatting to, select Body.
- Copy the existing JSON somewhere safe. Keep its
sectionsarray and existing field groups.
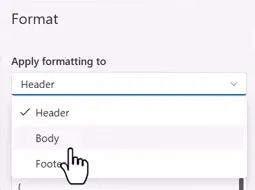
Choose Body.
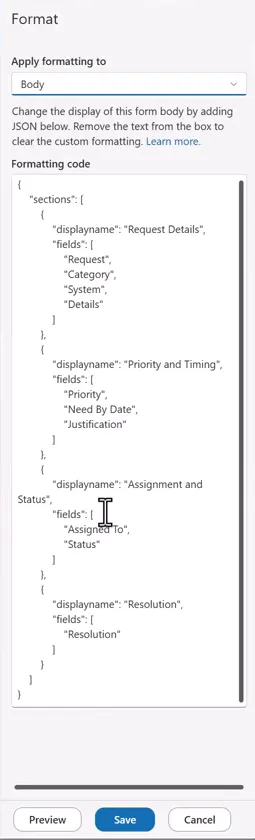
The existing layout. Your section names and columns may differ.
The header and footer have separate formatters. Add the field settings to the Body object, alongside sections, rather than placing them inside a section or pasting them into the header.
2. Add the read-only field settings
Add this property to the same top-level object as sections. This code is a property fragment to merge into your current Body JSON, not a complete replacement for it:
"fieldsettings": [ { "name": "Status", "readonly": true }, { "name": "Resolution", "readonly": true }]Put a comma after the existing sections array before the new property. Keep one outer object and one fieldsettings property; if that property already exists, merge these entries into its array. Use the Boolean true, not the string "true".
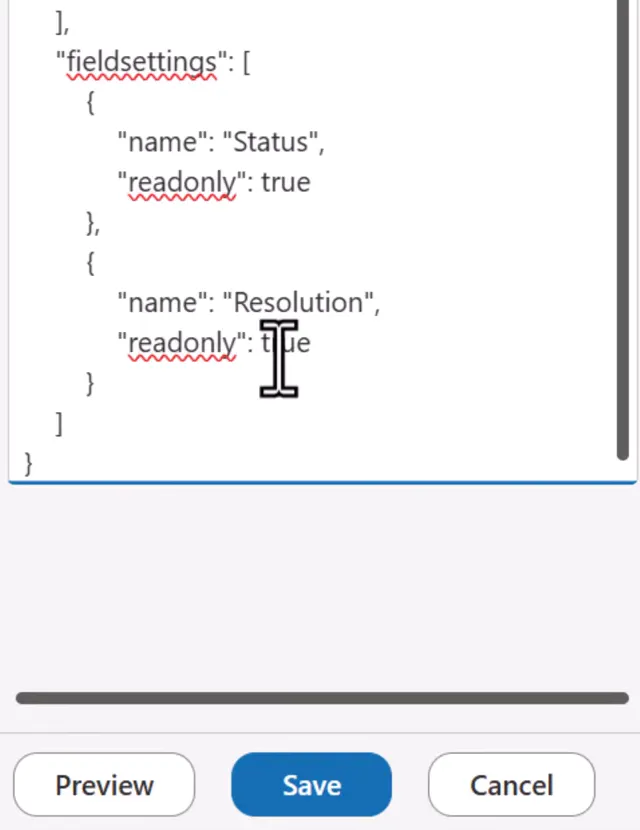
The added field settings. The red underlines didn’t stop these settings from working in this example, so don’t respell the words to remove them.
For a list without an existing Body layout, the JSON below is a complete starter example. It uses a simple section instead of the four-section layout in this example. Adapt its field names before use. In sections, use each column’s display name. In fieldsettings, use its internal name, which can differ. For example, Microsoft defines a space in a column name as _x0020_, so Due Date can become Due_x0020_Date. A column added from the list view may have no space code at all, so read the real name as described in Before you begin. Microsoft: column formatting.
{ "sections": [ { "displayname": "Request", "fields": ["Title", "Status", "Resolution"] } ], "fieldsettings": [ { "name": "Status", "readonly": true }, { "name": "Resolution", "readonly": true } ]}Any column you don’t list appears in the last section, and a custom Body switches the form to a multi-column layout. Use the merge approach when preserving an existing layout. The starter doesn’t include this example’s header, footer, conditional rules, or section layout.
Microsoft documents name as the internal field name and readonly as the read-only display flag. Microsoft describes this formatter as a proposed feature, so don’t assume the setting is available in every environment. Microsoft’s page doesn’t state availability for any environment, including GCC, GCC High, or DoD, so use the Preview step below to see what happens in your own list. Microsoft: read-only formatter.
3. Preview, save, and check the form modes
Select Preview in the Format pane. In this example, the display form adds (Read only) to Status and Resolution, while retaining their values: Completed and Granted access.
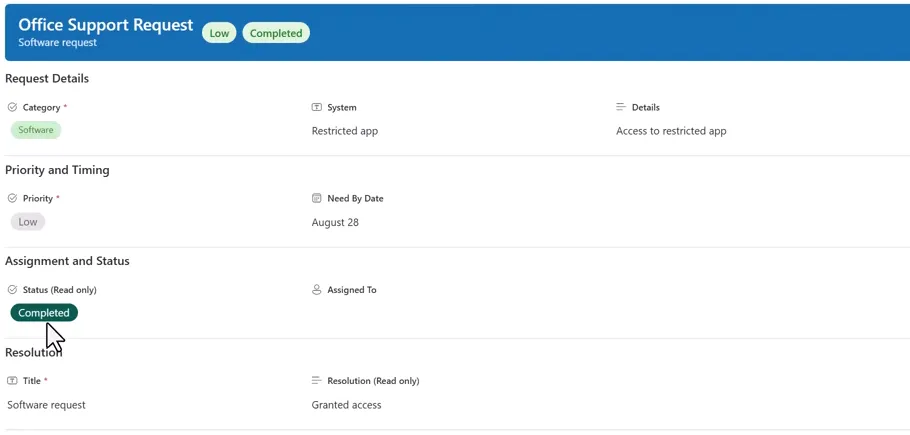
Preview result.
Select Edit all to inspect the editable form. In this example, the Status and Resolution controls disappear, while the other fields remain editable. Select Save in the Format pane to persist the formatter; this is separate from the form’s item-data Save button.
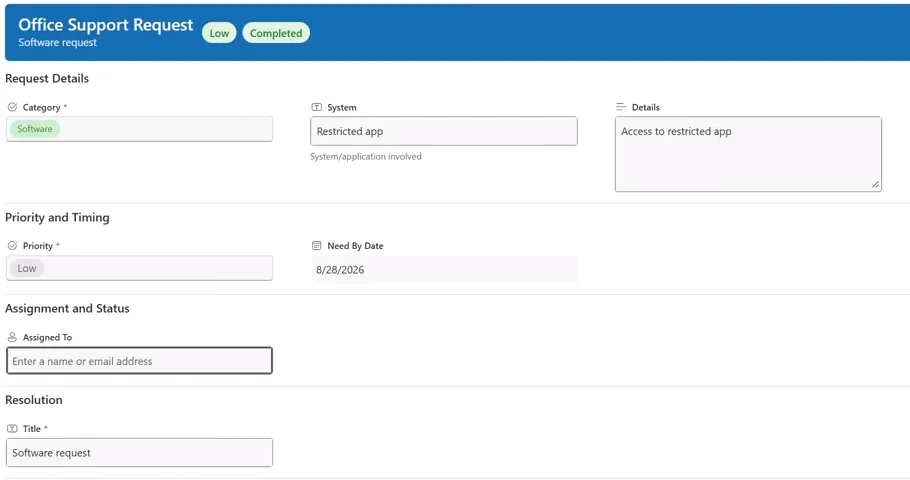
Edit all result. After checking it, save the formatter using the separate Format pane.
Close the form, reopen an existing item to confirm the saved result, then close it and select New on the list to inspect creation. The new-item form also omits the Status and Resolution input controls. The custom header may still display status-related information; hiding an input is not the same as removing every display of its value.
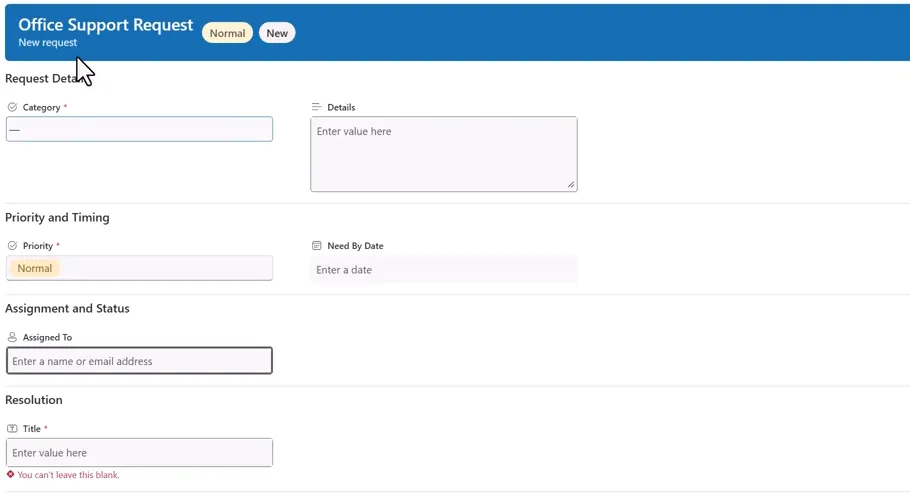
New form. The message under Title appears because that required field is empty.
Microsoft’s page says a read-only field isn’t shown on the New Item form or in Edit all mode, and that the Edit form shows it without an editable textbox, similar to a calculated column. Check each mode in your own list, and test the paths your users actually use. Microsoft: form-mode behavior.
Required fields: Don’t make a required column read-only unless the column gets a value some other way. Microsoft describes a required column as one that people can’t add an item without filling in, and the New Item form doesn’t show a read-only column, so someone creating an item has nowhere to enter that value. The form might refuse to save, or the item might save with the column empty. Microsoft’s form page doesn’t cover this combination. Status and Resolution aren’t required in this example, so this risk doesn’t apply to them. If a read-only column in your list is required, give it a suitable default value and test it before rollout. Complete every visible required field in a new item, select Save, then see whether the item saved and what’s stored in that column. If it won’t save, or the value is wrong, make the column optional or remove it from fieldsettings. Microsoft: column types and options.
4. Check grid editing after the form change
Return to the list and select Edit in grid view. In this example, the grid still opens after the form change, and a Status cell can be selected for editing. Microsoft’s form page doesn’t mention grid view, so check in your own list whether Status and Resolution can be changed there. Select Exit grid view when you’ve finished.
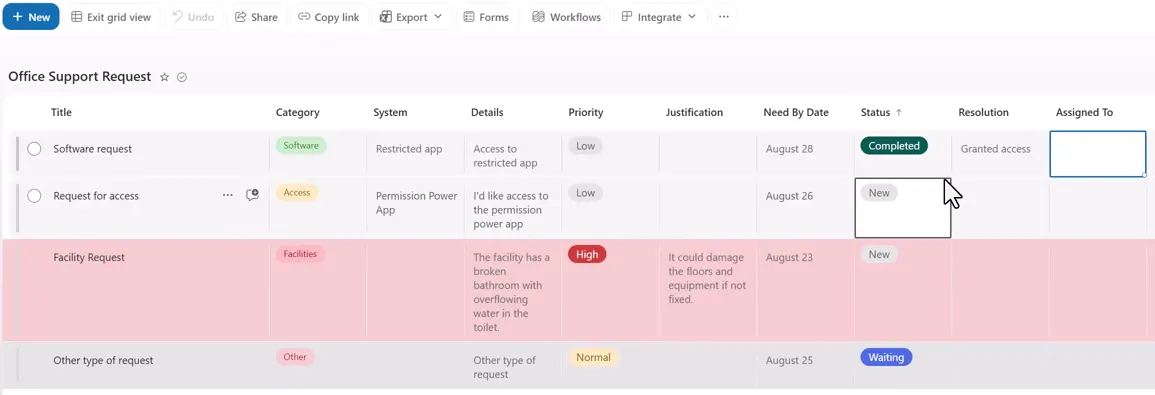
Grid view after the form change, with a Status cell selected.
The next step hides Edit in grid view in this view. It does not turn grid cells into individually secured fields.
5. Hide Edit in grid view while retaining row formatting
- Open the view menu, All Items in the example, and select Format current view.
- In the Format view pane, select Advanced mode.
- Back up the existing JSON before changing it.
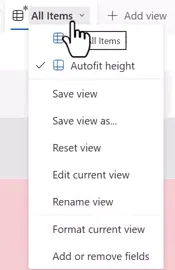
View menu.
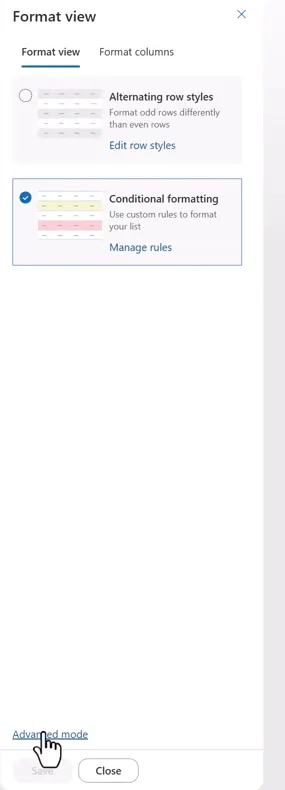
Advanced mode.
Add commandBarProps as another top-level property. Keep the existing additionalRowClass rule intact. If your formatter already has commandBarProps.commands, merge the grid command into that array instead of creating a second property.
This is the complete combined view JSON for this example, reformatted for readability. Its existing rule colors High priority rows pink and other rows gray; the added command setting hides grid editing:
{ "$schema": "https://developer.microsoft.com/json-schemas/sp/v2/row-formatting.schema.json", "additionalRowClass": { "operator": ":", "operands": [ { "operator": "==", "operands": ["[$Priority]", "High"] }, "sp-css-backgroundColor-BgDustRose sp-field-fontSizeSmall sp-css-color-DustRoseFont", "sp-css-backgroundColor-BgLightGray sp-field-fontSizeSmall sp-css-color-LightGrayFont" ] }, "commandBarProps": { "commands": [ { "key": "editInGridView", "hide": true } ] }}Use this block to see where commandBarProps goes, not to replace your own JSON. Customize a SharePoint list form without Power Apps or JSON sets a rule only for High priority, so your rule may not match this one. Keep your own rule and add only the commandBarProps change. This example’s rule also needs a Priority column in the view. Microsoft: field references. If the view has no formatter yet, commandBarProps can stand on its own, as it does in Microsoft’s samples. Microsoft: command-bar syntax.
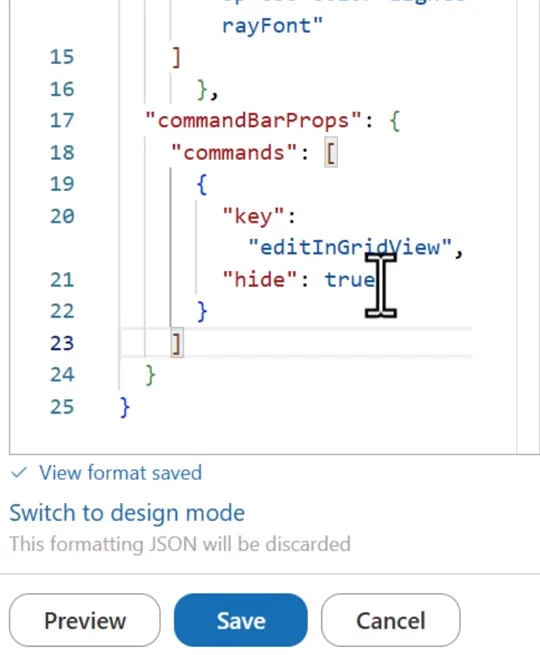
The added command setting.
editInGridView is the key for this command, and the Boolean hide: true hides it. The row-formatting schema accepts commandBarProps alongside row styling. Microsoft: command-bar syntax, Microsoft: row-formatting schema.
Select Save in the Format view pane. Confirm that Edit in grid view disappears while the existing priority colors remain. Stay in Advanced mode for later changes, because switching to design mode discards this JSON.
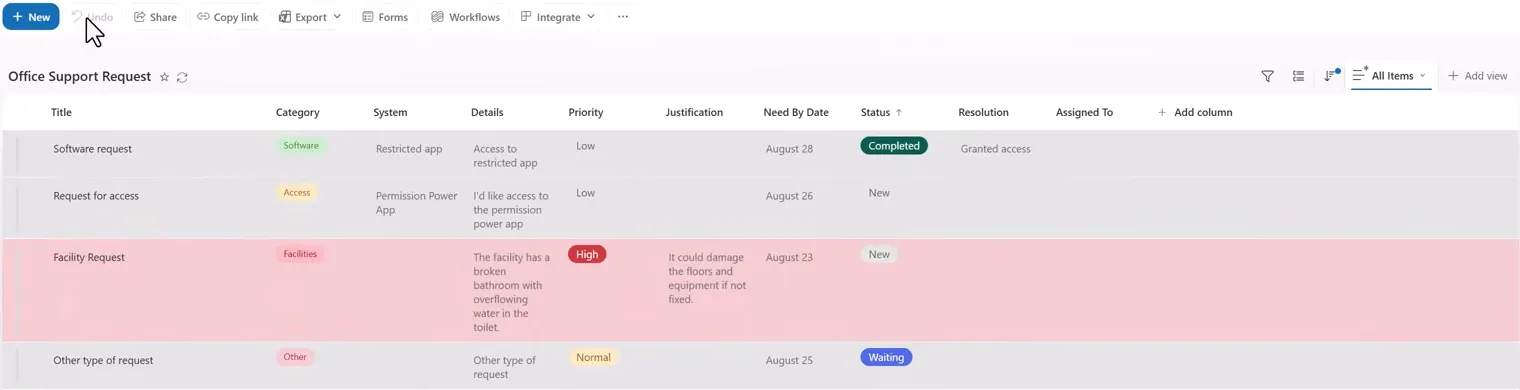
Result in this example.
This hides the specified command; the other commands remain. Formatting is associated with the view, so review other views users can access, and don’t assume the command is hidden anywhere else. People with Contribute access can create personal views, and people who can manage views can change or remove this formatting, so either may bring the command back. Microsoft: view formatting, Microsoft: permission levels.
6. Keep the outcome separate from security
Important: It can look as if the form is now the only way users can edit an item. Don’t rely on that. These steps hide this view’s grid command and configure the form to omit the two edit controls. They do not establish that every other update route is blocked, and they aren’t a security control.
Microsoft describes form and view formatting as display changes. Existing permissions still determine what users can update. Hiding a button or sharing only a form link does not revoke those rights. Microsoft: form configuration, Microsoft: view formatting, Microsoft: permission levels.
Microsoft documents other ways to update list items. For everyday editing, these include the details pane, bulk edit, and the mobile apps. For integrations, they include the SharePoint REST API, Microsoft Graph, and the Update item action in the SharePoint connector, which is available in Power Automate and Power Apps. Another view or client may also provide a way to edit. Microsoft’s form page describes the New Item form, the Edit form, and Edit all mode. It doesn’t say whether the read-only setting applies on these other routes, so treat each one as a way the values can still change until you’ve checked it. Microsoft: edit list items, Microsoft: bulk edit, Microsoft: SharePoint REST, Microsoft: Graph listItem update, Microsoft: SharePoint connector.
The static readonly: true setting also does not create a separate manager exception. Microsoft documents only a field name and a readonly flag, with no per-person condition, so don’t count on this form to let the people who process requests update those values. If managers or automation must update those values, plan their authorized update path separately. This tutorial doesn’t set up permissions or Power Automate.
Before using the result, check:
- Existing-item display, edit, Edit all, and New behavior in your tenant.
- The details pane, bulk edit, and the mobile app, signed in as a user with Contribute rights.
- A new item with every visible required field completed: whether it saves, and what’s stored in the read-only columns. Then an edit of that item, to see whether Status and Resolution keep their values.
- The intended view’s hidden command, other accessible views, and retained row formatting.
- The separately designed permissions if any change must be prevented across all update paths.
Restore the saved original formatter if the layout or behavior is not what you intended. After any change through Edit columns, reopen the Body JSON and confirm fieldsettings is still there.
Companion video
Video: Make SharePoint List Fields Read-Only Without Power Apps. Published September 14, 2026.
If the player is blocked on your network, open the video on YouTube.
Need help applying this to your own setup? Read about consulting.