 Office Solutions Pro
Let SharePoint list users read and edit their own items
Configure creator-based item access in a SharePoint list, understand why a filtered view is insufficient, and check the permission exceptions before rollout.
On this page
- Overview
- Before you begin
- 1. Show Created By so you can check the ownership rule
- 2. Understand why Created By = [Me] is only a view filter
- 3. Configure the two item-access settings
- 4. Review elevated permissions before choosing submitters and managers
- 5. Test with separate users and an unfiltered view
- 6. Check what this setting doesn’t cover
A request list may need to let employees submit and update their own requests while list managers handle everyone’s submissions. SharePoint’s Item-level Permissions settings can restrict reading and editing by item creator, without building a Power Apps form or a flow for this basic scenario.
This tutorial walks through that setup, then covers the permission checks that decide whether it works for your users. Every item in the example list has the same creator, so its screenshots can’t show a second user being denied access. Complete the checks in steps 4 and 5 before relying on the configuration.
Before you begin
This example uses a SharePoint Online list named Office Support Request, with a modern list view and classic-style settings pages. Use your own list. Use a site owner account for this tutorial; permission assignments require the appropriate permission-management rights. If Item-level Permissions doesn’t appear in Advanced settings, confirm you’re in a list rather than a library, and ask a site owner to check your permissions.
Use this tutorial for a list. These settings don’t apply to document libraries. Users still need the underlying list rights to view, add, and edit items: these settings restrict access, rather than granting list membership. Microsoft: SecurityBits reference.
Decide who is an ordinary submitter and who must manage all requests. Step 4 explains why the user’s actual permissions matter as much as the two radio buttons.
1. Show Created By so you can check the ownership rule
- Open the list’s view menu, All Items in the example, and select Edit current view.
- In Columns, select the Display checkbox for Created By.
- Select OK, return to the list, and refresh if the column is not visible.
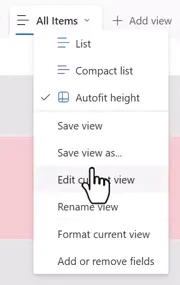
Open the view editor.
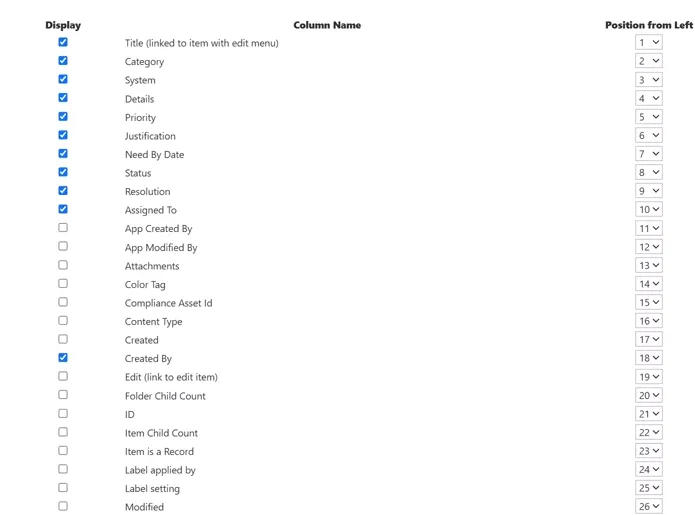
Created By is selected. You do not need to copy the sample’s column-position numbers.
All four sample rows show Travis under Created By. This field identifies the creator used by the setting. It is different from Assigned To or a custom Requester field. Microsoft: ReadSecurity reference.
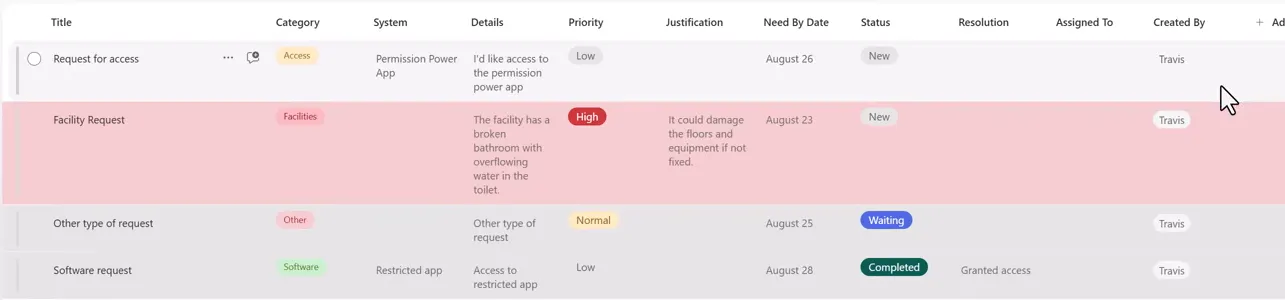
The sample list. With only one creator, an unchanged row count cannot prove separation between users.
Showing a column changes the view, not the access rules. Microsoft: view settings, Microsoft: views and existing access controls.
2. Understand why Created By = [Me] is only a view filter
A common first idea is a convenient personal filter. If All Items is your default view, first select Save view as on the view menu to make a copy such as My Requests, and add the filter to that copy, for the reason explained below:
- Reopen Edit current view and find Filter.
- Select Show items only when the following is true.
- Set Created By to is equal to and enter
[Me]. - Select OK.
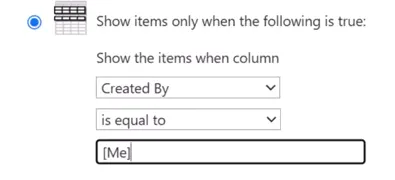
The final filter input. There is only one active condition.
The current user’s identity determines which rows this view displays. In this example, all four rows remain because Travis created them all. Microsoft: filter on the current user.
This is useful for a “My Requests” experience, but it does not revoke permission to other items. Another view or an item link can still expose data the user is allowed to access. Views change presentation, and existing access controls continue to apply. Microsoft: views and existing access controls.
The filter is optional for the access-control setup. A list’s default view is always a public view, so if All Items is your default, this filter changes it for everyone, including managers, who would then see only items they created. If you want this filter, add it to a separate view such as My Requests, and leave All Items unfiltered. Do not use it as evidence that another user’s data is secured. Microsoft: view settings.
3. Configure the two item-access settings
- Open the settings gear and select List settings.
- Under General Settings, select Advanced settings.
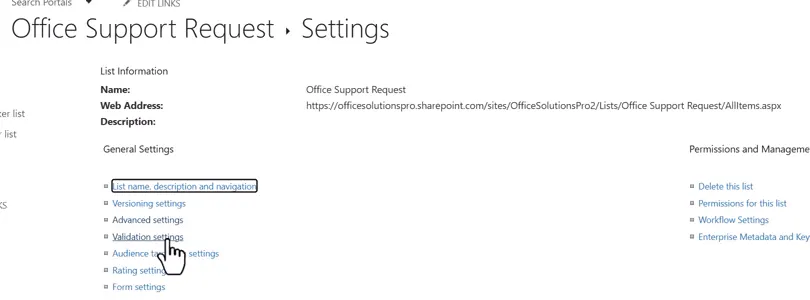
Advanced settings is under General Settings.
- In Item-level Permissions, choose these exact options:
| Setting | Select |
|---|---|
| Read access | Read items that were created by the user |
| Create and Edit access | Create items and edit items that were created by the user |
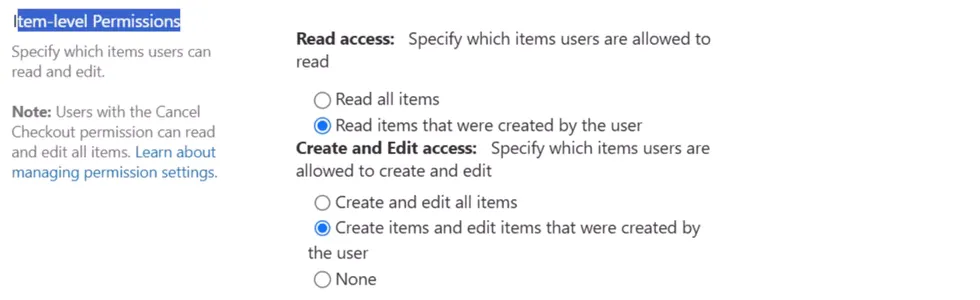
Both final selections are shown.
- Scroll to the bottom of Advanced Settings and select OK.
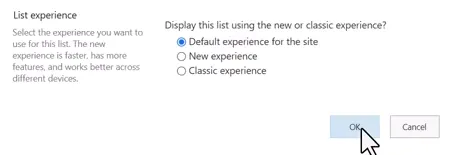
Select OK to save the settings.
These choices restrict ordinary users with sufficient underlying item rights to their own creations. Microsoft: ReadSecurity reference, Microsoft: WriteSecurity reference. Step 4 covers the exceptions.
This procedure changes the Advanced settings for the list only. It doesn’t break permission inheritance on the list or on individual items, change anyone’s permission level, or configure delete rights. Step 4 covers list permissions and delete rights.
These settings apply to whole items, not columns. They can’t hide one column or lock one column. A submitter who can edit their own item can change every editable column on it, including Status, Resolution, and Assigned To in the sample list. If those columns must stay under a manager’s control, these settings aren’t enough on their own.
4. Review elevated permissions before choosing submitters and managers
The Item-level Permissions options in step 3 and the list’s permissions do different jobs. The options in Advanced settings limit which items an ordinary user can read and edit. The list’s permissions decide what each person can do on the list, including whether they count as ordinary. You need both, so work through this step before you rely on step 3.
Members have Edit by default
Edit is the default level for a site’s Members group, and it’s the default in the Grant Permissions dialog. A list inherits its site’s permissions until you stop inheritance, so on a typical team site everyone in Members reaches this list with Edit. On a public modern team site, Members automatically includes Everyone except external users. Microsoft: permission levels.
That matters whatever the settings in step 3 do. Microsoft documents that Edit can add, edit, and delete lists, and its Manage Lists permission covers adding or removing columns and public views. So anyone who reaches this list through Members isn’t a restricted submitter, because they can change or delete the list itself.
To restrict them, work on this list. Microsoft’s guidance is to manage team site permissions through the connected Microsoft 365 group, and it describes breaking inheritance as supported but not recommended, so do this only because this list needs different access from the site. Microsoft: customize list permissions.
Prerequisite: give the list unique permissions first. While the list inherits, it uses the site’s grants, so you can’t change them for this list alone. The first step below gives the list its own copy of those grants. After that, you can lower Members on the list, including on a team site connected to a Microsoft 365 group. Private and shared channel sites are different, so if your list is on one, read the paragraph about them below before you start.
- Open List settings → Permissions for this list and select Stop Inheriting Permissions. After this, the list no longer inherits from the site. You can’t do this, or undo it, while the list has more than 100,000 items.
- Give anyone who must manage every request their own grant on this list, at a level the table below shows can read and edit all items. Anyone who has access only through Members loses Edit on this list in the next step. Use Grant Permissions, and open Show options to choose a level, because Edit is the default.
- Select the Members group, then do one of these:
- To keep Members as submitters, select Edit User Permissions, clear Edit and select Contribute. Adding Contribute isn’t enough: if Edit stays selected, the group keeps everything Edit allows, because levels combine.
- To remove Members from this list, select Remove User Permissions, then use Grant Permissions and Show options to give submitters Contribute, not the default Edit. Microsoft warns that removing permissions also removes them from child items, and they can’t be restored.
Lowering Members on the list changes the group’s grant, not its membership. Group membership decides who belongs to Members, and on a team site connected to a Microsoft 365 group, people in that group are in Members automatically. A grant decides what the group can do in one place. So the same people stay in Members, anyone added later gets whatever the group holds on this list, and the group keeps Edit on the site and on anything else that still inherits from it. Taking someone out of the group is a different change, because it affects their access across the site. Microsoft: team site permissions, Microsoft: permission levels.
Changing Members doesn’t change anyone’s other access. A person who also has access through another group or a direct grant keeps it, so check each person’s effective access as described below.
To undo stopping inheritance, select Delete unique permissions on Permissions for this list. That restores inheritance and removes every custom permission you set on the list. Microsoft: customize list permissions, Microsoft: customize site permissions.
Make these changes on this list, not on the site. Giving someone a role across the entire site is a broader decision. On team sites connected to a Microsoft 365 group, Microsoft says you can’t modify permissions for the default groups. That statement is in its steps for site permissions, so it isn’t a reason to skip this procedure: once the list has unique permissions, you can lower Members on the list. Microsoft: customize site permissions. On private and shared channel sites, site permissions are read-only in SharePoint and are managed in Teams, so check whether you can change Members on this list. Microsoft: team site permissions, Microsoft: Teams and SharePoint integration. On any site, if you can’t change Members on the list, treat that group as unrestricted and don’t rely on this design for its members.
Who can read and edit all items
The Item-level Permissions settings page says users with Cancel Checkout can read and edit all items. The closest right in Microsoft’s permissions table for Microsoft 365 is Override Check-Out. Microsoft’s permissions page for SharePoint Server, which doesn’t apply to Microsoft 365, lists Override List Behaviors instead and says it can override these settings. Microsoft describes Override Check-Out and Override List Behaviors in the same terms, as discarding or checking in a document checked out to another user, but it doesn’t say outright that they’re one right. Treat them as the same right when you check a permission level, and confirm what each level can reach in step 5. Microsoft: permission levels, Microsoft: SharePoint Server permission descriptions.
| Permission level | What to check for this design |
|---|---|
| Contribute | A starting point for submitters who need to create and edit items. Has neither Manage Lists nor Override Check-Out by default; verify their complete access and creator-only behavior |
| Edit | Has Manage Lists but not Override Check-Out by default; unsuitable as the restricted-submitter baseline, and don’t rely on it to show managers every item |
| Design | Has Override Check-Out by default; can read and edit all items |
| Full Control | All permissions, so it can read and edit all items; use only for people who need that authority |
| Approve, Manage Hierarchy | Levels found on publishing sites; both have Override Check-Out by default |
| Custom levels | Check for Override List Behaviors or Override Check-Out, not just the level’s name |
Check the actual rights in your tenant, including custom permission levels. Site admins, previously called site collection administrators, also fall outside these settings: they have Full Control and can reach any item in the site. If a Microsoft 365 group or team is connected to the site, its owners are automatically site admins. Microsoft: site admins.
Don’t rely on Edit to show every item
It isn’t clear whether Manage Lists on its own, and so default Edit, lets someone read and edit all items in SharePoint Online. A Microsoft schema reference for list definitions says it does, regardless of these settings. That reference is older, but it lists SharePoint Online. Microsoft’s protocol specifications say the same for on-premises SharePoint. The settings page names only Cancel Checkout, which default Edit doesn’t include. Microsoft: SecurityBits reference, Microsoft: ReadSecurity specification, Microsoft: WriteSecurity specification.
Plan for both outcomes. Don’t give Edit to submitters, because anyone with Edit can change or delete the list itself. Don’t rely on Edit to show managers every item. If anyone in your design keeps Edit, step 5 includes a row to record what they can reach in your tenant.
Check each person’s effective access
Effective access is what someone actually holds once every route is counted. Review inherited access, group membership, direct grants, and any items with unique permissions. Do not assume adding Contribute removes an existing elevated grant: when a group or person holds more than one level, they get the combined permissions of those levels. Microsoft: customize site permissions.
To see what a person holds:
- Select Settings → Site permissions. If the side panel opens, select Advanced permissions settings.
- In the ribbon, select Check Permissions.
- In User/Group, enter the person’s name and select Check Now.
- Review the permissions they have, and check any related security group.
Microsoft’s steps start from the site, so someone in Members can still show Edit there after you lower the group on this list. If this list has its own permissions, also review the grants on Permissions for this list. This check shows the person’s permissions. It doesn’t test the settings in step 3, so you still need step 5. Microsoft: Check Permissions steps.
Delete rights
Contribute includes Delete Items, so submitters at the usual starting level hold that permission. The settings in step 3 cover reading, creating, and editing. They say nothing about deleting. So don’t assume the creator-only edit setting also limits what a person can delete, or that it doesn’t. Check it with the delete rows in step 5. Microsoft: permission levels.
If submitters must not delete their requests, one documented way to build that level is to copy Contribute on the top-level site of the site collection, remove Delete Items from the copy, and grant the copy on this list in place of Contribute. If Contribute is already selected, clear it, because levels combine. The new level is then available across the site collection. Microsoft advises against editing the default levels, because changes affect the whole site collection. Test the result in step 5. Microsoft: create and edit permission levels.
5. Test with separate users and an unfiltered view
After you save the settings in step 3, an account that created every item still sees every item. In this example, the same four rows return, the Created By: [Me] filter is still active, and all rows belong to the signed-in creator.
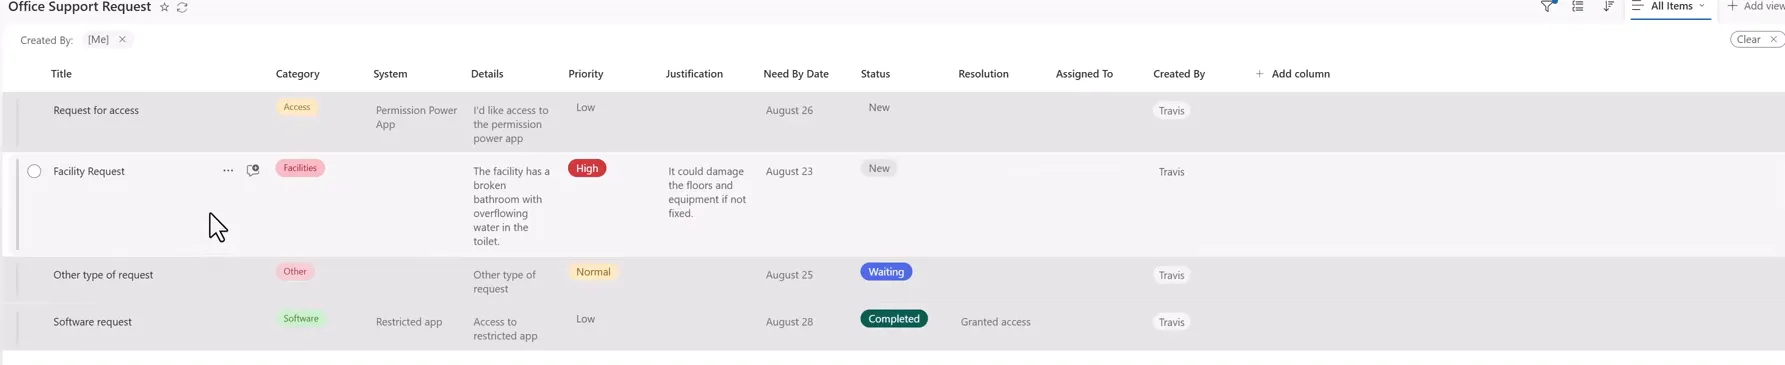
The same account after saving. This is not a multi-user security test.
One account can’t show another person being blocked, so this result proves nothing about separation. If you filtered All Items in step 2, remove the filter before testing.
Use accounts that match the people you’re testing for:
- Two ordinary test users, A and B. Each should hold Contribute on this list, or the custom level you chose, and nothing higher. Don’t use a site owner, or an account that still reaches this list with Edit through Members. A result from those accounts tells you nothing about a Contribute submitter.
- The intended manager account, at the level you plan to give managers.
Use separate signed-in browser profiles. Confirm their actual rights with Check Permissions from step 4, and on Permissions for this list confirm that neither they nor any group they belong to shows Edit. Create a test item directly in the list as each user, then check Created By.
| Test | Expected result for the intended setup |
|---|---|
| A opens a view without a creator filter | A sees A’s item and not B’s item |
| B opens the same unfiltered view | B sees B’s item and not A’s item |
| A opens B’s known item link | A cannot read or edit B’s item |
| A opens and edits A’s item | Allowed when A has the necessary underlying rights |
| A deletes A’s item | Not documented. Record what happens |
| A tries to delete B’s item from its known link | Not documented. Record what happens, including whether A can open it at all |
| A shares A’s item with B, then B opens it | Not documented. Microsoft’s permission levels page says sharing an item breaks its inheritance, but not how that interacts with these settings. Record what happens |
| Manager opens the unfiltered list | A manager with Design or Full Control can read and update both test items |
| Anyone who keeps Edit opens the unfiltered list | Not certain (see Don’t rely on Edit to show every item in step 4). Record which items they can read and edit |
These are checks to perform in your tenant. Where a row states a result, it describes what the settings are meant to do, not a guarantee. If a submitter can see another user’s item, inspect the effective permissions and item exceptions before accepting the setup.
The built-in rule is based on who created the item. If records are imported or created through automation, inspect their actual Created By values instead of assuming the employee named in another field owns them for this rule. Access based on Assigned To, a department, or an approval role requires a separate design, which this tutorial doesn’t build.
6. Check what this setting doesn’t cover
These settings control what people can read and edit in the list. They aren’t a complete data-protection boundary, so don’t rely on them alone for confidential or regulated data.
- Reports: A Power BI semantic model shows what the connecting account can see in the list. If a list owner makes the connection, the model can include every item, and that model can be shared with other people. Microsoft: Power BI and SharePoint lists.
- Flows: A flow that someone runs uses the connections defined in it, unless a connection is set to Provided by run-only user. A flow using an owner’s connection can reach what that owner can see, including items a submitter can’t, and can put them in an email, a file, or a message. Microsoft also says SharePoint users must have Edit permission, or be in Members or Owners, to run flows in SharePoint, so check any flow submitters start from the list before you move them to Contribute. Microsoft: flow sharing permissions, Microsoft: share a cloud flow.
- Exports: Export covers the items shown in the current view, so a manager’s export can include everyone’s items. A CSV file isn’t connected to the list, and an Excel export has only a one-way connection. Treat any export as a copy you must protect yourself. Microsoft: export to Excel.
- Attachments, search, and Copilot: Don’t assume these settings limit attachments, files in Image columns, Microsoft Search, or Copilot. Microsoft’s documentation doesn’t say how the settings apply to these.
Companion video
Video: SharePoint List Permissions: Users See Only Their Own Items. Published September 21, 2026.
If the player is blocked on your network, open the video on YouTube.
Need help applying this to your own setup? Read about consulting.