 Office Solutions Pro
Create SharePoint list approvals without building a flow
Turn on built-in SharePoint list approvals, send an item for review, and track the decision, with no custom flow.
On this page
- Overview
- Before you begin
- 1. Open the list’s approval settings
- 2. Enable approvals for the list
- 3. Understand the optional default-approver settings
- 4. Select an item and request approval
- 5. Approver: review the request in Teams
- 6. Approver: approve the request in SharePoint
- 7. Confirm the result in both interfaces
- Behavior to plan for
- Limits of this tutorial
SharePoint’s built-in approvals let you select a list item, choose an approver, and submit it for a decision. The approver can review the request in Microsoft Teams or open its approval details in SharePoint. The list then shows the result in a dedicated Approval status column.
This tutorial is written for site owners who set up approvals on a list. Steps 1 to 3 are the site owner’s setup. Step 4 is what a requester does. Steps 5 and 6, marked Approver, are what the person making the decision does. Step 7 confirms the result.
This tutorial uses an existing list called Office Support Request and its Request for access item. You do not need to reproduce the list’s custom form, formatting, or request-number columns to understand the approval procedure.
Before you begin
Have an existing SharePoint list with an item to review, access to its approval configuration, and an approver account that can use the Approvals app in Teams. This example uses a commercial Microsoft 365 tenant, SharePoint in a browser, and Teams on the web.
Menus and availability can differ between tenants. Some interfaces may place the approval entry under Automate rather than Integrate, and administrator settings may affect what is available. If the entry is missing, check with your Microsoft 365 administrator before following this procedure.
What to confirm first
- Item access: Grant the reviewer access before submitting; assigning an approval does not share the item. Microsoft: approvals user experience.
- Teams setup and licensing: Have your administrator confirm the Approvals app is available and the account has the required Power Automate entitlement. The administrator role in Microsoft’s prerequisites is for deploying the app, not something every approver needs. Microsoft: Approvals app prerequisites.
- Approver role: Microsoft says approvers need the Approvals User role for their responses to be processed and kept in their history. It’s normally assigned automatically, but not when the AllowAdHocSubscriptions setting is disabled, when a security group controls access to the environment, or under Power Automate US Government plans. That guidance is written for approval flows, so if any of these apply to you, send a test request to a real approver account first and check whether their response is recorded. Microsoft: assign approvals to any user.
- Cloud availability: GCC, GCC High, and DoD may not match commercial Microsoft 365 or each other, so confirm that Approvals appears on your list’s menu and that the Teams Approvals app is available before you plan around this feature. Microsoft’s list approvals guide doesn’t name any clouds. For GCC, Microsoft’s rollout notice for library approvals, which it calls an extension of its list approvals notice, includes that cloud. For GCC High and DoD, the published information conflicts: Microsoft’s Approvals admin page says the app hasn’t been released to those clouds, while Microsoft’s 2025 public sector roadmap newsletters announced it for both. None of this settles whether list approvals work in your cloud, so go by what your tenant shows. Microsoft: November 2024 newsletter, manage the Approvals app, January 2025 newsletter, March 2025 newsletter.
You don’t build a flow in this tutorial, but list approvals still depend on the Teams Approvals app and its licensing. To use the app, Microsoft says you need a license for Power Automate, and it lists a Power Automate, Microsoft 365, or Dynamics 365 license among the prerequisites for deploying the app. Microsoft: Approvals app prerequisites. For approval flows, which use a standard connector, qualifying Office 365 and Dynamics 365 licenses include the rights to use that connector, so a separate Premium purchase may not be necessary. Microsoft: license to create flows. That guidance covers the app and approval flows rather than list approvals specifically, so have your administrator confirm that requesters and approvers are covered. A guest assigned to an approval needs a valid Power Automate license, per user or Microsoft 365-based, to view or respond. Microsoft: approvals known issues with guest users.
Microsoft’s list approvals guide doesn’t name a minimum role for this setup, so plan for a site owner to do it. If you aren’t one, use an account authorized to manage this list, or ask a site owner to do it.
1. Open the list’s approval settings
Open your SharePoint list. On its command bar, select Integrate, then Approvals.
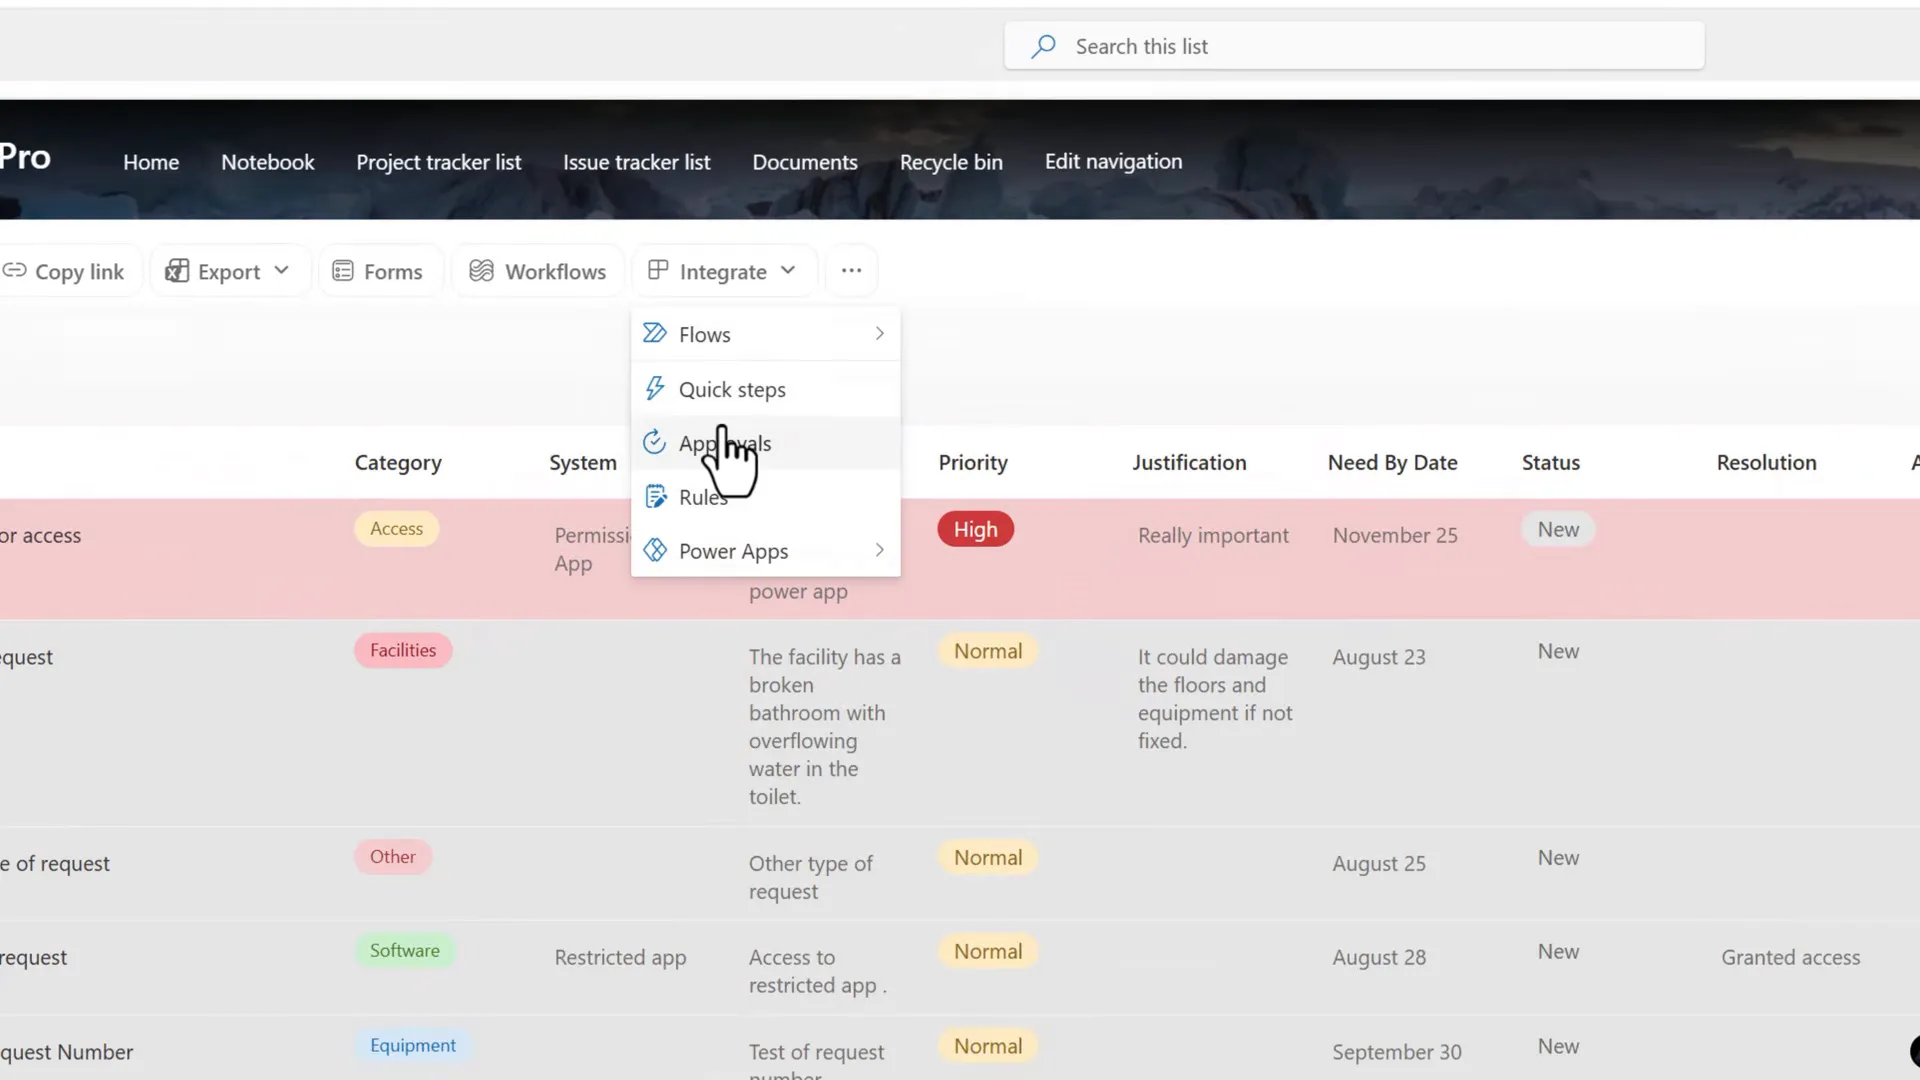
Built-in Approvals opens from the Integrate menu.
This opens Configure Approvals. The separate Workflows command visible nearby is not used in this tutorial.
2. Enable approvals for the list
Turn on Enable Approvals. For a simple setup, leave Enable default approvers off.
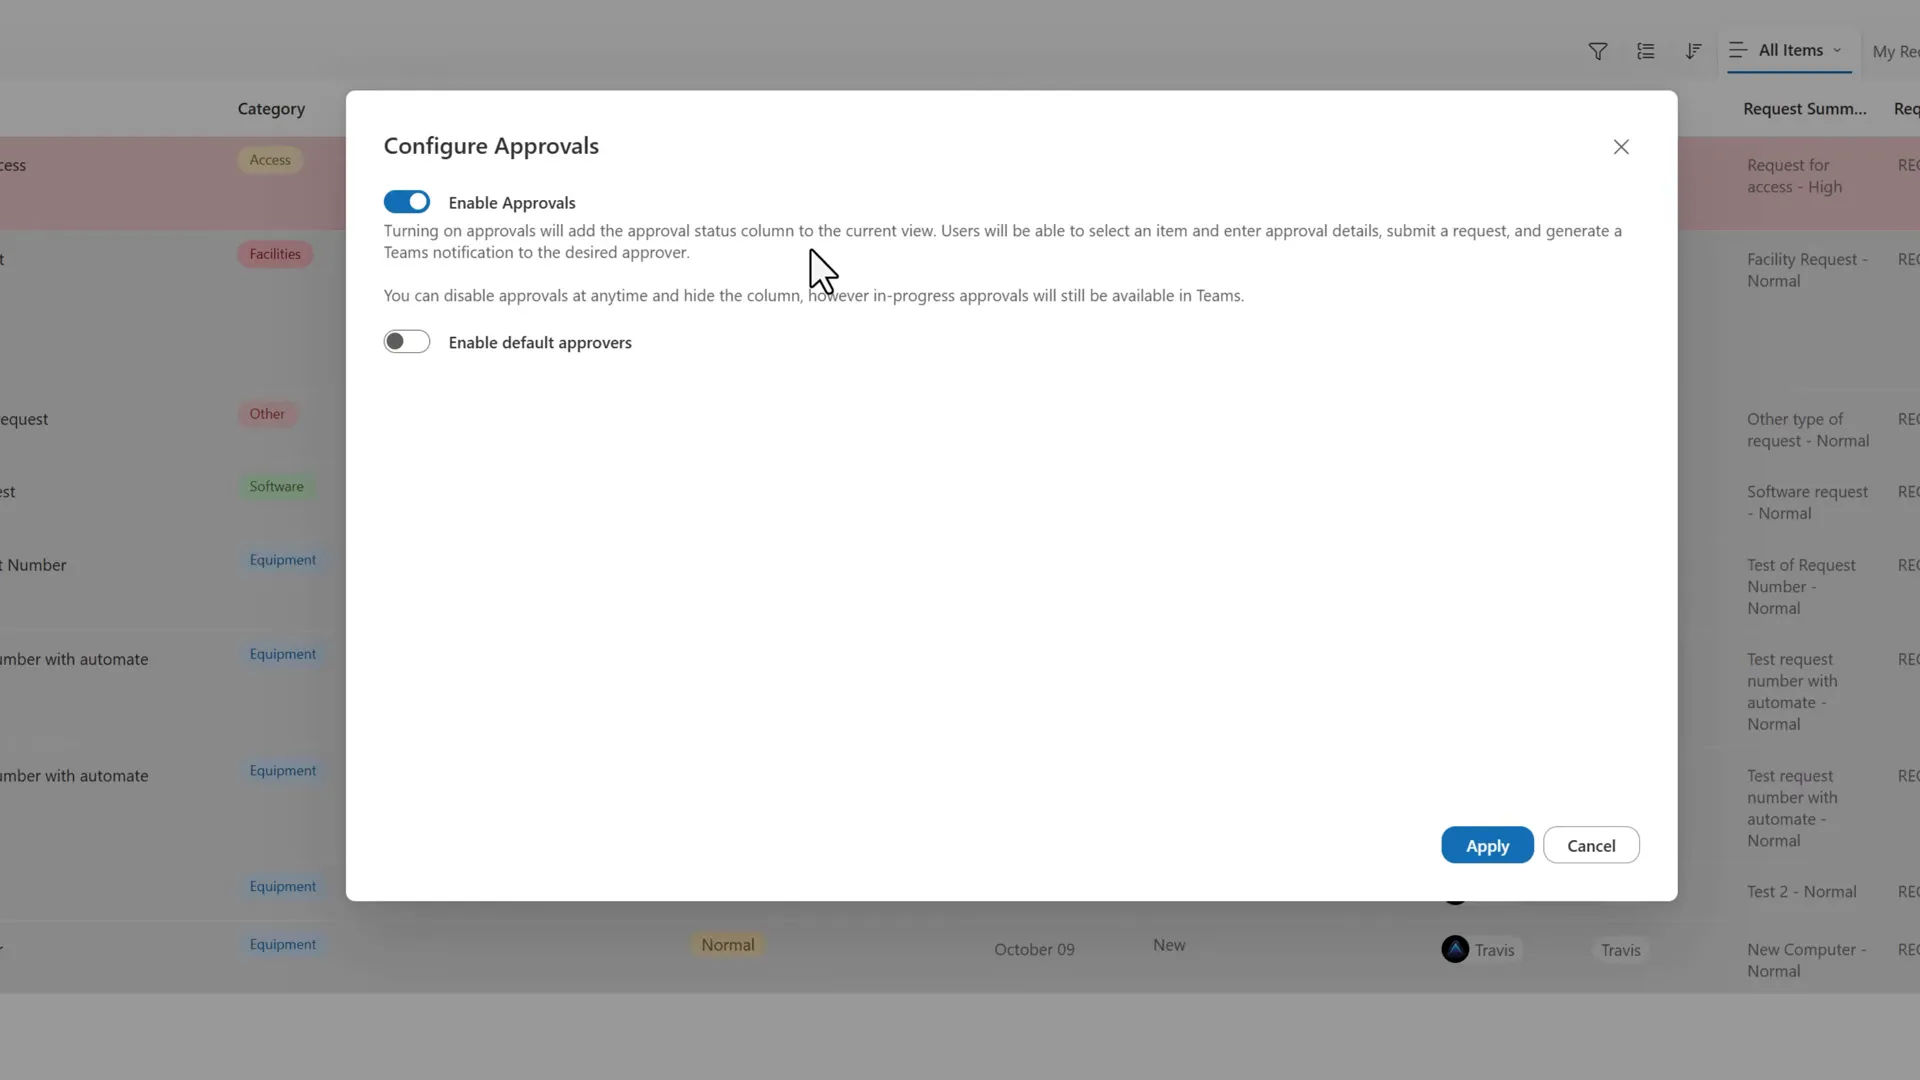
The basic configuration lets the requester choose an approver for each submission.
Enabling approvals adds Approval status to the current view. This is separate from any existing Status column your list already uses.
Keep the dialog open while you review the optional settings in the next step. Save the final configuration with Apply at the end of that step.
3. Understand the optional default-approver settings
If requests normally go to the same people, turn on Enable default approvers and enter them under Default approver(s). With defaults off, the requester selects the recipient when submitting each request.
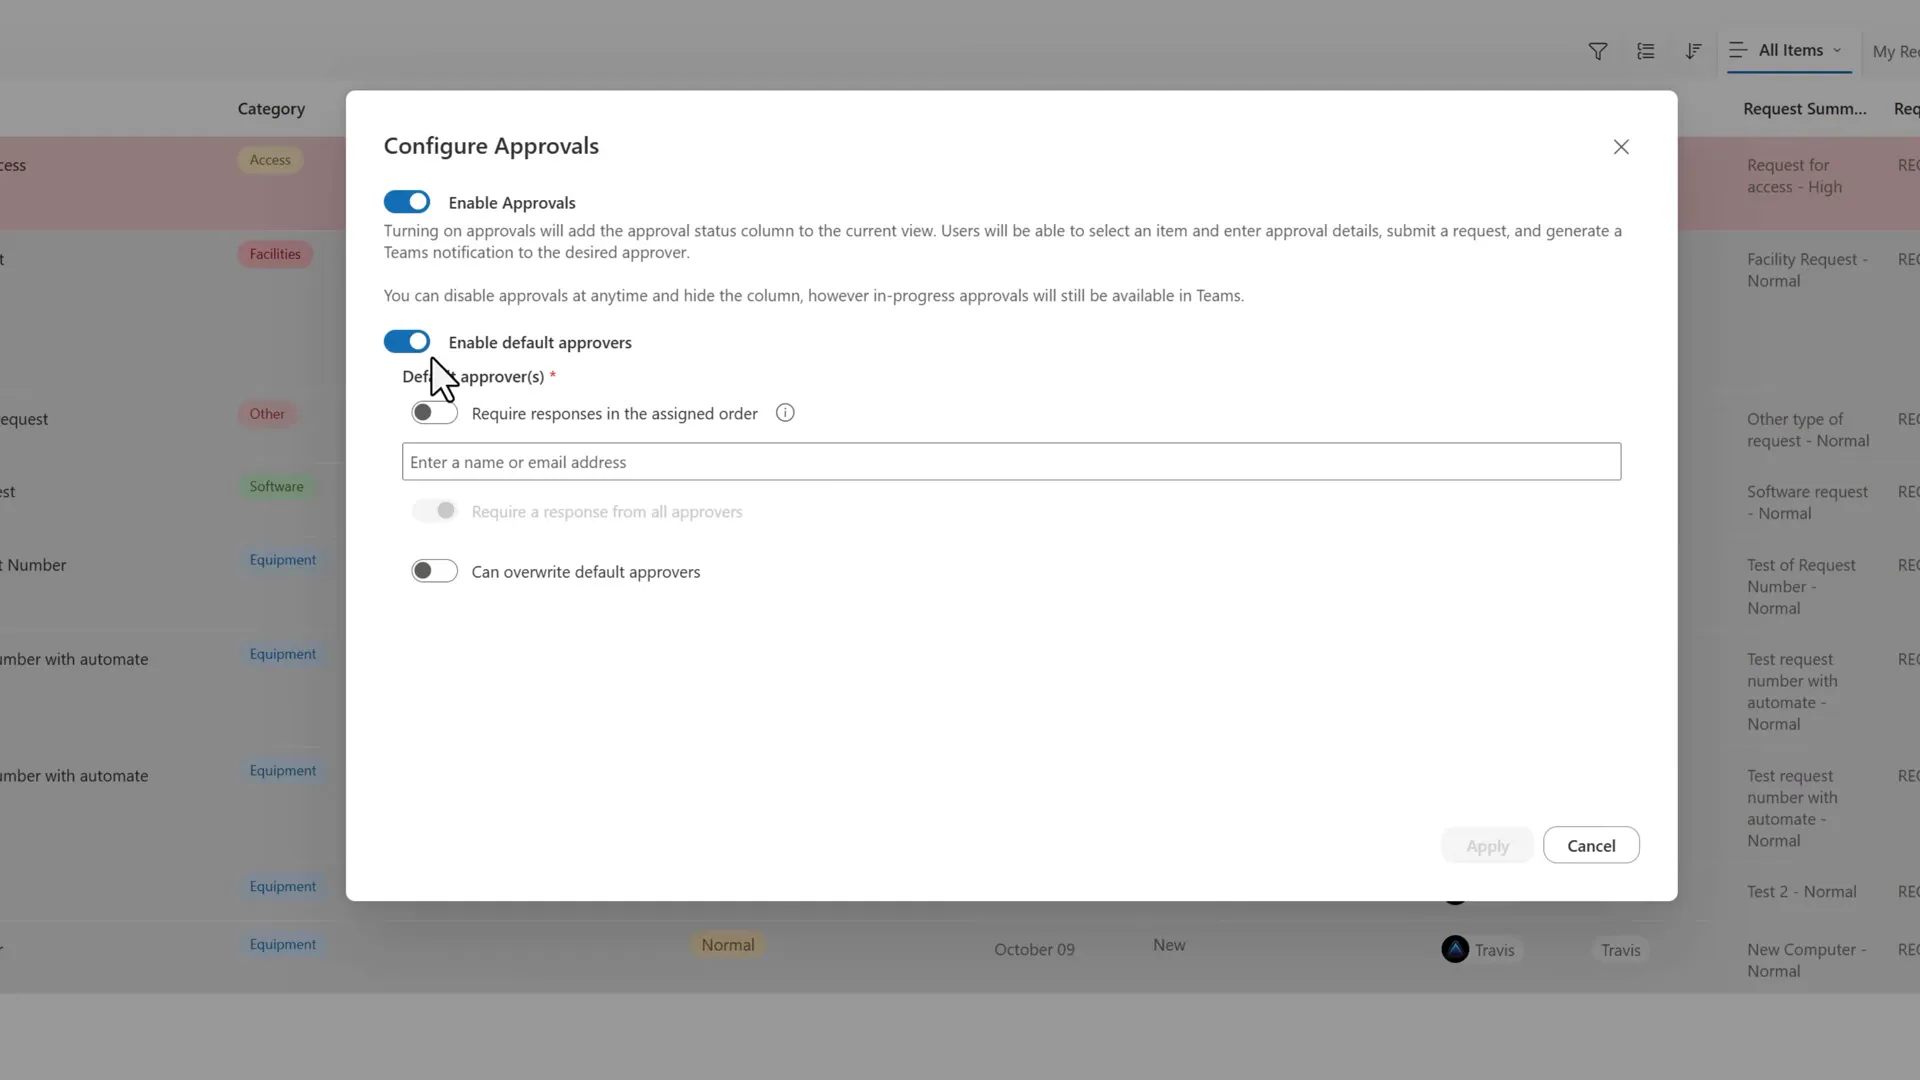
The default-approver panel before recipients are entered.
The dialog also exposes these options:
- Require responses in the assigned order displays numbered recipient positions. Use Add additional recipient to add another position.
- Can overwrite default approvers controls whether users with lower permission on the list can replace the configured approvers.
- Require a response from all approvers appears when assigned order is off. It’s unavailable in these screenshots, which have no more than one approver entered.
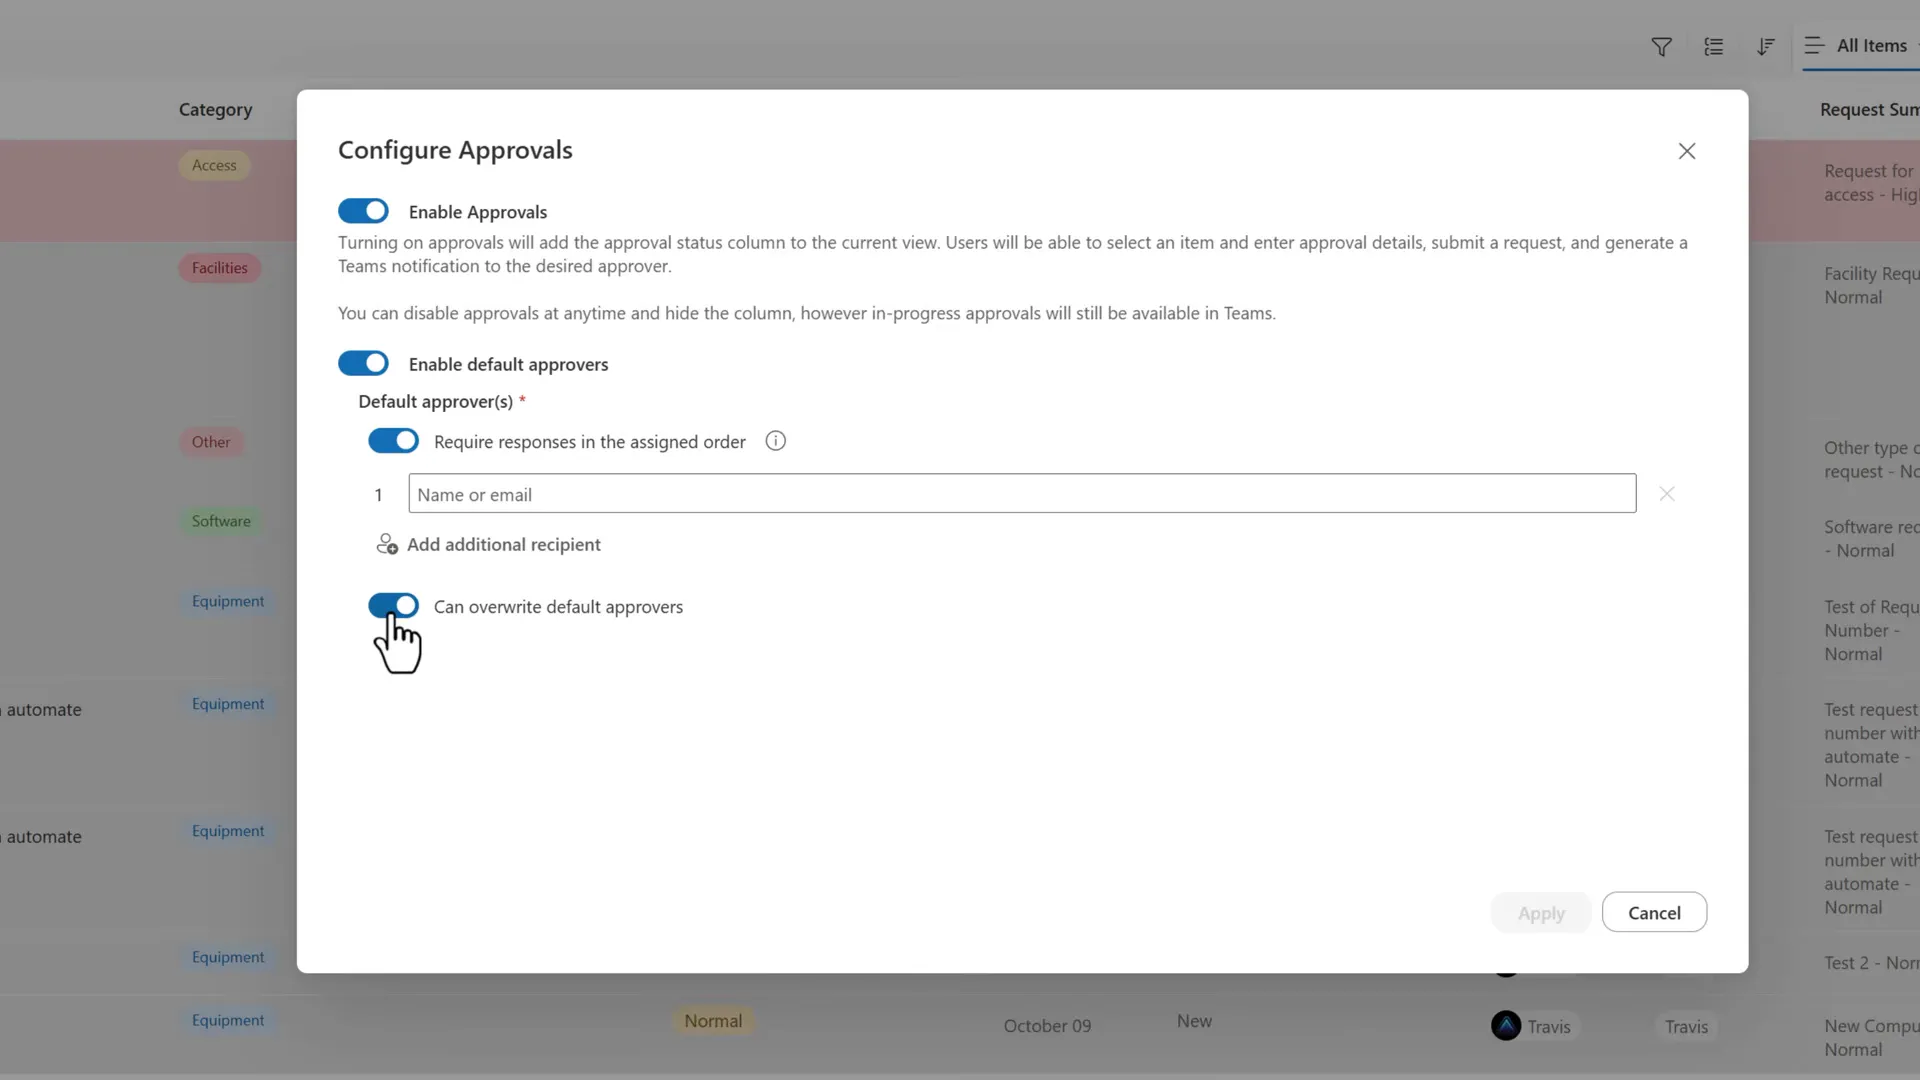
These options are switched on here to show them. The example that follows turns defaults off.
Multiple approvers: By default, Microsoft considers a request granted if any approver approves it. Enable Require a response from all approvers when everyone must respond. Microsoft: create a modern approval request. Don’t assume what happens with assigned order, or when one of several approvers rejects a request, because Microsoft’s list approvals guide covers neither. Before you rely on assigned order or on Require a response from all approvers, send a test request to real accounts. Check whether the all-approvers toggle is on once you’ve entered several approvers, who is notified and when, and what Approval status shows after each response, including a rejection.
To follow the completed example, leave Enable Approvals on, turn Enable default approvers off, and select Apply.
4. Select an item and request approval
With approvals set up, this step is what a requester does. Select the row you want reviewed using its selection circle. The command bar displays Request Approval. Select it to open the Request approval dialog.
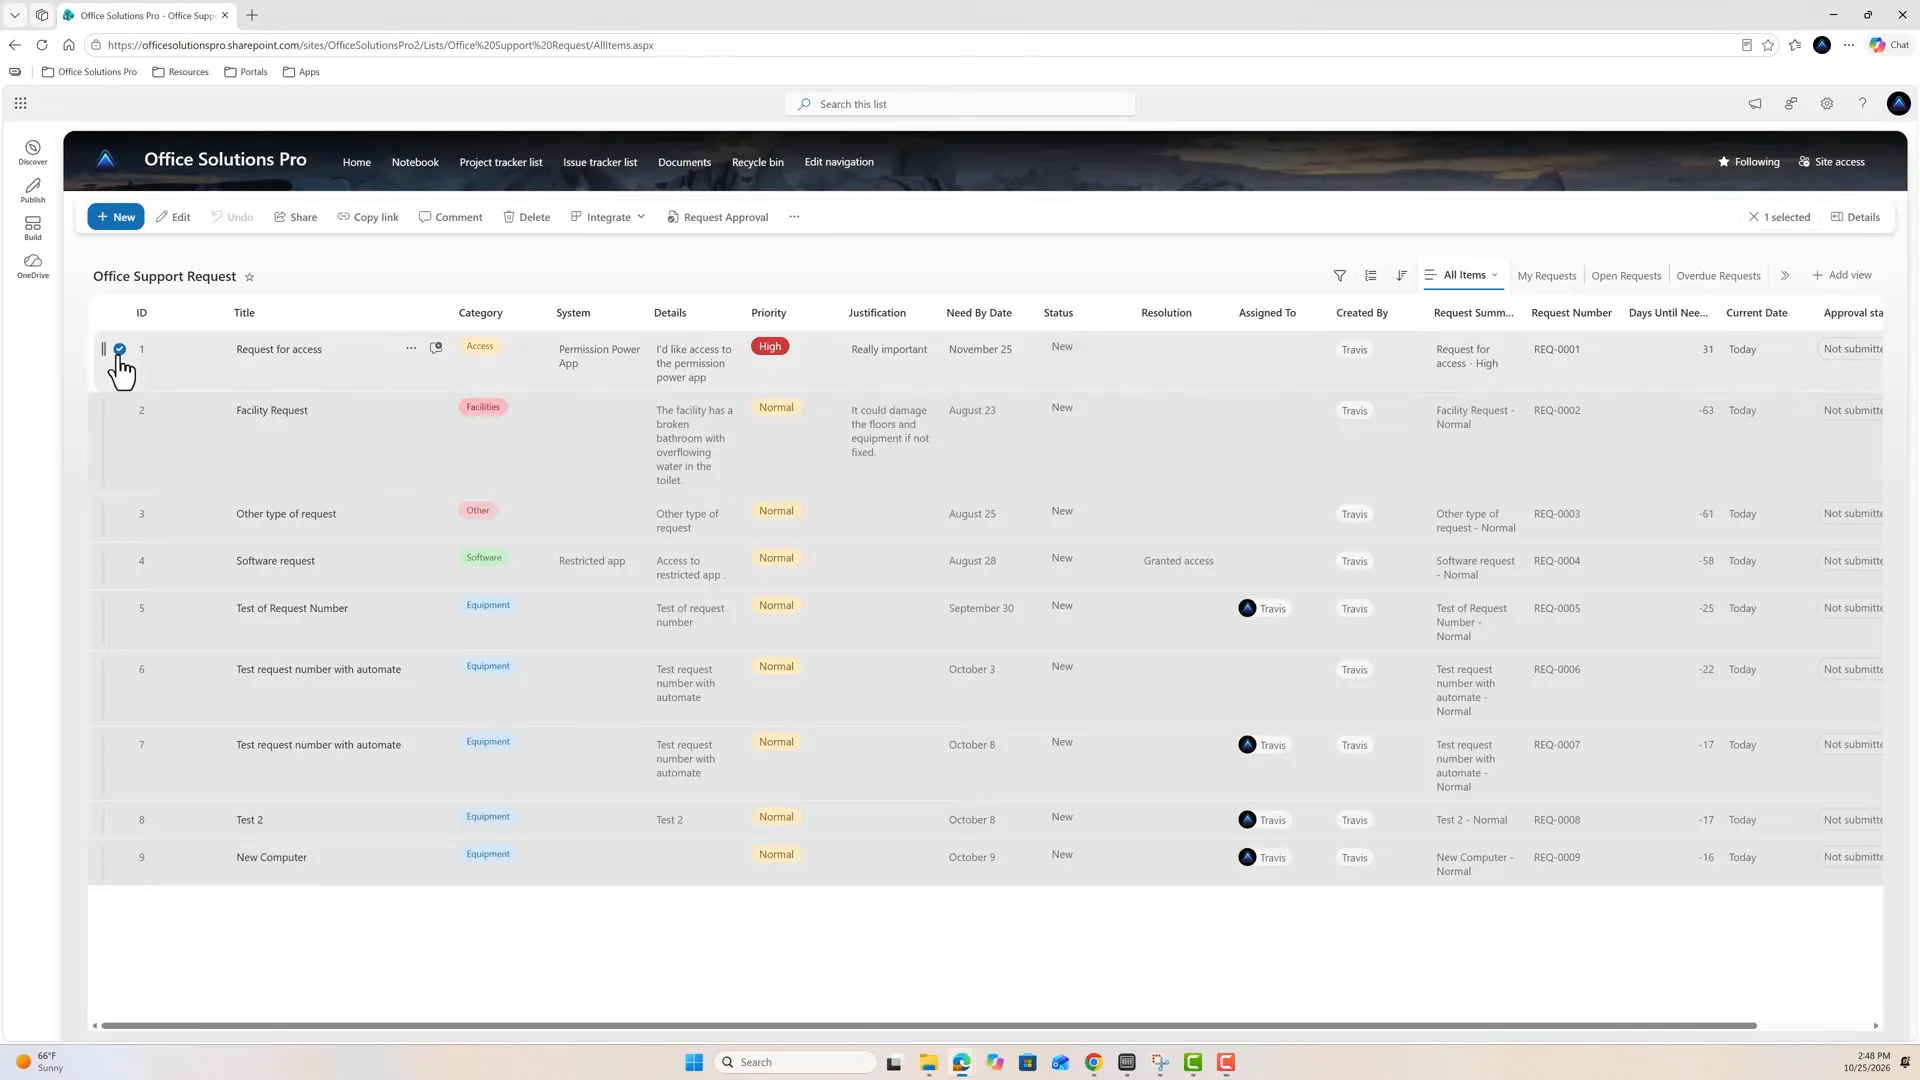
Before submission, the selected item’s Approval status is Not submitted.
Complete the request:
- Review Name, which initially comes from the item’s title. The example changes it to Request for access Approval Requested.
- Enter a person in Approver(s) and choose the matching account. The example uses one account for both roles.
- Leave Require responses in the assigned order off for this single-person example.
- Enter context in Details. This example uses Request approval.
- Select Submit and allow a few seconds for the request to be created.
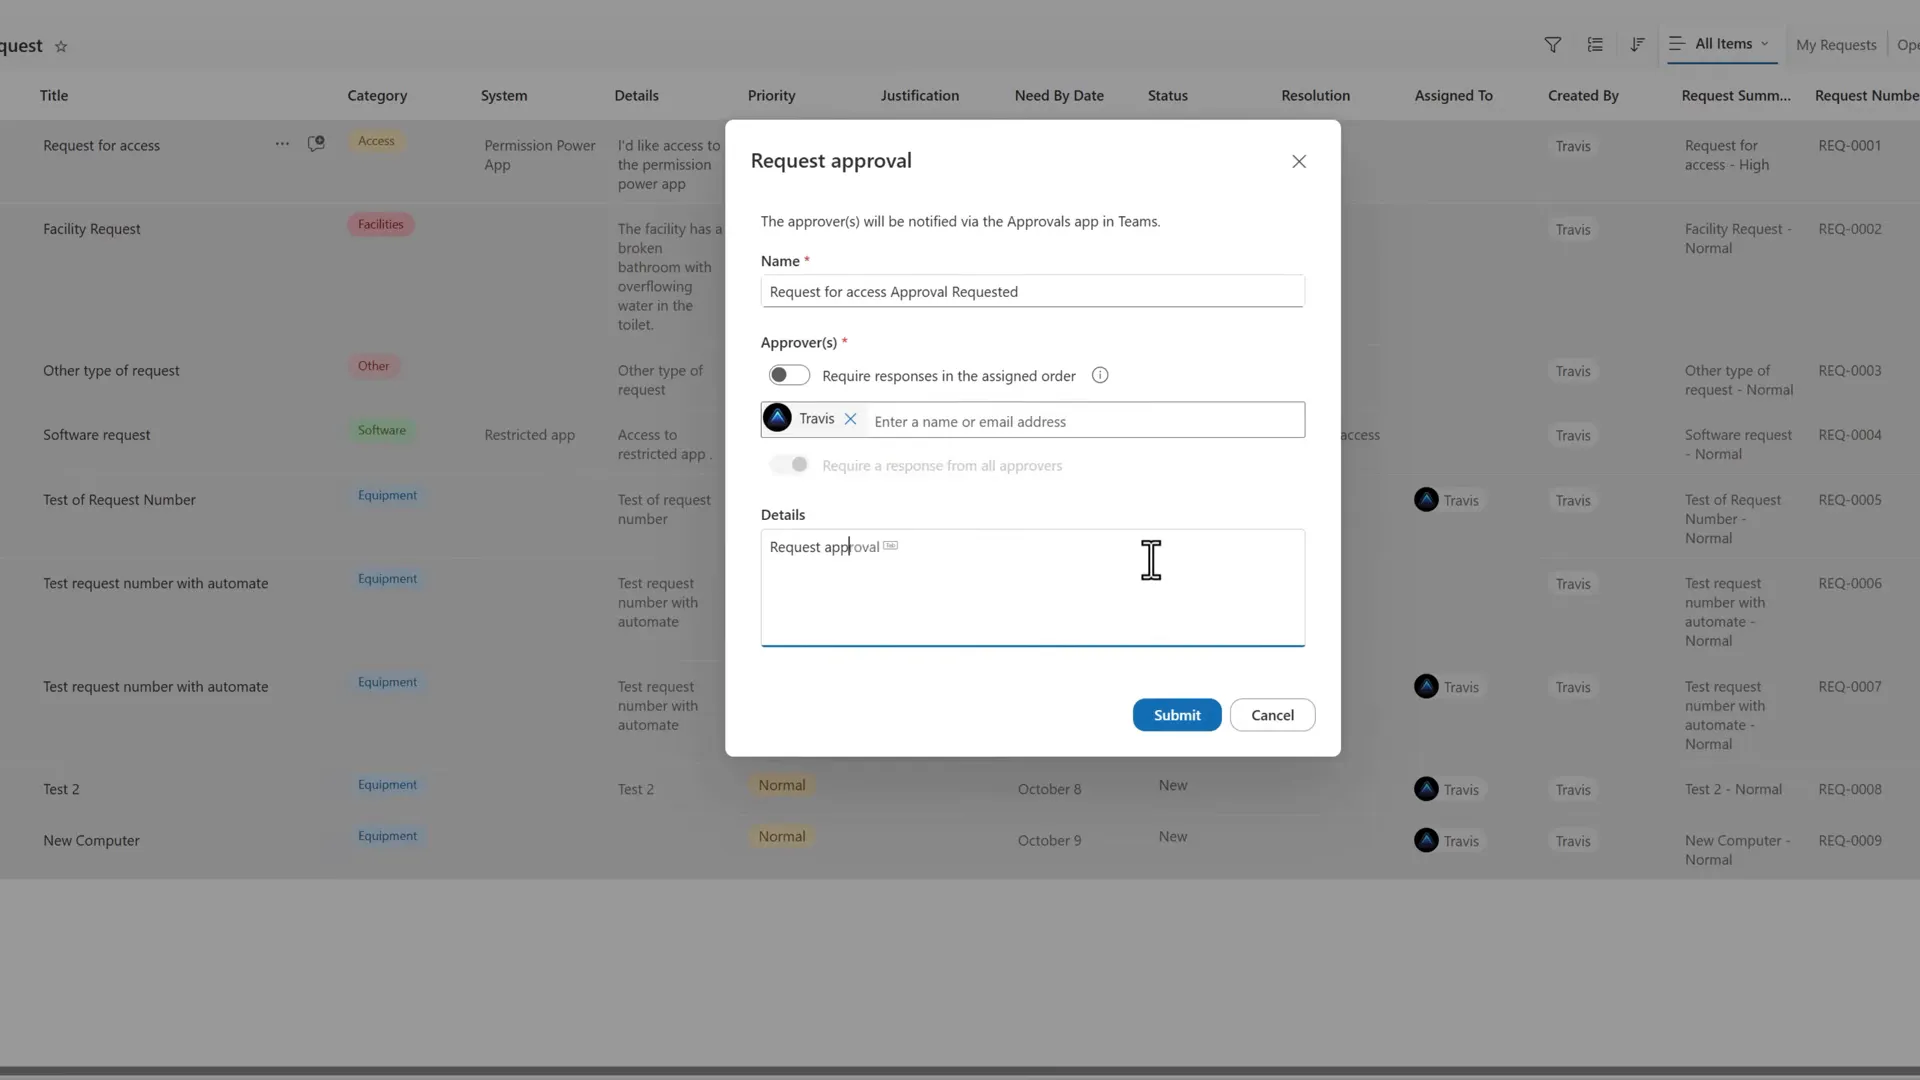
The completed submission form.
The dialog states that approvers will be notified through the Approvals app in Teams. In this tutorial, creating or saving a list item doesn’t submit it: you select Request Approval and Submit.
If an approver isn’t notified, ask your Teams administrator to check that the Approvals app is available to them, then have the approver look under Received in the Approvals app. An approver with access to the item can also open Approval Details from the list. If you also need email, Microsoft’s approval workflows announcement suggests a list rule on Approval status or Power Automate.
5. Approver: review the request in Teams
As the approver, open Activity in Teams and select the approval notification. The request opens with its name, details, a link to the SharePoint item under Attachments, and a pending response in the activity history.
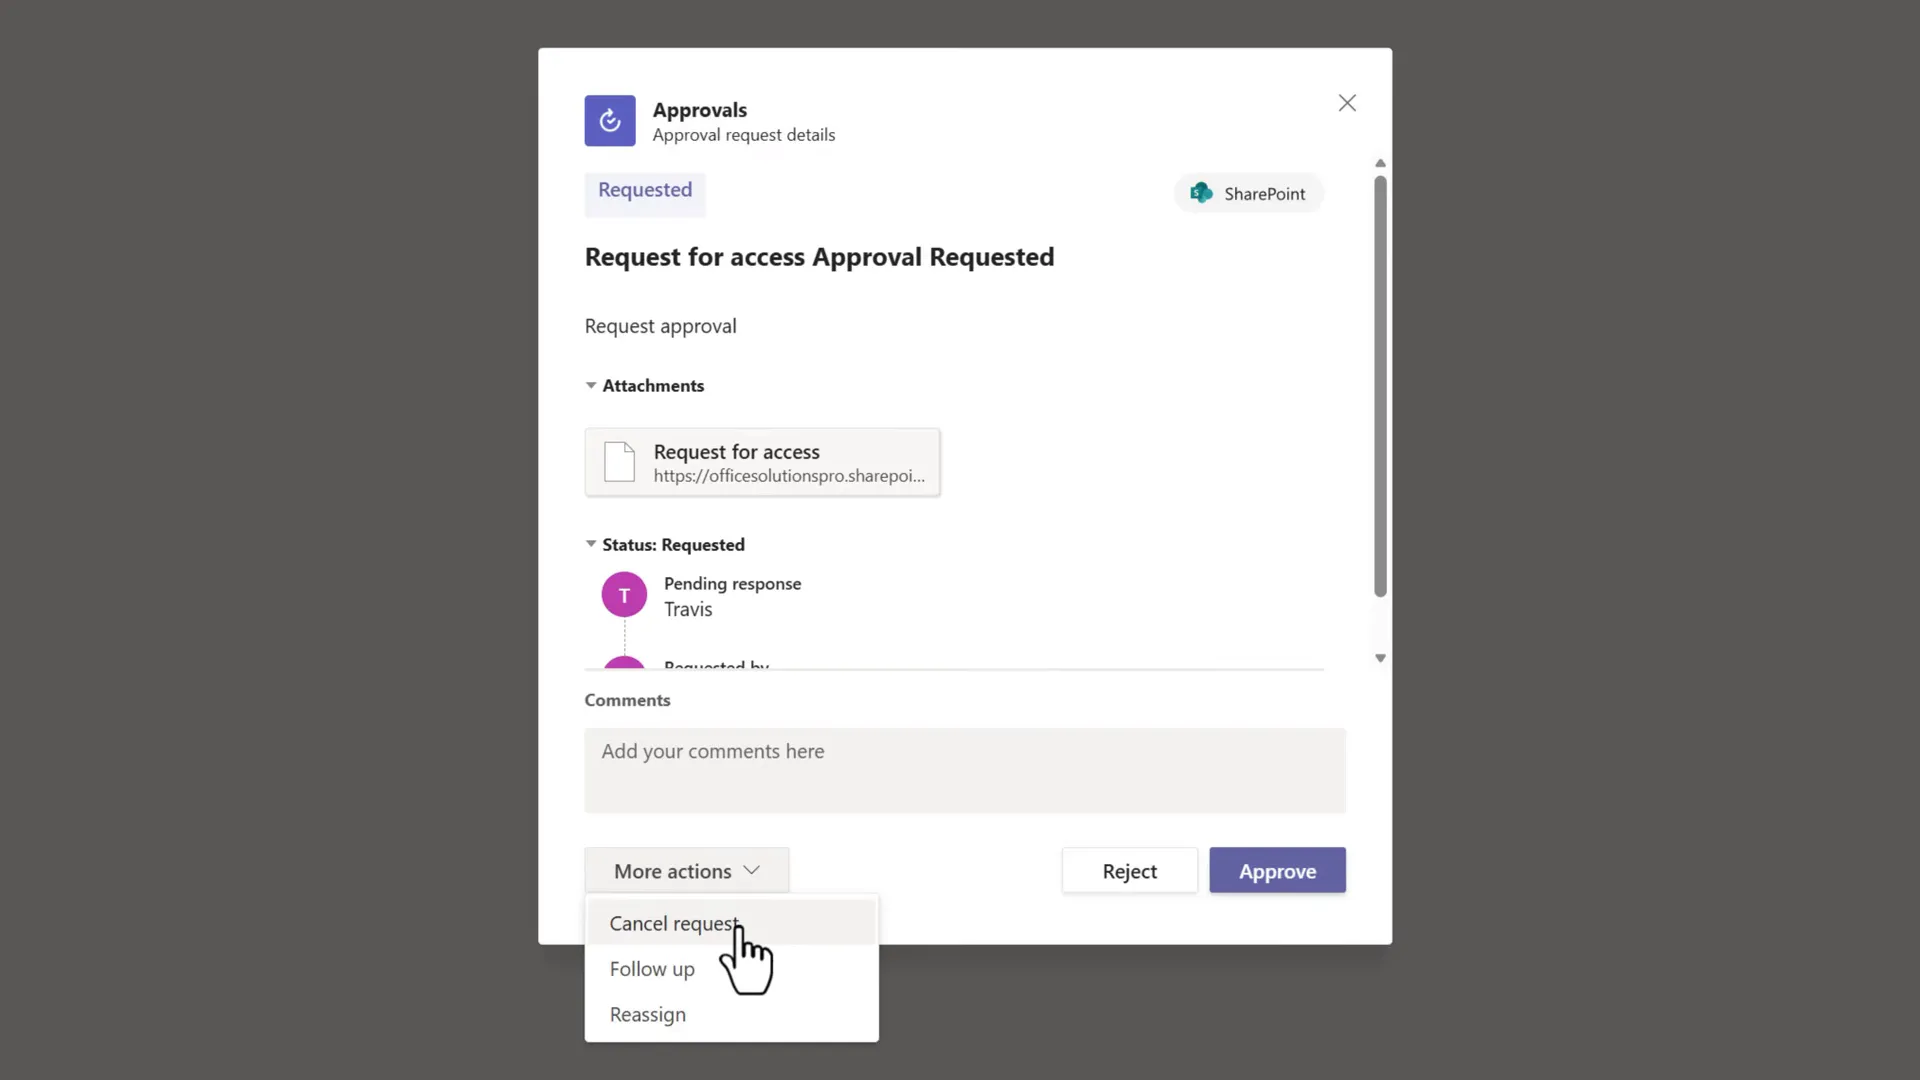
Teams displays the pending request and available actions.
The card offers Comments, Approve, and Reject. In this example, one account is both requester and approver, and its More actions menu shows Cancel request, Follow up, and Reassign. Microsoft documents Cancel request for the requester, so your menu may differ. Microsoft: respond to an approval request.
You can also approve or reject from this card. This example returns to SharePoint for the decision, so step 6 shows that route.
6. Approver: approve the request in SharePoint
Return to the list and select the submitted item. Its Approval status now reads Requested, and the command bar offers Approval Details.
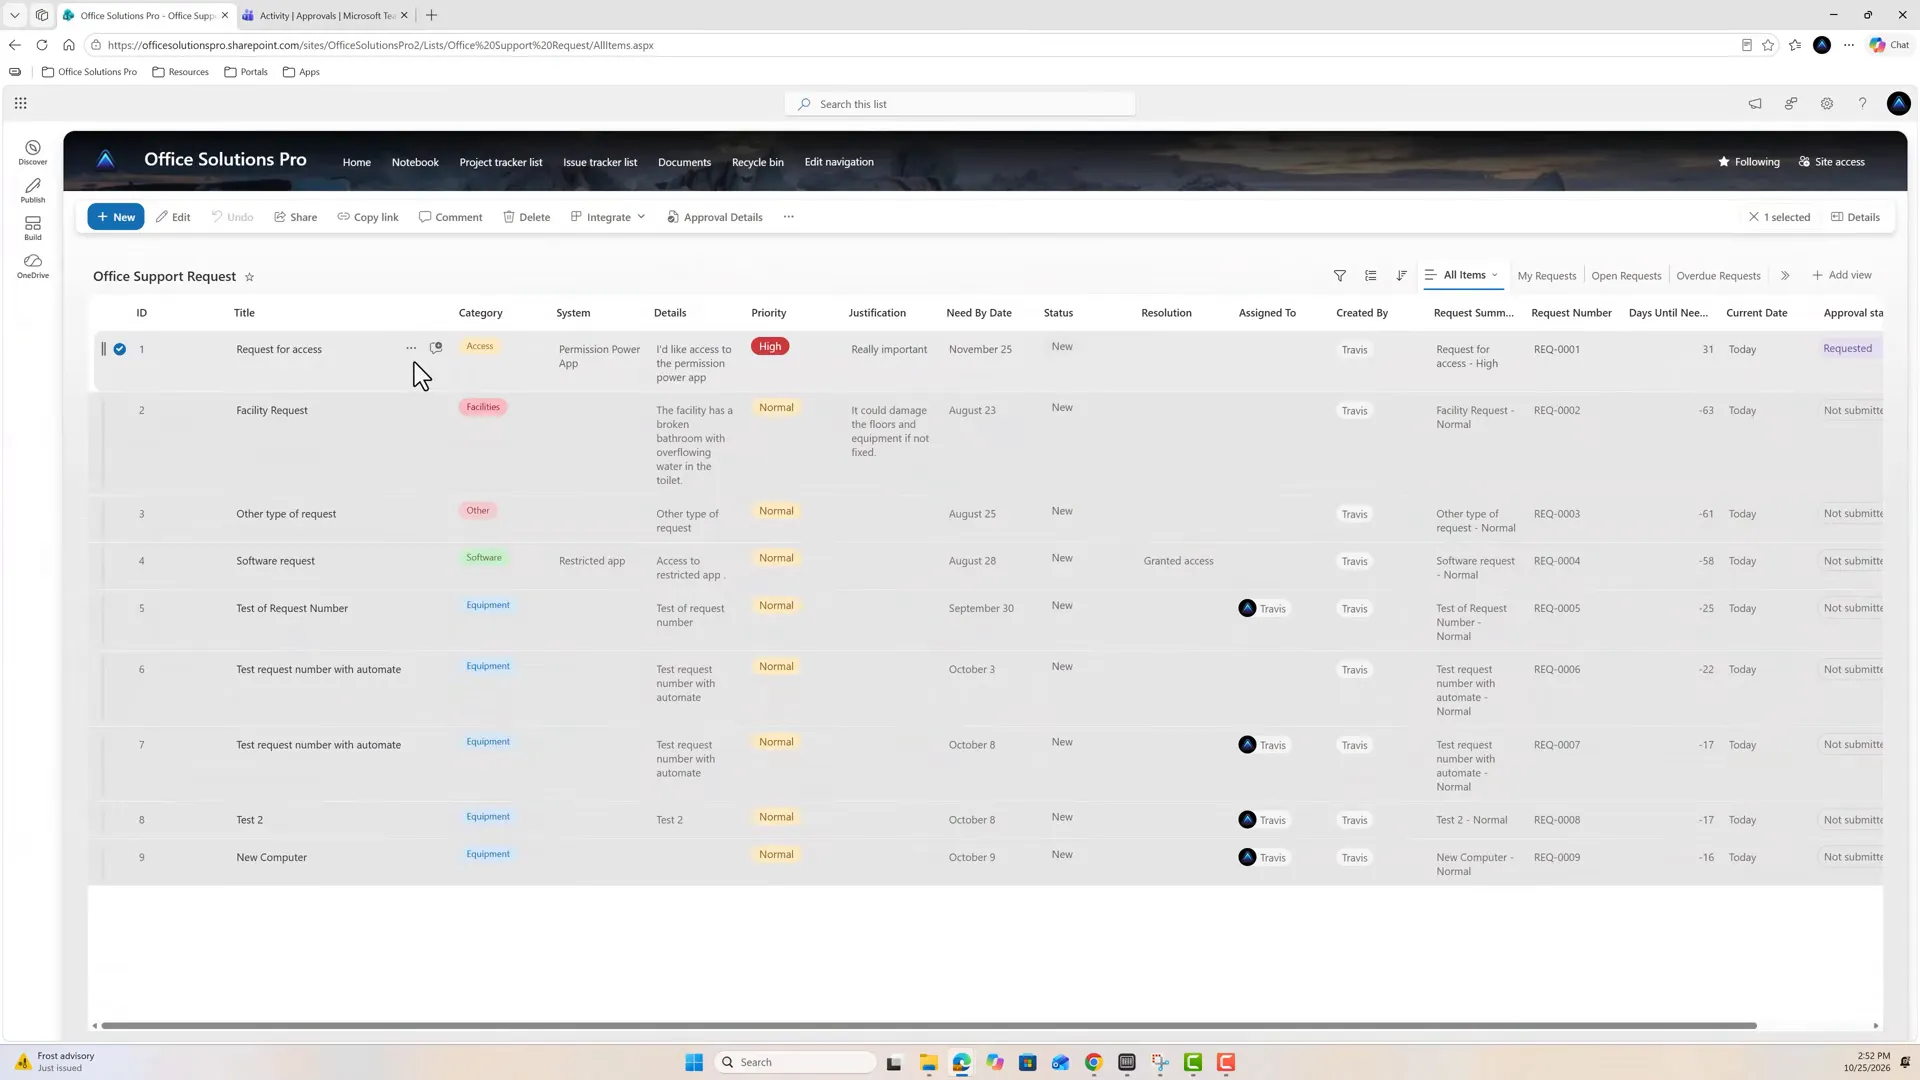
The submitted request before a decision.
Select Approval Details. In Approval request details, review the request and its Approval activity. Enter a comment under Comments—the example uses Approved—then select Approve.
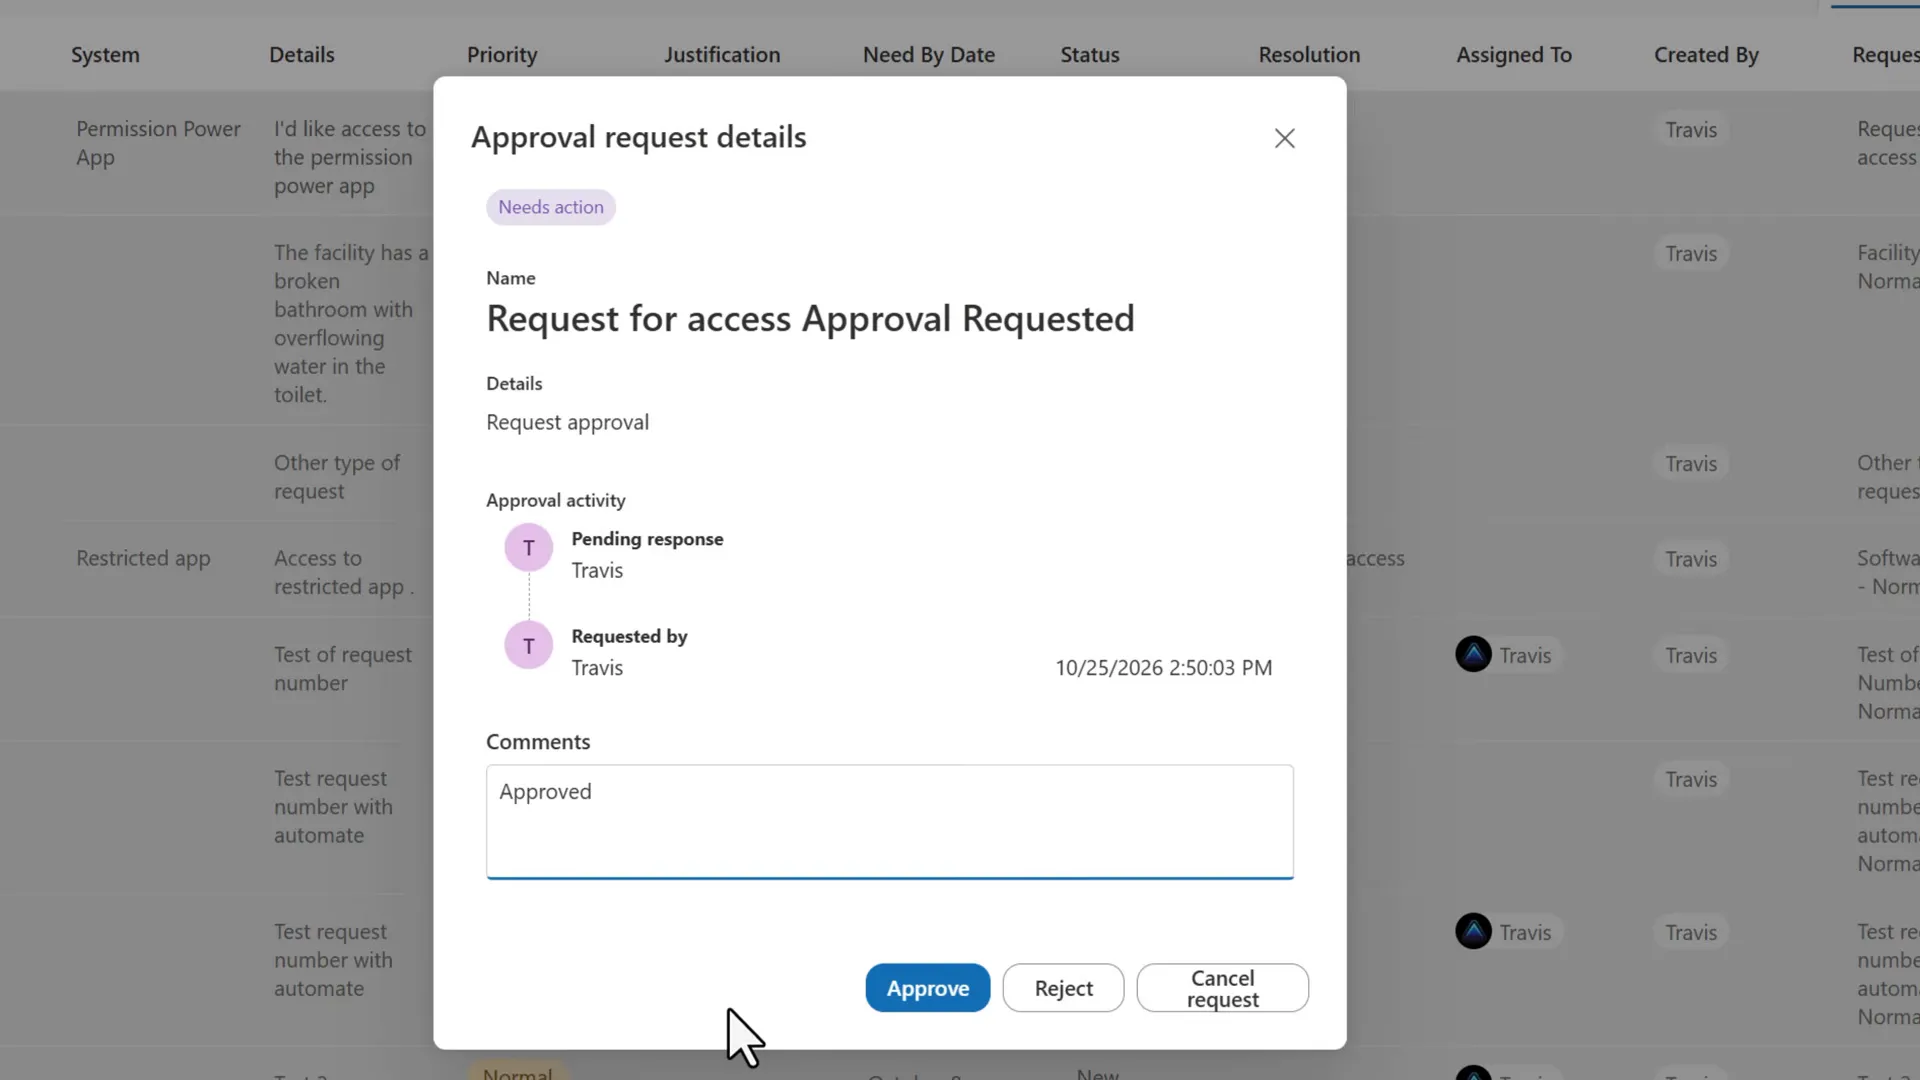
Typing “Approved” is a comment; selecting Approve records the decision.
The same dialog also shows Reject, and the person who requested the approval also sees Cancel request. The completed example uses Approve.
7. Confirm the result in both interfaces
Check the list’s Approval status column. In this example it changes to Approved.
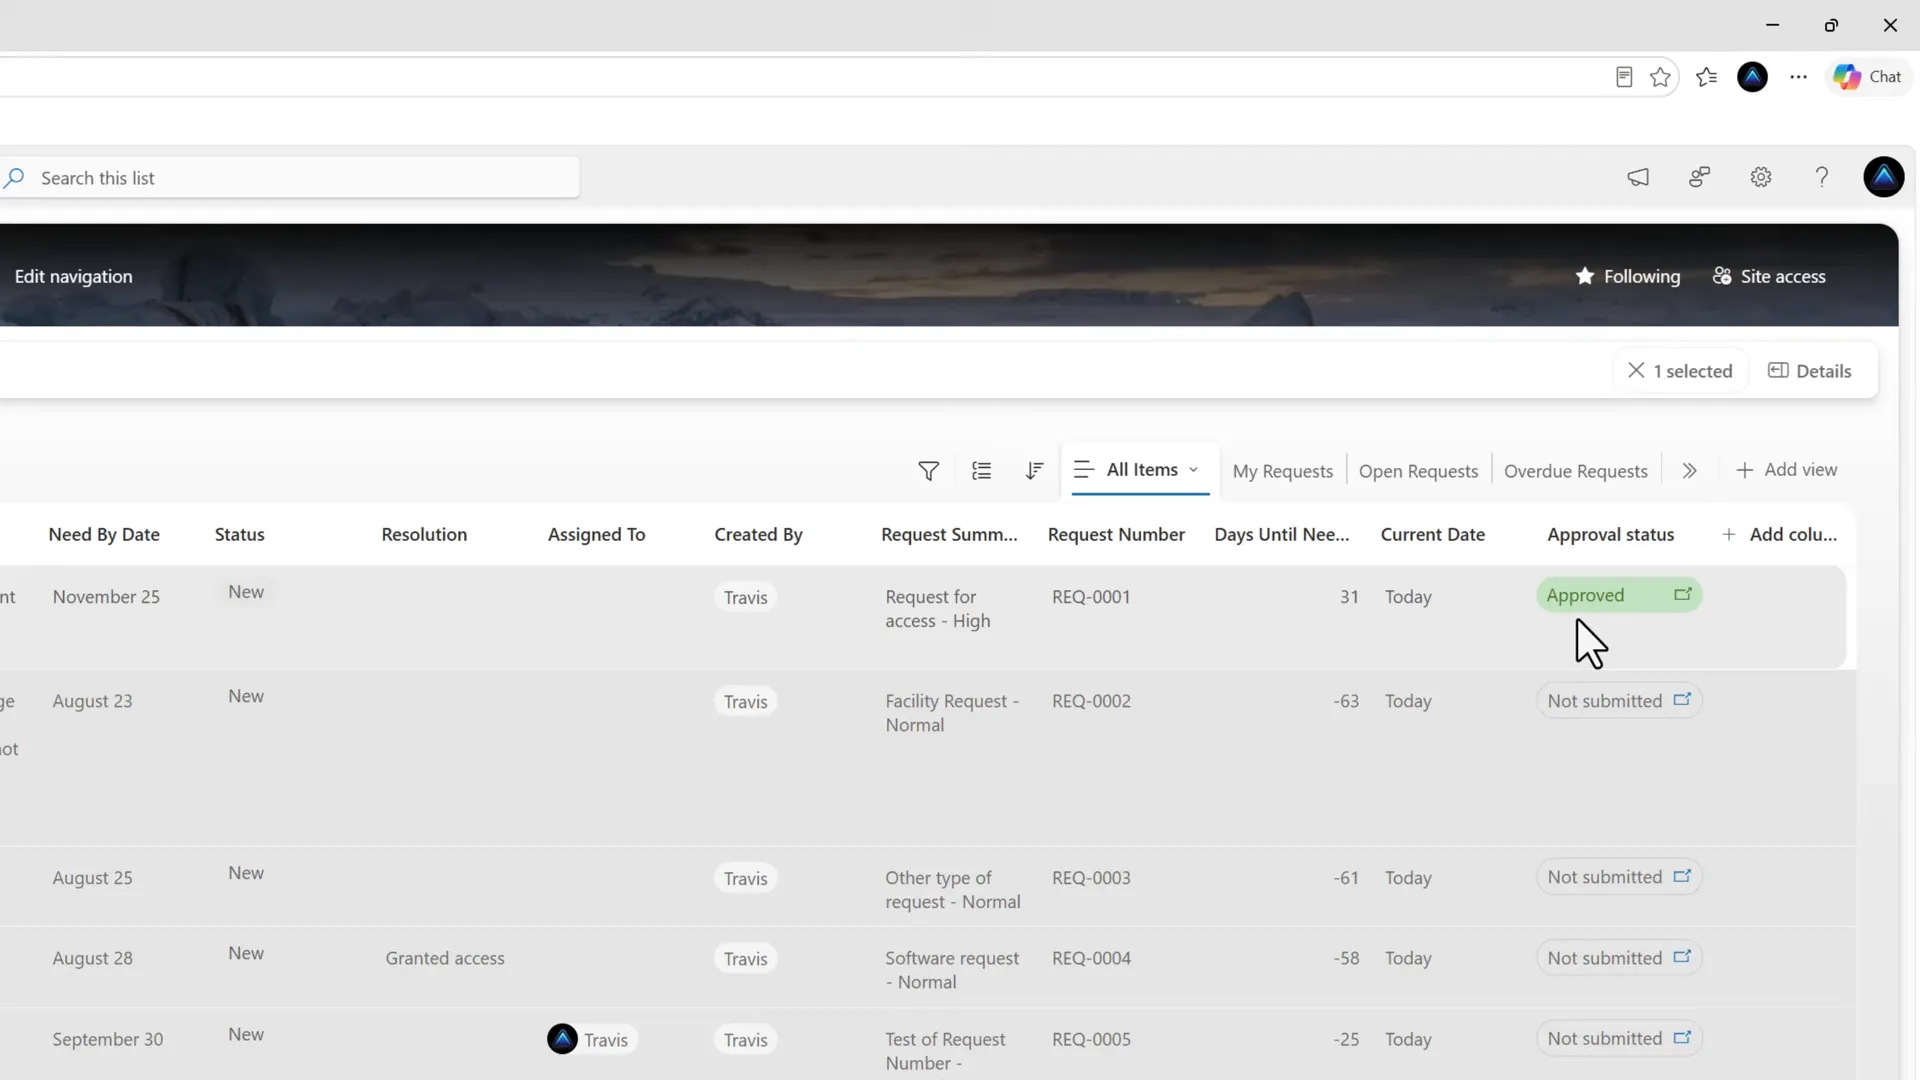
Approval status tracks the approval independently of the list’s existing Status column.
Notice that the separate Status column still reads New. This example does not update that custom business-status field as part of approval.
In a real process, send requests to someone other than the requester. Microsoft’s approval workflows announcement says editing an approved item shows a warning. Don’t count on that warning to block the edit, and treat Approved as a record of the decision.
Return to Teams. In this example, the final-status notification opens the completed request, which shows Approved, the approver’s comment, and the request/decision history. You can also find the request in the Approvals app. A Save as PDF button is also available.
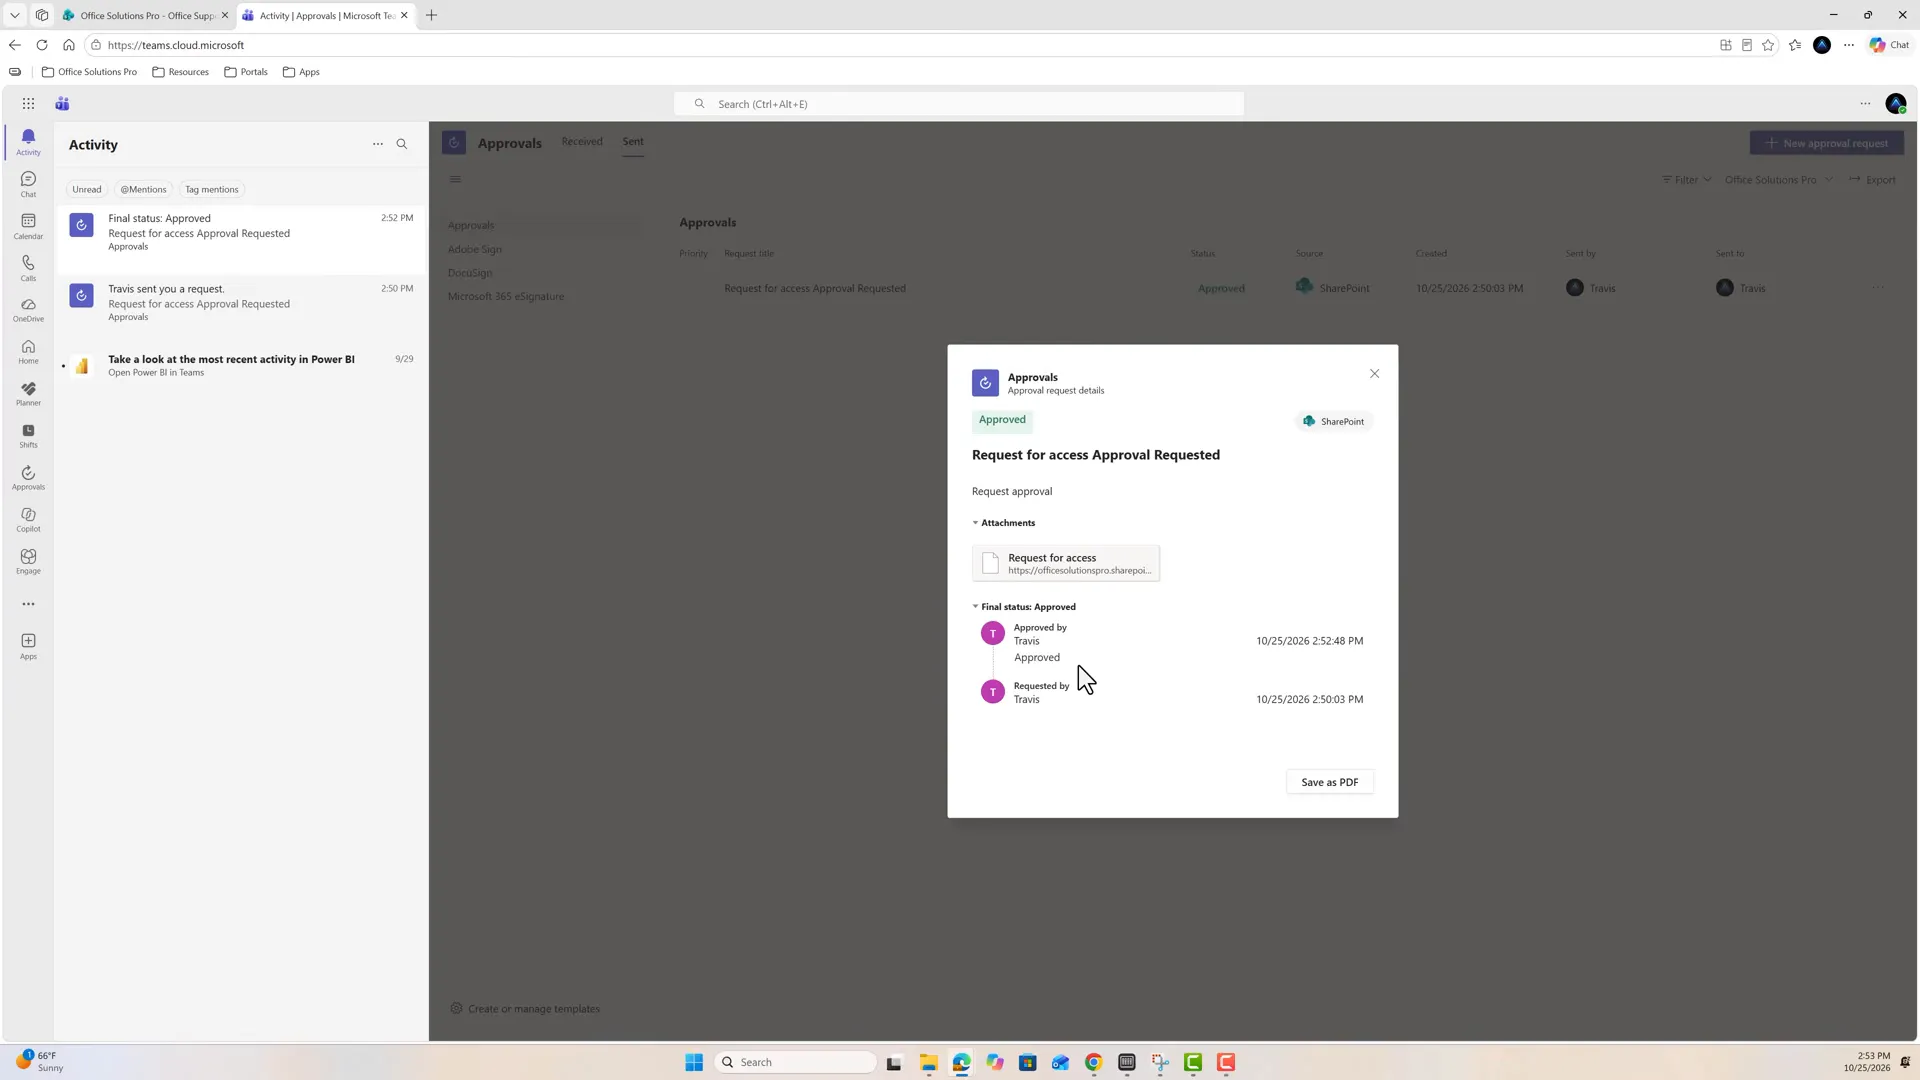
The SharePoint decision is reflected in Teams.
Behavior to plan for
- Editing or deleting a submitted item cancels its active approval; metadata edits also affect approval status. SharePoint warns first, and the request’s creator is recorded as canceling it, whoever made the edit. Finish edits before submission.
- Enabling modern approvals disables Lists sync for that list.
- SharePoint approval columns show the latest activity; use Teams for complete history.
- Modern approvals do not integrate with classic content approval or request sign-off.
- In grid view, you can request approvals, but you respond from the command bar.
- List rules can use Approval status, but some conditions may not have a valid user to send the email from.
Microsoft: limitations of modern approvals.
In a comment on Microsoft’s approval workflows announcement, its author said these requests follow the Teams Approvals app’s timeout logic, and that the request’s information stays visible in SharePoint. The comment gives no length, so don’t leave a request waiting. Requesters can use Follow up to notify anyone who hasn’t responded.
Limits of this tutorial
You have now enabled approvals, submitted an existing list item, and completed a single-person approval with a result visible in SharePoint and Teams. No custom Power Automate flow was created during the procedure.
This tutorial covers the built-in request and review controls on a list. It does not cover rejection, cancellation, follow-up, reassignment, exporting the PDF, conditional routing, automatic submission, updating other business fields, a completed multi-person sequence, or a document-library or classic content-approval procedure. Power Automate can support more advanced requirements, and Microsoft’s guide also covers document libraries.
You can return to Integrate → Approvals to change the configuration. The dialog notes that disabling approvals hides the column while in-progress approvals remain available in Teams.
Companion video
Video: How to Create SharePoint Approvals Without Power Automate. Published October 26, 2026.
If the player is blocked on your network, open the video on YouTube.
Need help applying this to your own setup? Read about consulting.