 Office Solutions Pro
Add a calendar to a Dataverse main form
Show dated task records on a calendar tab in a model-driven app, using a selected view, start and end dates, and a readable text description.
On this page
- Overview
- Before you begin
- 1. Open the main form your users will use
- 2. Add a Calendar tab
- 3. Select the table, view, and date columns
- 4. Use a readable Text column for Description
- 5. Finish the component and set its record scope
- 6. Tidy the labels and publish the correct form
- 7. Open the calendar and verify a task
- Need a calendar without opening a record?
- Troubleshooting
A calendar on a main form lets users inspect scheduled tasks while working on a record. Give it its own tab, choose the task view, and map the columns that provide the dates and caption. This example uses the custom Task Tracker table, shown as Task Trackers in the calendar’s table picker.
Before you begin
Have these resources available:
- A model-driven app backed by Dataverse, in an environment where you can customize the target table. Use a System Customizer or System Administrator role for the calendar customization. Microsoft: Calendar control
- An active, editable Main form for that table and access to the solution containing it. Tabs are supported on main forms. Microsoft: Form tabs
- A suitable public view, such as All Tasks, and saved sample rows with populated titles and valid date ranges. Use a sample whose end date is later than its start date for this walkthrough.
- Columns corresponding to Start Date, Due Date, and a normal Text title. The example uses Date Only dates and Task Title (Text). Keep longer task details in their existing column.
- App users with Power Apps premium use rights for the model-driven app, environment membership, and Dataverse read access to the task records. Adding a calendar does not grant record access. App access and licensing, model-driven app licensing, Dataverse privileges
The Calendar tab and component are created below. A Priority Choice column is optional; it is not required to display tasks.
1. Open the main form your users will use
A table can have several main forms. Editing one does not change every other form. Choose the form actually used by your app, or plan to make the edited form available in Step 6. Microsoft: Edit a form
- Sign in to Power Apps and select the correct environment.
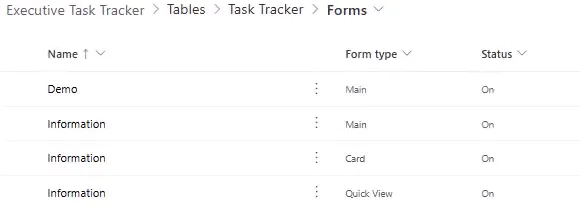
- Open Solutions, open your solution, then select Tables > Task Tracker > Forms.
- Choose the intended form with Form type set to Main, then select Edit or open it by name.
- Note the form’s name. You will select that same form when validating the published app.
2. Add a Calendar tab
- In the form designer, open Components.
- Add a 1-column tab to the form.
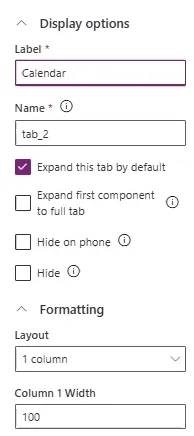
- With the new tab selected, set its Label to
Calendarin the properties pane. Keep the generated Name, which identifies the tab internally. - Select the section inside that tab, then select Display > Calendar in the Components pane.
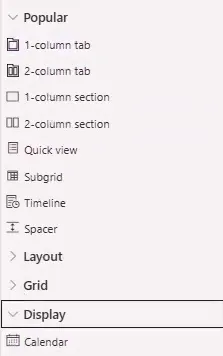
If Calendar is not listed, search the Components pane and use Get more components to look for the Microsoft component. If it is unavailable in your environment, stop this form setup rather than substituting a date picker or a similarly named canvas-app control. Microsoft: Add components to a form
3. Select the table, view, and date columns
Use a populated normal Text column for the caption. If the long-description column you wanted is not offered, choose Task Title (Text); Step 4 explains the distinction. For timed events, use appropriate Date and Time columns instead of assuming a date-only field contains a meeting time.
In Add Calendar, choose these values using the dropdowns:
| Calendar setting | Example selection |
|---|---|
| Table | Task Trackers |
| View | All Tasks |
| Start date > Table column | Start Date (Date Only) |
| Description > Table column | Task Title (Text) |
| End date > Table column | Due Date (Date Only) |
| Duration > Table column | Leave unselected |
Use the corresponding columns from your own table; the names above are sample selections, not required schema names. Microsoft documents the calendar’s start, end, description, and duration mappings. Microsoft: Calendar configuration
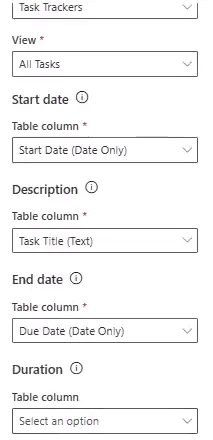
Leave Duration blank for this date-range setup. After publishing, compare a sample event’s displayed period with its stored start and end values; do not assume a business due date means the event includes the whole final day.
4. Use a readable Text column for Description
Description here is a calendar mapping, not a requirement to use a table column named “Description.” Select Task Title (Text) so the caption contains a concise value that is already populated.
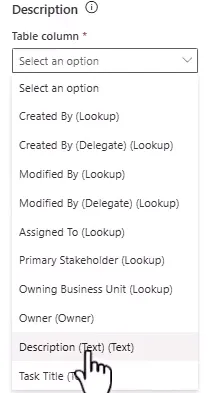
If the desired long-description or rich-text column is absent from this picker, use Task Title (Text) and retain the full details on the record form. Do not delete or convert an existing details column just to make it appear in the calendar picker.
Dataverse Text Area and Multiline Text are different types: Text Area is a Single Line of Text format, while Multiline Text uses the Memo type. This setup uses a normal Text column offered by the calendar picker; it does not require every text format to be interchangeable. Microsoft: Column data types
Optional: Priority colors
The component’s color field can appear as CC_AdvancedCalendar_Color. Its dropdown offers Choice columns, including Priority (Choice) in this example. If you want to try priority coloring, select that column. After completing Step 5, inspect the calendar’s component configuration to confirm that the selection was retained.
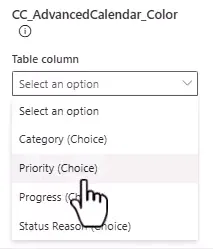
Priority coloring is optional; leave the color binding empty if it is unavailable or does not persist. Establish the dated calendar first. Then compare a task’s Priority with its event color before using colors as a scheduling cue. Keep meaningful titles and text labels so color is not the only way to understand a task.
Choice options can have configured colors, but an option-color setting alone does not prove how every calendar component renders it. Microsoft: Choice configuration
5. Finish the component and set its record scope
The desktop layout is the focus here. Test enabled mobile clients separately; the Calendar control is not supported in mobile offline. Microsoft: Calendar experience
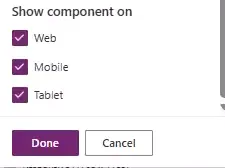
- Under Show component on, keep Web selected. Select or clear Mobile and Tablet for the clients you intend to support.
- Select Done to insert the calendar.
- Select the inserted calendar on the form. In its properties, set Label to
Calendar. - To show rows from the selected All Tasks view independently of the open record, leave Show related records cleared. Confirm Table is Task Trackers and Default view is All Tasks.
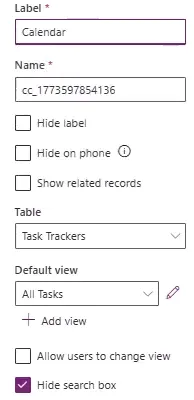
If you instead need tasks related to the open record, select Show related records and choose the appropriate relationship-backed table/view. That changes the scope from the view-based configuration above. All Tasks is a view name, not permission to see every task in the environment. View filters and users’ record privileges still apply. Microsoft: Subgrid properties
6. Tidy the labels and publish the correct form
Keep the Calendar tab visible. Hide only redundant section or component labels, not the tab or calendar itself. When resolving form access, retain other required roles and do not grant broader data privileges just to display this form.
- Select the section containing the calendar and select Hide label in the section properties. Leave Hide cleared.
- If the component’s own
Calendarlabel is redundant, select the calendar component and select its Hide label option too. - Select Save and publish on the form command bar. If your designer has separate commands, save, then publish.
- In the app designer, select the table’s form page. Confirm the edited main form appears under In this app. If it is under Not in this app, select its … > Add command. Save and publish the app if you changed its form selection.
- If a user cannot access the form, have the maker responsible for form access open Forms > Form settings > Security role. If Specific security roles is selected, select the intended users’ existing role, retain other required selections, and select Save and Publish. If Everyone is already selected, leave it selected and resolve app inclusion, form activation, or record access instead; do not change data privileges as a shortcut.
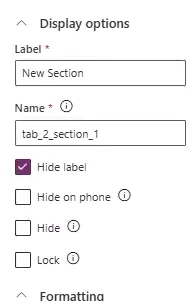

Form inclusion and form-role access are separate requirements. Form order influences the default, while users with multiple available main forms can select another one. Add forms to an app, Form access settings
7. Open the calendar and verify a task
- Run the app and open a task record.
- If multiple main forms are available, use the form selector near the record heading to select the exact form you edited. If it is missing, return to Step 6 and resolve form inclusion or role access.
- Select the Calendar tab. Navigate to the sample tasks’ date range.
- Change the calendar’s Day dropdown to Month to inspect tasks across a longer period.
- Select a task bar. Compare its title, displayed period, and duration with that task’s stored values. If Task Title is also the mapped Description, the summary can repeat the title.
- Use More Details to open the task’s full record when needed. The popup also exposes Delete; deleting from it is a data operation, not a way to hide a calendar entry.
- Repeat with an ordinary app user to confirm the expected form and authorized tasks appear.
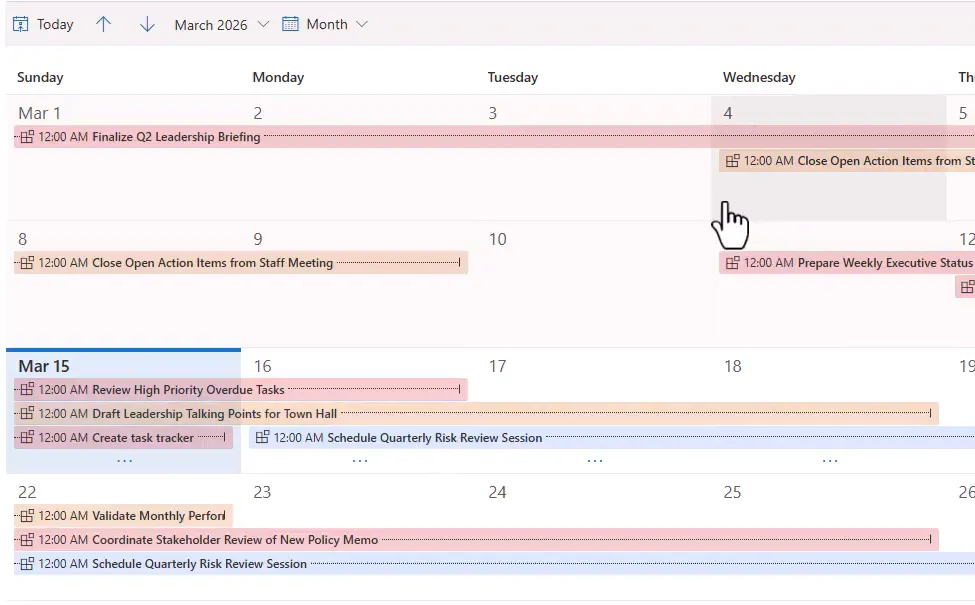
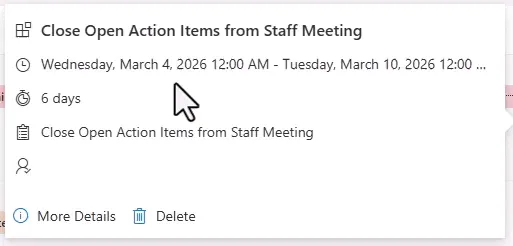
The popup is a summary of the selected row. Use the record for longer task details. Microsoft: Working with calendar rows, Select the intended main form
Need a calendar without opening a record?
A form tab is one placement option. You can also configure the Calendar control on a table view, so users reach it from the app’s table navigation. Before choosing that alternative, note that Microsoft’s table-view configuration replaces the standard control for all views of that table. Follow the separate table-calendar setup for that scope.
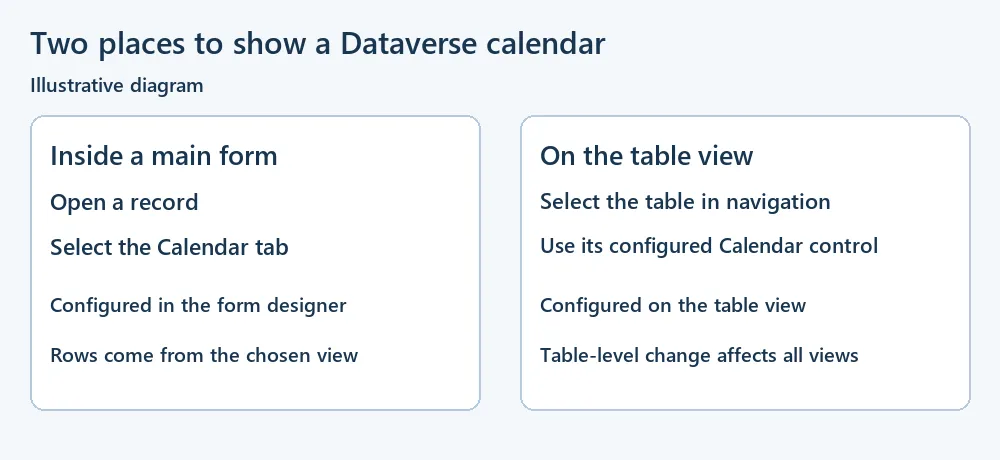
Illustrative diagram: form placement and table-view placement have different entry points and configuration scope.
Troubleshooting
| Symptom | Action |
|---|---|
| Calendar tab is missing | Confirm the selected runtime form is the one you published. Resolve app form inclusion and role access in Step 6; ensure the tab is not hidden. |
| Calendar appears empty | Navigate to a known task’s date range. Compare the selected view’s rows with the calendar, confirm the mapped date values, and check Show related records. If the row is unavailable in the view for that user, resolve its filter or access first. |
| Description column is not offered | Select the populated Task Title Text column. Keep long/rich details on the record; inspect the column’s actual type instead of relying on its display name. |
| Captions are blank | Open a task and confirm the mapped Text column contains a value, then refresh the calendar. |
| Last day or duration looks unexpected | Open the task and compare its exact start/end values with the popup’s period. Correct the source dates or choose date/time columns appropriate to the scheduling requirement. |
| Priority colors are missing | Reopen the calendar configuration and inspect the optional color binding. If it is absent or not retained, leave it empty and use the dated calendar with text labels. |
| Mobile layout differs | Confirm the component is enabled for that client and the containing tab/section is not hidden on phone. Use an online session; do not expect the desktop Day/Week/Month layout on every mobile client. |
Companion video
Video: How to Add a Calendar View to a Dataverse Table Form (Model-Driven App) | Limits?
If the player is blocked on your network, open the video on YouTube.
Need help applying this to your own setup? Read about consulting.