 Office Solutions Pro
Build an employee survey in Microsoft Forms with branching, Likert, and NPS questions
Create an employee satisfaction survey in Microsoft Forms, send managers to their own questions with branching, add Likert and Net Promoter Score questions, and choose the right privacy and ownership settings.
On this page
- Overview
- Before you begin
- 1. Start from a template
- 2. Set the look of the form
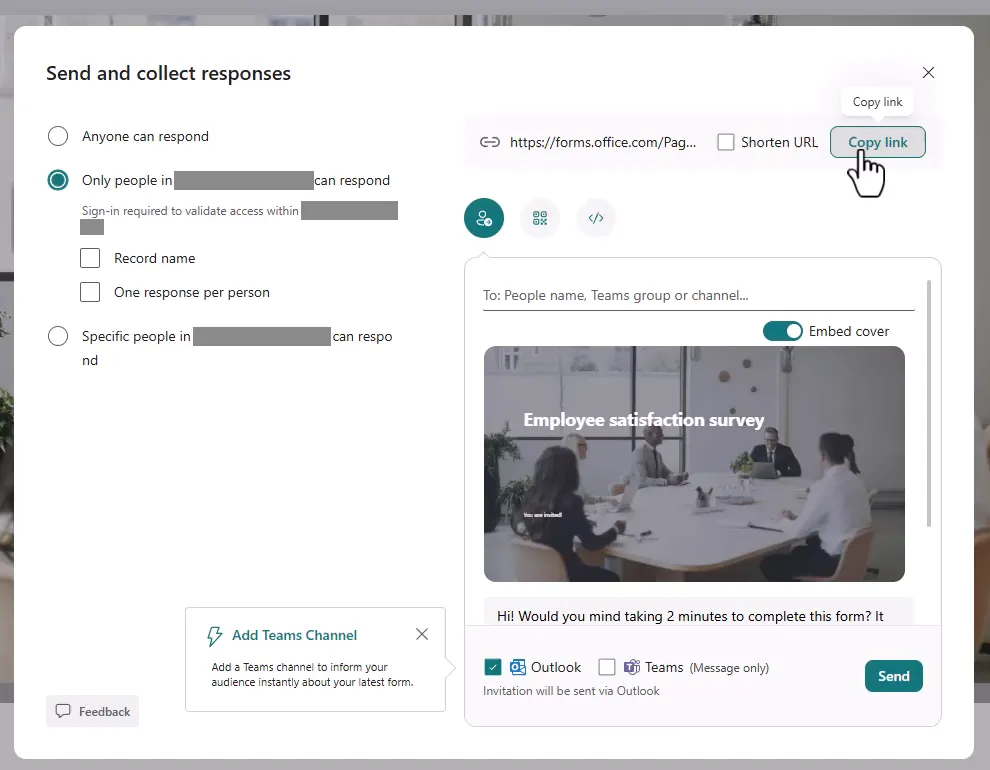
- 3. Choose who can respond and what is recorded
- 4. Set the remaining options
- 5. Trim the template questions
- 6. Add sections and the manager question
- 7. Add the branching
- 8. Add a Net Promoter Score question
- 9. Preview, send, and review
- 10. Decide who owns the form and results
- Troubleshooting
- Where to go next
Microsoft Forms can handle a complete employee survey without any code. This walkthrough starts from a built-in template, then adds sections, a manager-only question, and a Net Promoter Score (NPS) question. It also covers two decisions that are easy to overlook: what “anonymous” really means, and who owns the form and its results.
Before you begin
You need a work or school Microsoft 365 account with access to Microsoft Forms. Some options depend on your organization. Administrators can control external sharing and whether names are recorded by default, so your settings may differ from the images here.
Decide two things before you build:
- Who should respond? Everyone in your organization, specific people, or anyone with the link.
- Who should own the results? You can start in My forms and move the form to a group later, as described in Step 10.
1. Start from a template
-
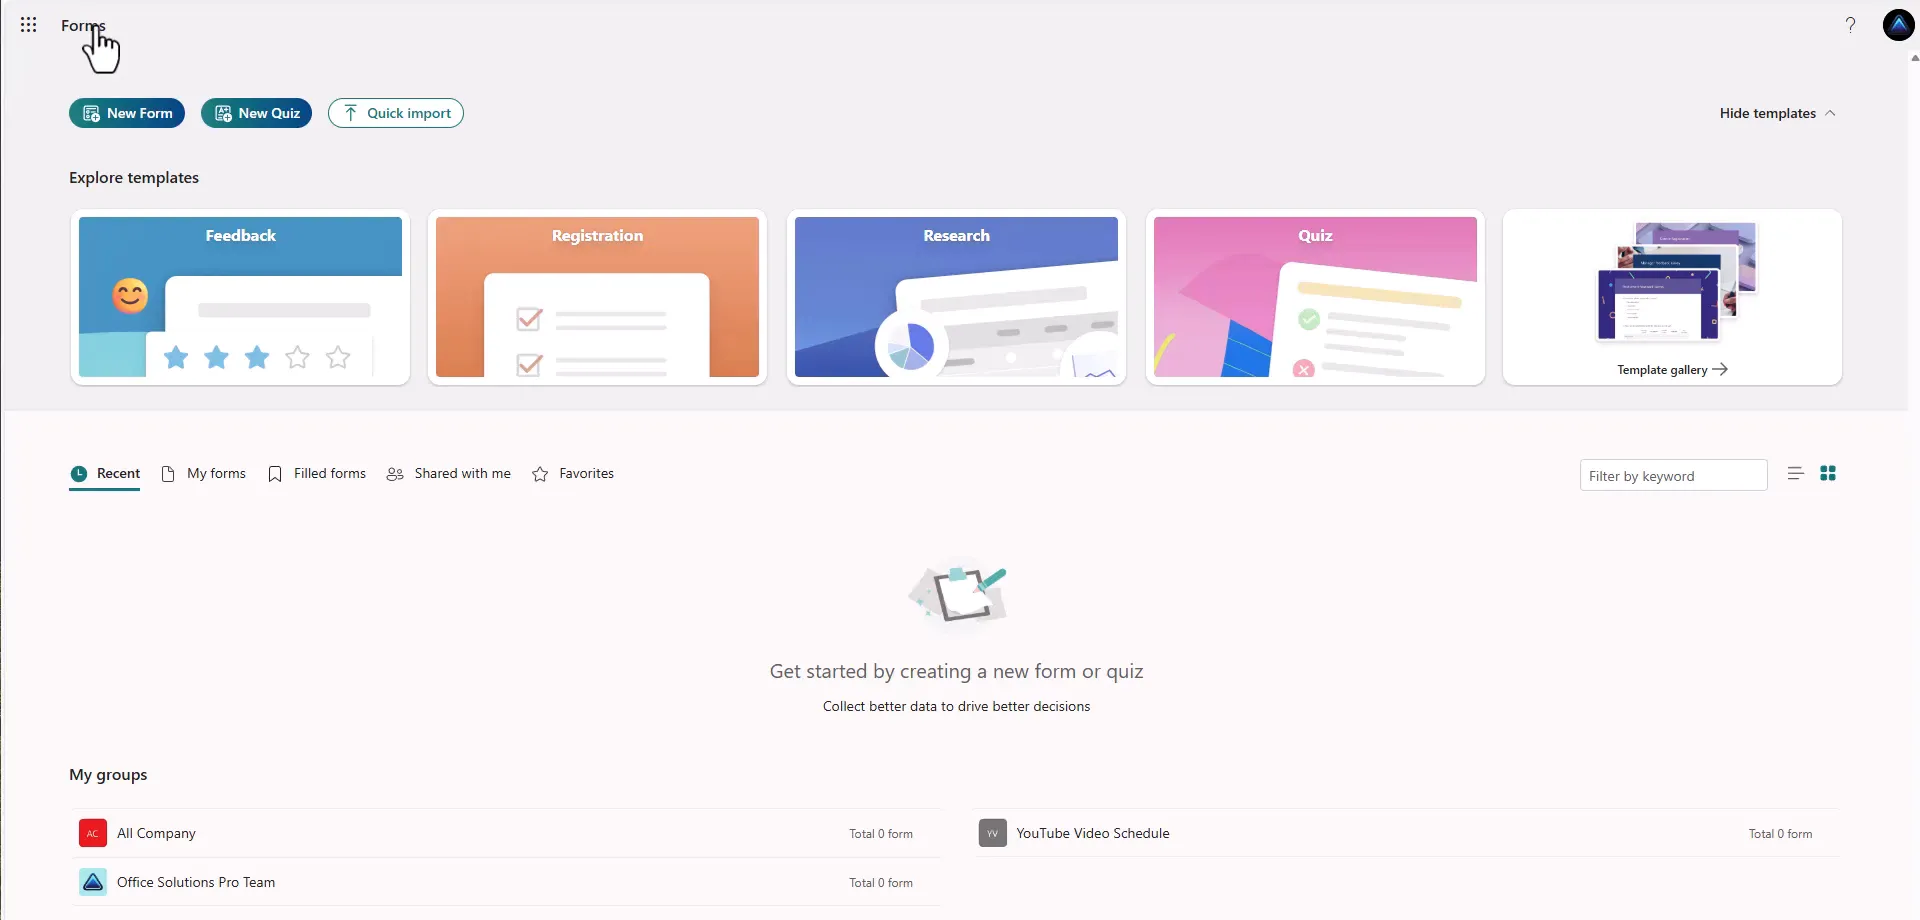
In Microsoft 365, open Forms from the app list.
-
If you already know a group should own the survey, open the group under My groups and create the form there. Otherwise, continue from the home page.
-
Open the template gallery and find Improve employee satisfaction.
-
Select Employee satisfaction survey.

Templates are worth checking first. Even when one is not an exact match, it gives you well-written questions that you can edit.
2. Set the look of the form
- Select the form title to edit the name, the date, and the text on the start screen. The template’s “You are invited!” text is a placeholder, so replace it with a short explanation of the survey and how the results will be used.
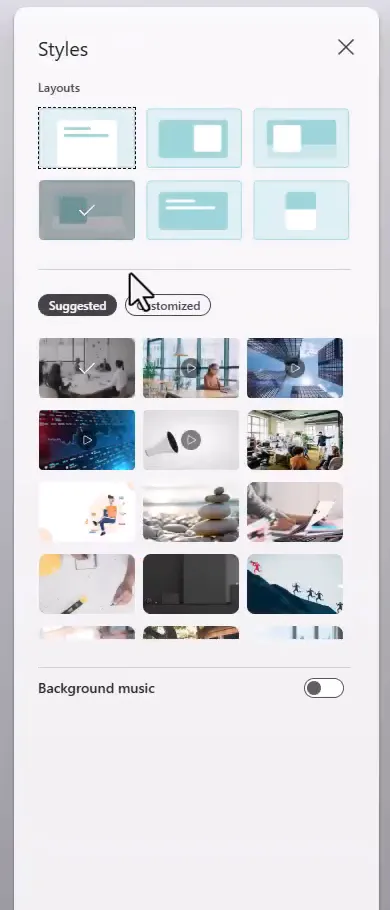
- Select Style on the toolbar.
- Choose a layout and a background. You can also turn on Background music, although most workplace surveys leave it off.
3. Choose who can respond and what is recorded
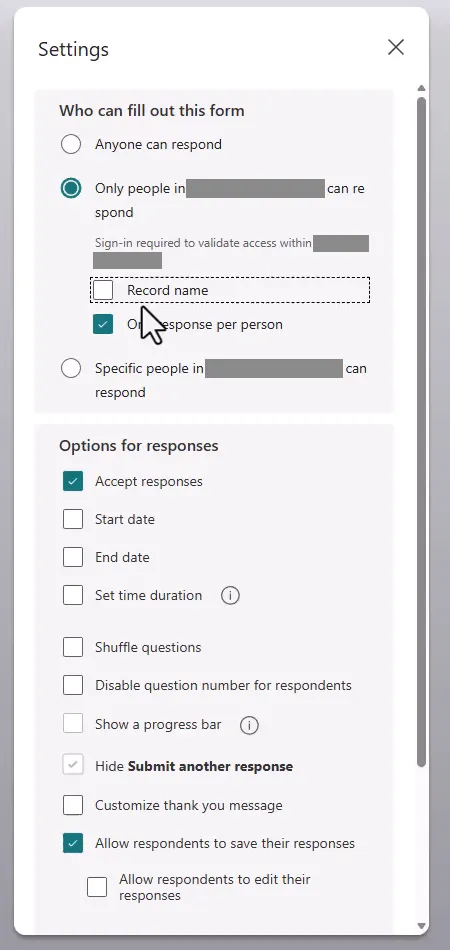
Select Settings on the toolbar and work through Who can fill out this form.
| Option | Sign-in | Names | One response per person |
|---|---|---|---|
| Anyone can respond | Not required | Responses come in without names | Not offered |
| Only people in my organization can respond | Required | Your choice, using Record name | Available |
| Specific people in my organization can respond | Required | Your choice, using Record name | Available |
For this survey:
- Select Only people in my organization can respond.
- Clear Record name if you do not want names recorded with the responses.
- Select One response per person so that each person can respond only once.
What “anonymous” means here
Clearing Record name means that names are not recorded with responses. In the results workbook, the example response shows anonymous in the Email column.

That is not the same as a promise that nobody could ever work out who responded. Microsoft points out several ways that identity can still be revealed:
- A question asks for identifying details, such as a name.
- The form goes to only a few people, so answers can be matched to them.
- Start or completion times can be matched to people in different time zones.
Questions about role and length of service have the same effect in a small team. When you introduce the survey, say what you have actually set up, such as “names are not recorded”, rather than promising complete anonymity.
4. Set the remaining options
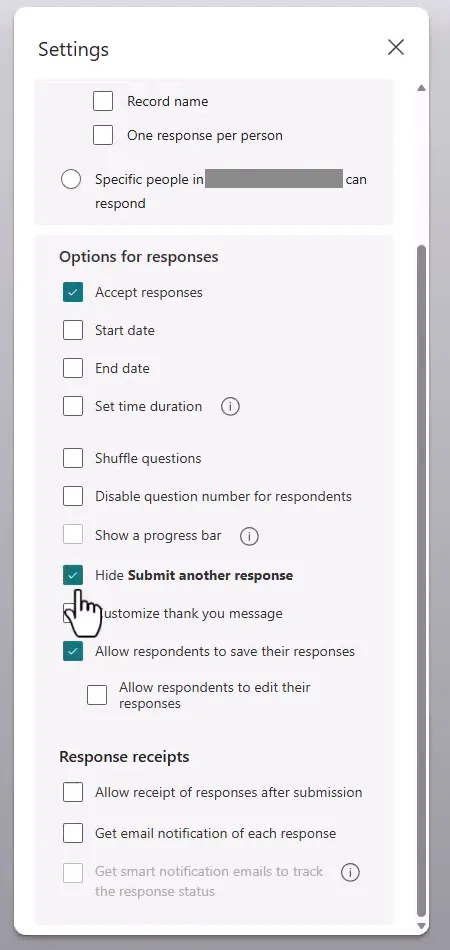
Still in Settings, go through Options for responses:
- Start date and End date: set these if the survey should only be open for a certain period.
- Shuffle questions: leave this off when the questions follow a planned order, as they do with branching.
- Hide Submit another response: select this for a one-time survey.
- Customize thank you message: add this if you want to explain the next steps.
- Allow respondents to edit their responses: leave this off unless you want people to be able to change their answers.
5. Trim the template questions
Edit the questions to fit your survey.
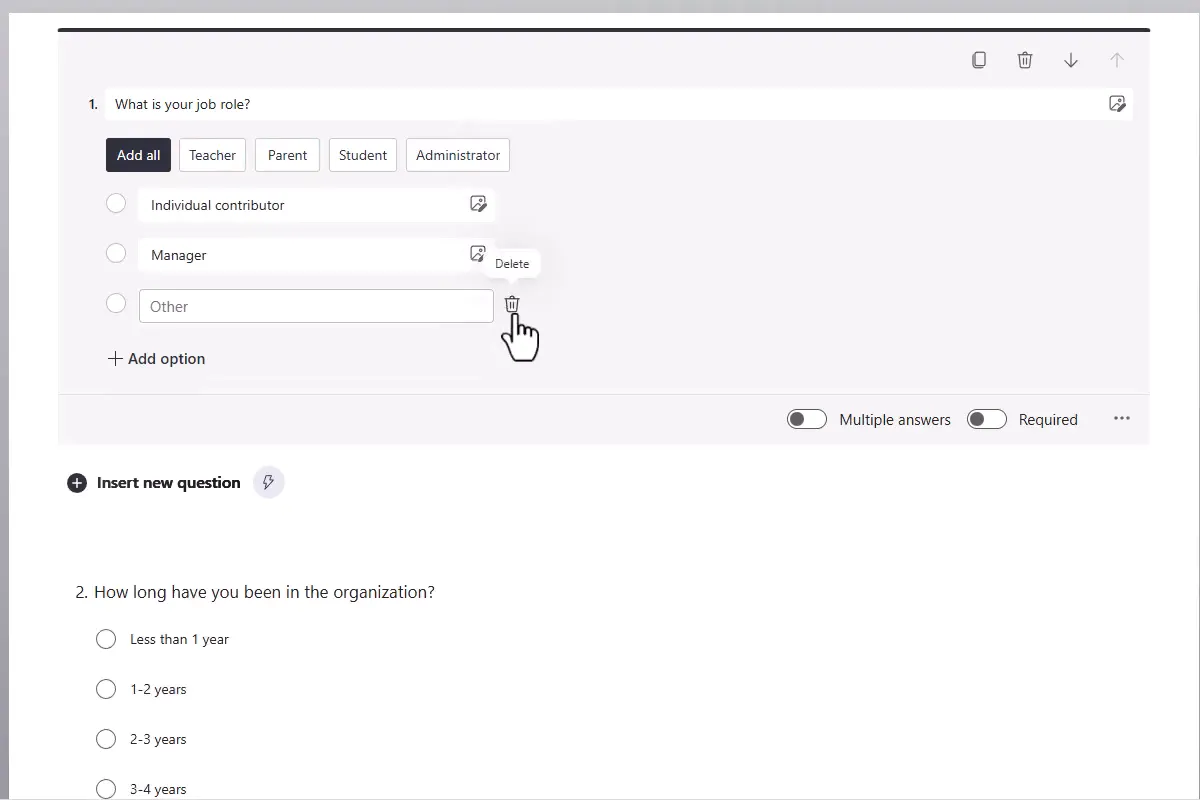
- Select What is your job role?. Delete the options you do not need, so that only Individual contributor and Manager remain.
- Delete the Other option.
- Turn on Required. Leave Multiple answers off, because each person chooses one role. Branching in Step 7 depends on this question.
- Adjust the answer ranges in How long have you been in the organization? so that they suit your workforce. If many people stay for decades, for example, add longer ranges.
- Delete any question you do not need. The age group question is a good candidate if it will not affect your decisions.
- Keep a free text question at the end. Open comments often reveal issues that your other questions do not cover.
6. Add sections and the manager question
The form needs this order, because branching only moves forward:
| Section | Questions |
|---|---|
| 1. Respondent Information | How long have you been in the organization? What is your job role? |
| 2. Management Support | Manager Likert question |
| 3. General Employee Experience | All remaining questions |
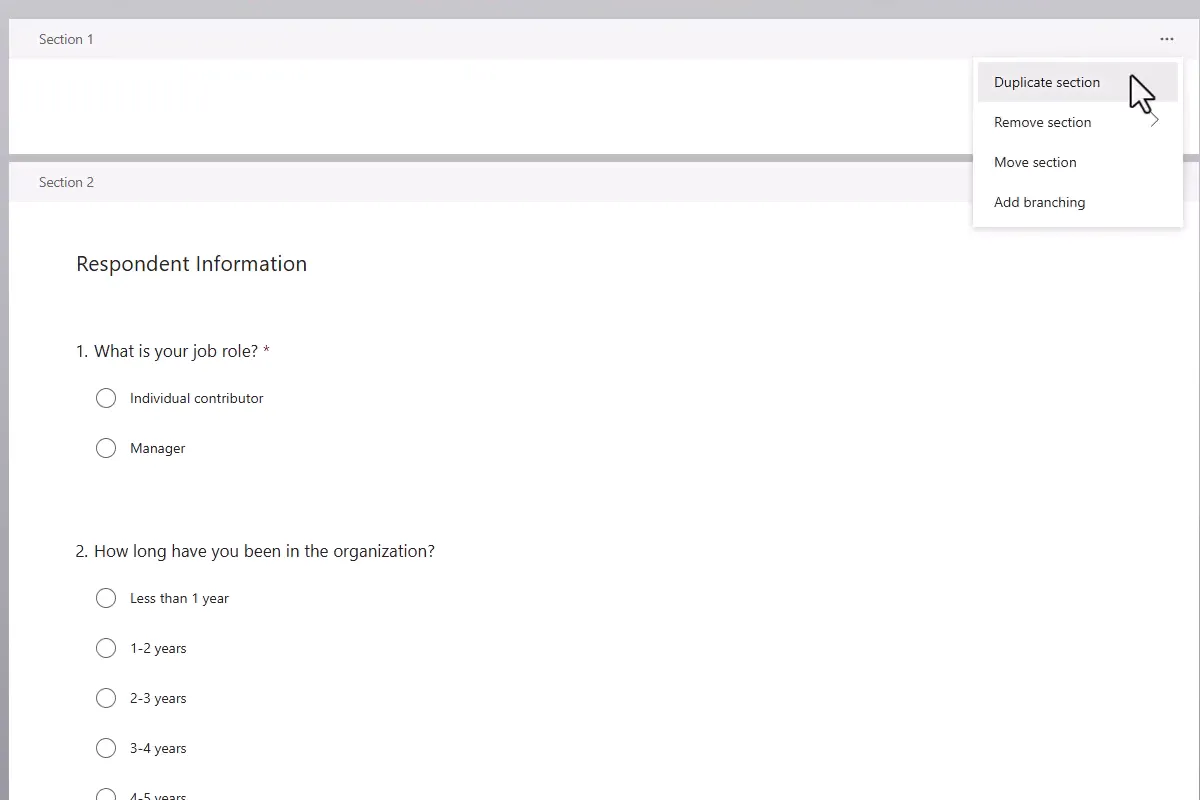
- Select Insert new question, open the additional question types, and select Section. Name it
Respondent Information. - Move the section to the top. Use its … menu if you need the Move section command.
- Move the role question below the tenure question, so that the role question is the last one in the section.
- Below the role question, insert a section named
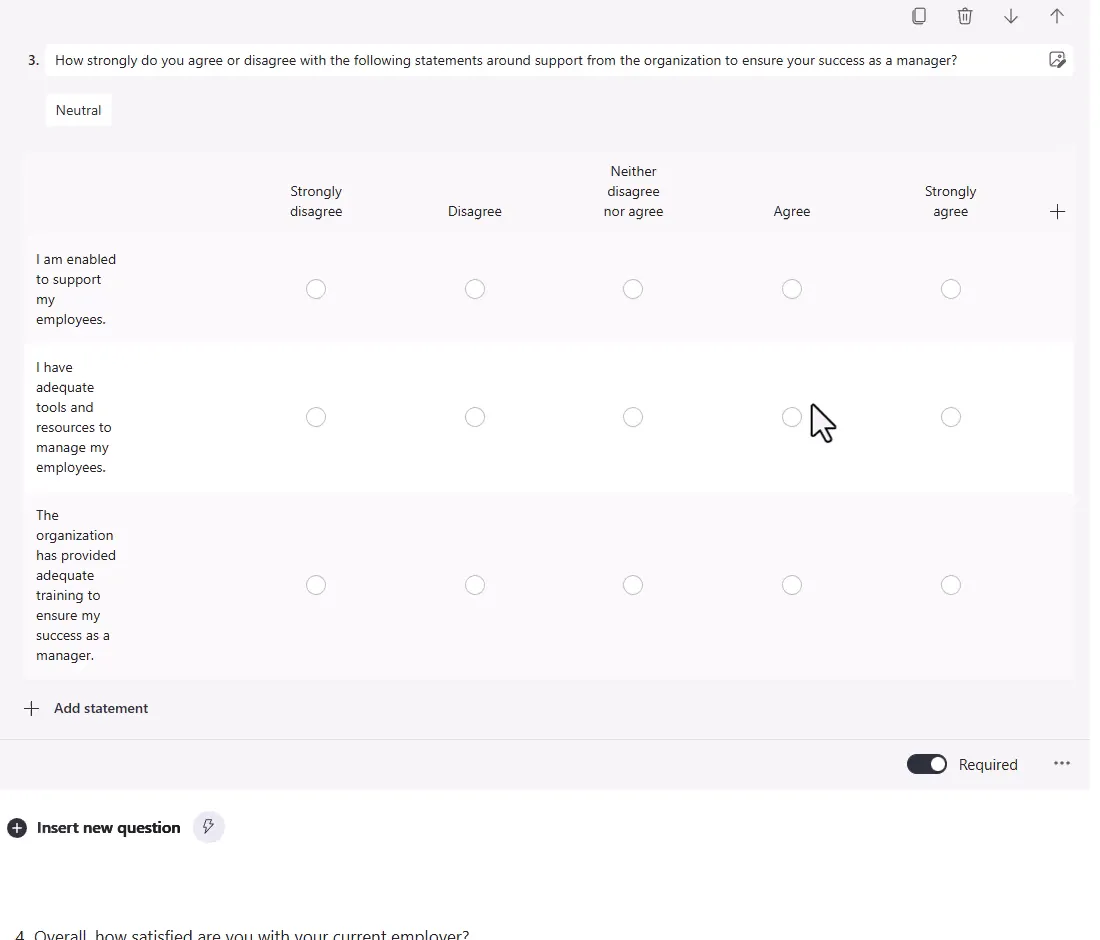
Management Support. - In that section, select Insert new question, then add a Likert question.
- Enter the question:
How strongly do you agree or disagree with the following statements around support from the organization to ensure your success as a manager? - Add these statements and turn on Required:
I am enabled to support my employees.I have adequate tools and resources to manage my employees.The organization has provided adequate training to ensure my success as a manager.
- Below that question, insert a section named
General Employee Experience.
7. Add the branching
- On the role question, select … and then Add branching.
- Next to Individual contributor, set Go to to General Employee Experience.
- Next to Manager, set Go to to Management Support.
- Check that the Management Support section continues to General Employee Experience, either with Next or by selecting that section directly.
- On the final question, you can choose End of the form if a branch needs to finish early.
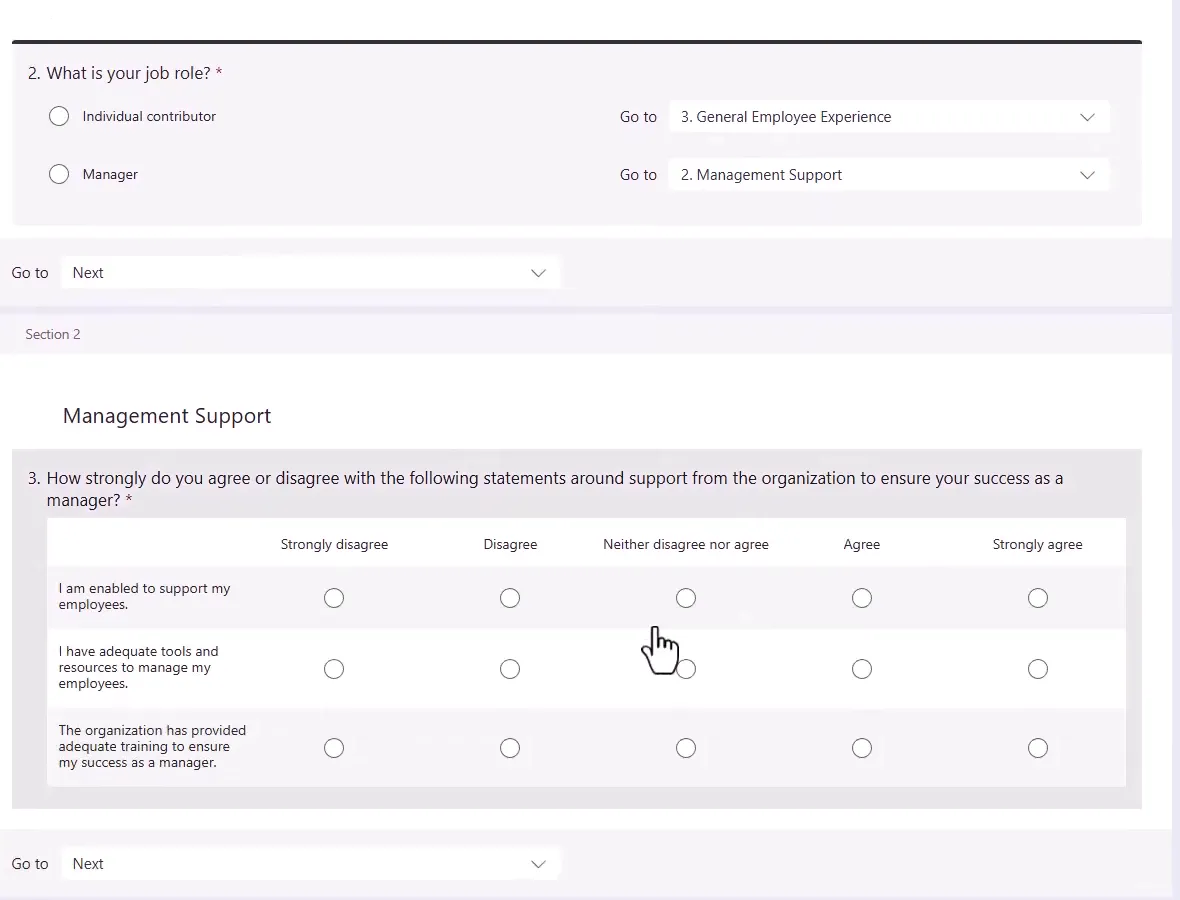
Adding or moving sections can change the branching destinations. Whenever you restructure the form, open the branching options again and confirm each destination.
8. Add a Net Promoter Score question
- In General Employee Experience, select Insert new question and open the additional question types.
- Select Net Promoter Score.
- Enter
On a scale of 0-10, how likely are you to recommend your workplace to others? - Turn on Required.
- Confirm that the remaining questions are required as well, or decide which ones should stay optional.
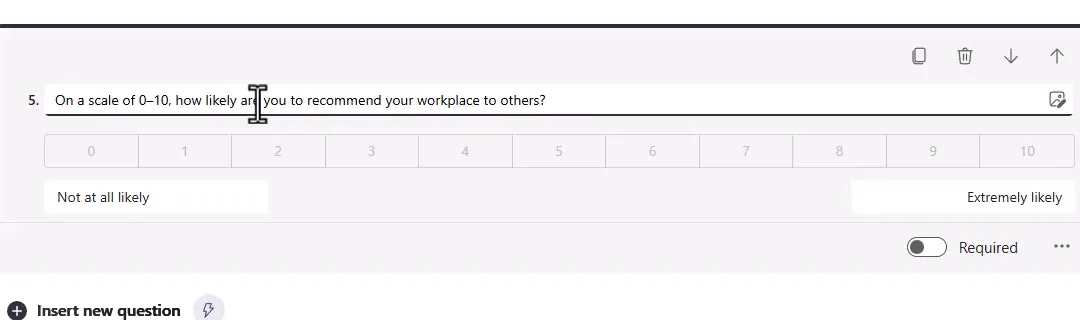
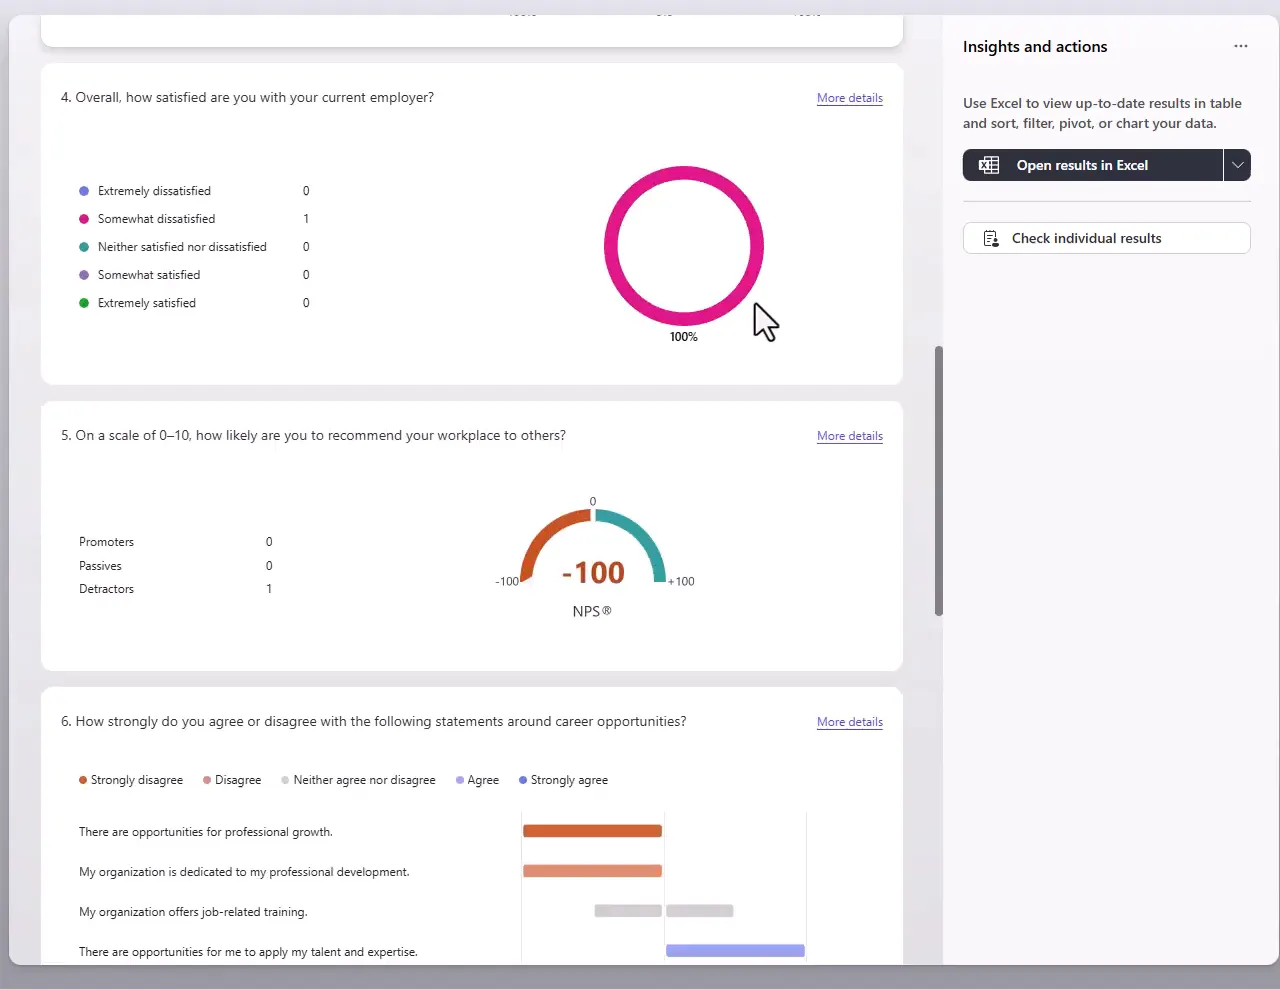
The results group these answers into detractors, passives, and promoters. If your form doesn’t offer branching by those score ranges, plan on everyone following the same path after this question.
9. Preview, send, and review
-
Select Preview and test both paths. A manager should see Management Support and then General Employee Experience. An individual contributor should go straight to General Employee Experience.
-
Try to submit with a required question blank, and confirm that Forms stops you.
-
Select Collect responses, confirm who can respond, then select Copy link and share it.
-
Select View responses to see charts for each question, including the NPS gauge.
-
Select Open results in Excel to work with individual rows. The workbook has a live data connection to your form. A downloaded copy does not stay connected.
10. Decide who owns the form and results
The results workbook is stored in OneDrive for work or school, and for group forms it is saved in SharePoint. A survey in your own My forms depends on your account, which is a risk for anything that should outlast your role.
To move the form to a group:
-
On the Forms home page, go to My forms.
-
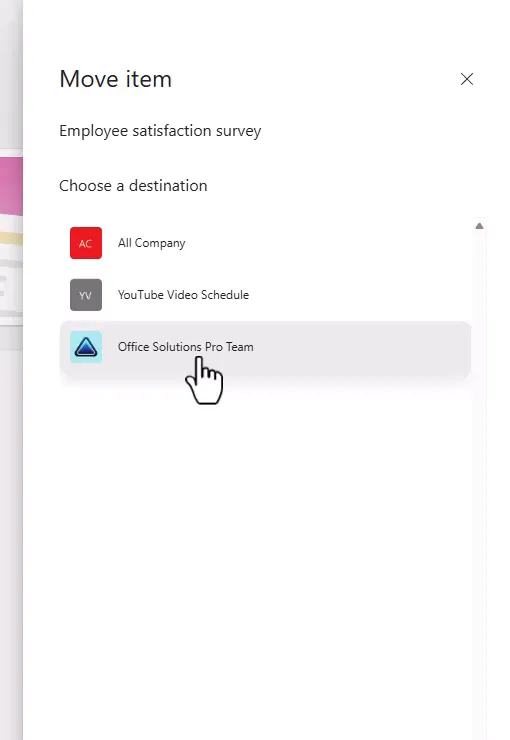
On the form’s tile, select … and then Move.
-
Choose the group, then select Move.
-
Open the form from the group under My groups. From the responses page, open the workbook to start its first sync, which brings across the earlier responses.
-
Confirm the workbook’s location. In the example, it is now in the team’s Shared Documents.
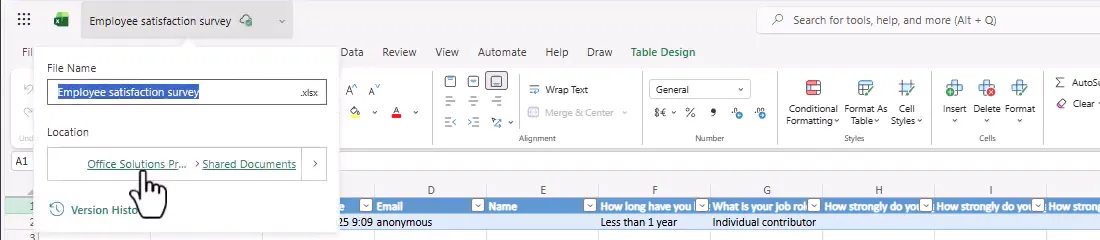
Keep these rules in mind before you move a form:
- Only the form’s owner can move it, and you must be a member of the target group.
- Moving a form to a group gives members full editing capabilities. The workbook is also in a location the group can reach. For a sensitive survey, pick a group whose members may see individual responses.
- A group can’t transfer a form to another group, so choose carefully.
- Do not move the workbook to another location, because new responses stop syncing to it.
Troubleshooting
| Symptom | Likely cause | What to do |
|---|---|---|
| Anyone can respond is missing or unavailable | Your organization has limited external sharing | Ask your Microsoft 365 administrator, or use an organization-only option |
| One response per person is not available | Anyone can respond is selected | Select an organization-only option |
| A respondent skips a section or ends up at the Submit button | A branch points backward or to the wrong place | Branch only to later questions and review every destination |
| Managers do not see their section | Go to is still set to Next or points to the old question | Reopen the branching options after adding sections |
| New responses are not in Excel | The workbook is a downloaded copy or was moved | Open it from the form with Open results in Excel. Keep the workbook in its original location |
| Charts in Power BI are difficult | Answers are stored as words, such as Agree | Plan how to convert answers to numbers, or send responses to a SharePoint list with number columns |
Where to go next
Forms suits a quick, professional survey with built-in charts. If you want more control over how answers are stored, you can send each response to a SharePoint list with Power Automate. From there, you can use the data in Power BI or a Power App.
Companion video
Video: Microsoft Forms Masterclass: Build a Complete Employee Survey (Branching, Likert, NPS)
If the player is blocked on your network, open the video on YouTube.
Need help applying this to your own setup? Read about consulting.